Uber in Auckland - Everything You Need to Know
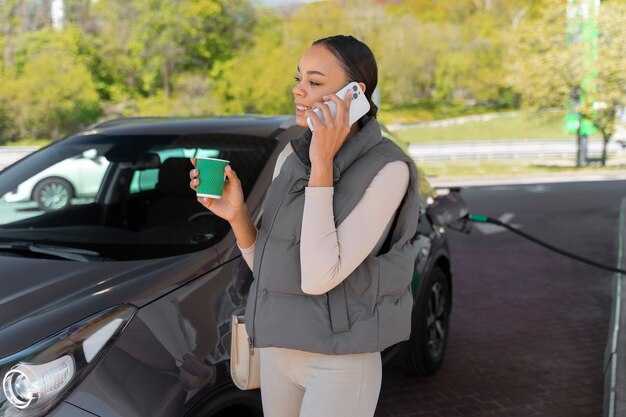
Your best move is to choose UberX for most Auckland trips. This option balances price and comfort. From Auckland Airport to the city center, the gross fare typically falls in the NZD 25–40 range under normal conditions; surge can push it higher. You would see fare estimates in the app before you confirm, helping you plan your week. Also, this approach works for trips from other airports and you have options if you travel with a group or extra luggage.
Uber operates with a simple operations model that matches riders with nearby drivers in real time. The app shows the driver’s position, ETA, and the platform adapts to demand pockets around the city; in Auckland, pickup points at airports and central zones are clearly signposted, and curb rules are aligned with local authorities. In a typical week, wait times can rise, but options like Comfort or XL remain reliable for longer trips or groups.
Rides come in ranks such as UberX, Comfort, and XL, each with its own basis for pricing–base fare, per-kilometer, per-minute, plus surge when demand spikes. The app shows the gross price before you confirm, so you can compare and decide based on baggage, passenger count, and your position relative to the driver. If you’re arriving from delhi or atlanta for events, the flow stays the same: request, track, and pay cashless with the card linked in your account. In case of high demand, the app still guides you to the right pickup.
Tips to optimize value: enable ride-hailing during off-peak times; also share rides if your itinerary allows; head to the marked pickup spots; always confirm your driver’s name and plate before stepping in; use agencies or airport staff if you need help finding the curb at busy terminals. The Auckland operations keep you covered with a straightforward model and regular updates; this would help you avoid surprises in fare, especially when the week ends with events. If the idea is to keep costs predictable, consider sharing rides with a companion whenever possible.
How to Set Up Your Uber Account in Auckland
Download the Uber app, open it, and start by creating your account with your name, email, and phone number. Verify the code sent to your phone, then add a paying method so you can ride immediately.
If you already started, go to Profile to verify details and upload a clear photo for your rider profile.
The in-app setup guides you through the process and keeps you connected to this well-known platform. This action lets you tailor pickup preferences, add emergency contacts, and manage receipts.
What you’ll need
Good internet connection, a valid phone number, and a paying method (card, wallet, or bank account) are enough to begin. Among settings, enable two-factor authentication when possible to enhance security; this reduces risk with changing account details or access. Below, you’ll find tips that help you stay covered for medical or accessible rides.
This leads you to the action steps below, and you can review official resources on the websites linked in the section below to confirm requirements.
Step-by-step setup
Verify your phone number, then add a paying method. This lets you confirm trips and track charges easily.
Set your default pickup location, language, and notification preferences. If your plans are changing, you can adjust pickup times and locations directly in-app. These settings apply to all rides you take.
Airside pickups at Auckland Airport require following airport rules; select the correct pickup point in the app to avoid delays and keep the process smooth.
When you plan a ride, surge pricing may apply during busy periods. Review the gross fare estimate before you confirm a ride.
For medical appointments or accessibility needs, use the related filters to find the right ride type. If you encounter an issue, the rescue option in-app provides quick guidance and support.
If you drive, ensure your vehicle servicing is up to date to keep trips safe and reliable. This good practice helps you avoid cancellations and keeps earnings predictable.
Check below for official websites and support channels. If you need help, these resources are well-known and connected across Auckland; they provide direct assistance and tips for new users.
Understanding Fare Estimates and Price Variability in Auckland
Always check the in-app fare estimate before you call Uber in Auckland, and compare it with a nearby time window to gauge the total cost. The estimate covers base fare, time and distance rates, a booking fee, and possible tolls, with the breakdown shown below the total in the app. Typical ranges in Auckland are base NZD 2–3, time NZD 0.25–0.40 per minute, distance NZD 1–2 per kilometer, and a minimum fare around NZD 7–9; a short central-town trip is often NZD 7–12, while longer routes toward the suburbs can reach NZD 15–25 depending on traffic.
Safety, hygiene, and reliability matter as much as price. Ratings reflect driver performance, vehicle cleanliness, and adherence to hygiene standards, while camera policies and in‑app safety features build confidence. The total you see starts with a base and scales with distance and time, then adds the booking fee; tolls apply on select routes, and the app explains every line of the fare breakdown below the total. For online support or to review a fare, you can call or message from the app if questions arise, and you can compare directives from licencing bodies and town regulations that influence what you pay.
In Auckland, price variability comes from dynamic pricing that responds to demand and driver supply. When many riders request rides near the town centre or during events, the app may show a higher multiplier, pushing the total up quickly. Airport pickups and longer trips there can amplify this effect, since drivers cluster around terminals and waiting times shift. Since supply fluctuates, price can move even within the same hour. The app displays the current multiplier below the fare breakdown, helping you decide whether to wait or try a different time. This pattern matters to stakeholders and regulators alike, who issue licencing directives and online safety standards that shape how the system operates through resumption after disruptions. For context, comparisons with airport hubs–like hartsfield-jackson–show how terminals concentrate demand and influence pricing dynamics in similar settings.
To manage variability, plan ahead using the fare estimator, check multiple ride types, and pick precise pickup points to minimize detours. If the estimate seems high, consider waiting a short while, choosing a smaller vehicle option, or alternating with a different mode of transport. Maintain personal safety by reviewing ratings and hygiene practices, and use the app’s call or chat features if you need quick clarification. Since you may rely on these tools regularly, keep your account online and up to date so you can access accurate, timely numbers at the moment you need them. Need more guidance? Stakeholders, drivers, and regulators publish updates that help you navigate changes during events or resumption periods throughout Auckland.
What affects the fare
Base fare, time and distance rates, booking fee, and tolls form the core. The total varies by ride type (X, XL, Comfort), trip length, and traffic conditions. The fare breakdown appears below the total in the app, with the component values shown clearly so you can verify every charge.
Tips to plan and save
Always compare the estimate across a few minutes and consider off-peak times to reduce the chance of surge. Use precise pickup locations in town to avoid extra detours, and test different options (for example, a smaller car or a longer walk to a nearby hub) if the first estimate is higher than expected. Maintain hygiene by choosing well-rated drivers and reviewing safety features; if needed, use online support or call the help line for clarification. By staying informed about licencing directives and safety standards, you can better anticipate price movements during events, which helps you decide when to book and when to wait for the resumption of normal pricing.
Best Pickup and Drop-off Spots in Central Auckland
Start at Britomart Transport Centre for the fastest pickup and reliable drop-offs. Such a hub offers clear sign postings, generous bays, and staff ready to help, enabling resumption of your plan quickly, whether you're heading home, meeting five events in a day, or moving between venues. Card payments are convenient here, and the included facilities keep things moving; if something wasnt clear, staff can guide you. Drivers such as chris, russell, sangster, and saggaf know the best lanes during events. At the beginning, confirm your pickup point with the driver.
Five top spots for pickup and drop-off
- Britomart Transport Centre – central hub with multiple bays, visible signposting, and a dedicated kiss-and-ride area; ideal for travelers arriving by train or ferry.
- Princes Wharf / Quay Street – broad curb lanes near the ferry terminals; easy to loop in busy periods, with staff ready to assist.
- Aotea Square / Civic Precinct – nearby loading zones around the square; handy for quick stops during events or while following a city plan.
- Albert Street / Civic Theatre area – central curbside zones with clear lines of sight; convenient for late-evening pickups after shows or meetings.
- Lower Queen Street / Wellesley Street corner – practical access to main routes and nearby offices; quick drop-offs when heading to a home or a project site.
Tips for smoother pickups
- Know your signs: use official pickup zones and the card reader for fast payment; this helps such moments go through without delay.
- During busy hours around events, expect heavier traffic near Britomart and Princes Wharf; plan an extra five minutes.
- Spare space for a child: mention it in the app, and choose bays with space for a stroller or car seat; like drivers, you’ll find the right approach quickly.
- Share landmark references to reduce back-and-forth calls (e.g., “near the Sangster statue” or “by chris’s pickup bay”).
- If you’re traveling with cookies or snacks, keep them closed in a bag and offer anything quick for young travellers.
- Keep the driver informed about your plan from the beginning; stay near the curb until it’s safe to hop in; this is especially important if you’re coming from a council project or related sites.
- Remember: federal rules on loading zones can change; check for notices around the block before you head out.
- After you’re dropped off, walk a short distance to your home or next destination to avoid blocking lanes, especially throughout peak times.
Built-in Safety Features You Should Use (Share Trip, SOS)
Start every Auckland ride by turning on Share Trip and SOS in the safety panel before you head out. That quick toggle is the most practical step you can take to protect yourself and keep friends in the loop, and it sits below the driver details for a quick confirmation before you head into traffic. We are proud to offer this built-in safety practice, which helps you stay connected no matter where you ride.
Share Trip streams a live location to a selected source; you choose which contacts receive updates and can pause or stop sharing anytime. The algorithm tracks route changes and flags long pauses, so you meet the situation faster if something seems off. That means the alert is meant to prompt a quick response. SOS triggers a rapid alert with your location, trip ID, and vehicle details to the safety panel contacts; alerts go online and can be sent by SMS if data is spotty. Youre in control: you can start these at any time, including friday, and generate a summary that your contacts gave you. simon from safety operations notes these steps.
Practical steps to maximize safety: before the ride, open the safety panel, tap Share Trip, and select at least two contacts who will receive the live link; youre in control of who sees updates. After the ride, check the summary in the app to verify the log started when you hit SOS. If downtime or poor signal occurs, the algorithm keeps trying to push the last known location to your meet contacts, which helps responders meet you faster. For extra reassurance, link SOS with a short message that tells the recipient what to do and when to expect a response. If you ride in hutt or town routes, note that contractors may be involved in a response, and keep a simple protocol in place. Dont break the routine; that practice is damn useful and deserves a quick review by the safety panel. It was awarded for reliability and deserves ongoing attention on friday, so you can tell me when it is done.
Payment Options and Tipping for Uber Rides in New Zealand
Use in-app payments with a card on file and enable Apple Pay or Google Pay for the fastest checkout on every ride.
five payment options commonly appear in the app: card on file (Visa, MasterCard, American Express), Apple Pay, Google Pay, and any loaded ride credits where available. You can add multiple methods and set a default right before a trip.
From the rider screen, you can switch methods with a tap, so youll take the fastest route to payment after each ride. Youll see a fare estimate and a receipt in-app or emailed afterward.
Tipping is optional and can be given in-app where available; read the guidance in the app to see the amounts you can spend. While not required, a small tip rewards safe, courteous driving and is awarded for good service. The tipping feature is free to use and relies on innovative technology to process the payment quickly, with continued improvements for travellers across the country, becoming more helpful as the ecosystem grows.
In New Zealand, payments are processed electronically; cash is not accepted. The default currency is NZD, and receipts show tax details where applicable. For corporate travellers, you can link a dedicated business card on file and track rides on your basis with company accounts. Expect further updates to payment options as technology evolves.
Travellers from places like atlanta knew these options and rely on them across New Zealand, where a million riders use the platform for safe, reliable transport.
To spend wisely, five quick tips: keep a card on file, enable Apple Pay or Google Pay, read receipts before you tap, check the fare estimate, and decide on tipping preferences. This approach reflects continued training and a dedicated focus on travellers' needs.
Rideshare Availability: Getting a Ride During Peak Times and Events in Auckland

Schedule a ride 15–20 minutes before you need it and use the app’s live tracking to see approaching drivers. Since peak demand clusters around CBD hubs, stadiums, and transport corridors, aim for pickup points near Queen Street, Britomart, or the Viaduct to shorten the wait. The wider Auckland area offers more options, but events compress the road network and processing times can rise, so add a buffer of 5–10 minutes when planning. There’s a clear link between event traffic and rider availability, and you’ll notice more signed-in drivers as you get closer to kickoff or concerts–the news on busy nights confirms this pattern. For families with a child, the app lets you set a child seat in advance to speed up pickup, giving you a smoother start to your journey.
Regulatory licencing standards keep the pool of drivers reliable, and they influence how quickly you can secure a ride during busy periods. They knew the best spots to wait and where the lines form, which helps you avoid long down times. If you’re travelling with a group, you’ll find there are more options than a single vehicle, and you can compare earnings potential and costs across nearby drivers in real time. In practice, this flexibility supports both travellers and drivers alike, and it supports an overall better experience when demand spikes.
| Event or Peak Scenario | Typical Peak Window | Surge Range | Best Pickup Spots | Strategy to Use |
|---|---|---|---|---|
| Auckland CBD evening buzz (weekdays) | 4:30 PM – 8:30 PM | 1.2x – 1.6x | Queen Street, Britomart, Viaduct | Request early, consider curbside pickup, stay near core routes |
| Eden Park and major stadium events | 2 hours before to 1 hour after | 1.3x – 2.0x | Nearby streets off Auckland Domain, Mt Eden exits | Queue near gates if allowed; use Scheduled rides when available |
| Spark Arena concerts and Viaduct area | Evening to late night | 1.5x – 2.0x | Viaduct Harbour, Princes Wharf | Avoid main bottlenecks, choose alternate routes; adjust pickup timing |
| Public holidays and conferences | Midday to evening | 1.2x – 1.8x | City fringe hubs, bottom of the CBD | Plan 10–15 minutes extra for processing; consider group options |
Practical steps for peak times
Keep a close eye on the app’s live tracking so you know when a driver is 2–5 minutes away, and head to a well-lit, clearly marked pickup zone to speed the process. If you’re travelling with a child, preselect seating in the app and share your destination’s exact address to reduce detours. Between crowded blocks, short delays are common, so set realistic expectations and use scheduled rides when available to lock in a pickup window during a busy month. By choosing nearby options, you gain freedom in timing and reduce costs compared with waiting longer for a distant vehicle.
Maximizing earnings and options
For drivers, peak times boost earnings and income, but costs rise with longer waits and traffic, so stay online during the strongest windows to improve average earnings. The leading driver strength comes from consistent sign-in during the busiest hours, which means there’s more room to grow income month to month. They signed into the platform to service travellers, and their tracking helps them pick the fastest routes between road sections with the least congestion. For travellers, there are better options than always chasing a last-minute ride–consider scheduling ahead, using arranged pickups at known hubs, or sharing rides when you’re comfortable with detours. There’s no one-size-fits-all approach, but planning around major events and CBD peaks makes the experience smoother, with more predictable costs and shorter waits. There’s always flexibility in choosing routes and pickup points, which suits both the need for speed and the desire for savings.


