Iguazu Şelaleleri'nin Brezilya Tarafına Pratik Bir Rehber
advice: arrive before 9 am to enjoy cooler temperatures and clearer viewpoints on the Brazilian side. If you have arrived, head straight to the upper decks to catch the spray without long lines. Plan your route to maximize short walks between shaded spots and bring a light backpack with sunscreen and a microfiber towel.
Find your base: The belmond Hotel das Cataratas on the Brazilian side offers easy access to the park entry. If you lean toward budget options, frequent hostels around Foz do Iguaçu keep günlük costs reasonable. michaela, an australian traveler, says a flexible plan and conversation with staff unlock quiet paths after rain. bring an amount for local taxis or shuttle buses, and reserve a couple of hours for a relaxed morning walk.
What to wear and pack: Wear sturdy shoes with grip for slippery stones. dont forget a lightweight rain jacket; the spray from the falls sticks to everything. Pack a compact poncho, bottled water, and a small power bank for photos. A günlük plan helps you hit viewpoints in the best light, especially as temperatures rise.
Plan your route: Start at the main Brazilian circuit and work your way to the Garganta do Diabo overlook. Use the park shuttle to hop between trailheads, especially in peak heat. Look for wildlife, like toucans and coatis, along shaded stretches. A well-timed visit in the morning or late afternoon yields better lighting for photos.
Practical tips: Bring protection for cameras; the spray can fog lenses. dont rely on data connectivity in the park; download offline maps beforehand. The amount of walking is moderate but stairs add up; take breaks and hydrate. Consider a late-afternoon viewpoint, when temperatures drop again and mist creates rainbows.
Best Time to Visit the Brazilian Side for Garganta do Diabo Viewpoints
Plan your visit for May or September and start before 9 a.m. to catch Garganta do Diabo viewpoints on the Brazilian side with soft light and thinner crowds.
In these dry-season months, the wide catwalk stays dry, the air is comfortable, and visibility is best for photography. If you come in summer, be ready for higher humidity and occasional showers that heighten the mist and create dramatic portraits; the views remain powerful, especially in early morning light or late afternoon when the land and forest contrast most.
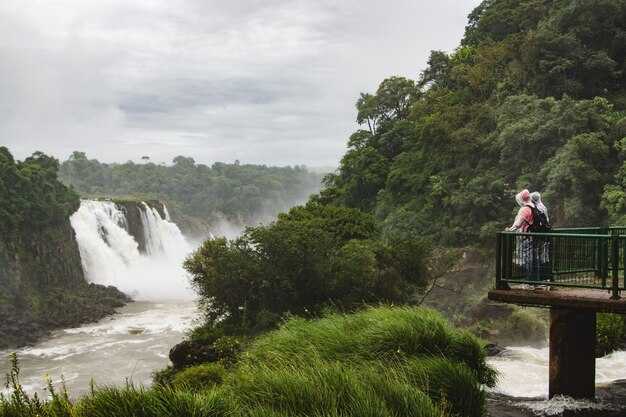
weve found that morning visits pay off: over the years, travelers have learned to optimize timing by starting early; weekdays are generally calmer; backpackers and local guests mix with day-trippers on weekends, but the quieter hours are still present. To simplify logistics, use rideshare from town to the park entrance, a reliable means to avoid parking hassles. On-site facilities provide a simple lunch option at the gate, but for a fuller meal you can purchase in town or at a nearby mall after your visit. wifi coverage is strongest near the main plaza; along the main catwalks it can be spotty, so download offline maps in advance. At the gate you obtain a map and can purchase tickets online to start smoothly. The Garganta route on the Brazilian side is wide and well-maintained, with viewpoints that place you between the spray and the forest land; some overlook on the opposite bank offer a different perspective if you plan a separate day trip to the Argentine side.
Timing and viewpoints
- Start early: aim for 7:00–9:00 a.m. to beat crowds and catch the best light.
- Prefer May or September for lower rainfall and comfortable temperatures, with strong water flow still present.
- Choose weekdays when possible; weekends draw backpackers and families, increasing crowding at key lookouts.
- Check the weather and park alerts the night before; morning mists can affect visibility if you start too late.
Practical planning
- Wear sturdy shoes for a wide, well-maintained path that remains mostly flat but can be slick after rain; plan for tiny spray droplets on skin and glasses.
- Pack light rain gear, sunscreen, and a small backpack; dorm-style hostels around town offer budget options if you’re traveling with a group.
- Purchase tickets online in advance to start your day smoothly; at the gate you can obtain a map and you’ll see coverage updates on-site.
- Use rideshare means to reach the entrance; it’s a common, cost-effective option for solo travelers and groups.
- Be mindful of wifi coverage: stay offline with maps if the signal is weak on the trails; download the route beforehand.
- Consider adding a second day to explore the Argentine side for a fuller variety of viewpoints between the two countries.
Getting There: From Foz do Iguaçu to the Brazilian Park Entrance
Book a private transfer or use a reliable taxi to reach the Brazilian Park Entrance quickly. From Foz do Iguaçu to the entrance, expect about 25–30 km of road, 30–45 minutes in light traffic; peak times can stretch it to 60 minutes. If you arrive via the IGU airport or other area airports, a pre-booked shuttle or taxi offers door-to-gate service, saving you stops and backtracking. Here’s a practical approach that keeps everyone on track.
Two solid ride options: private transfer or public bus
Option A: Private transfer. A driver waits in the arrivals hall at IGU or at your hotel and delivers you directly to the Park Entrance. Expect to pay around R$80–120 one way, depending on your hotel location and traffic; it’s better to pay a bit more for reliability, especially with kids or a lot of gear. If you’re traveling with others, the per-person cost drops and the space helps you pack everything you need. Passengers appreciate the convenience after travel, and the driver can stop for a quick photo along the road if you ask.
Option B: City bus. From downtown Foz, Bus 120 Cataratas runs roughly every 30–40 minutes and stops at the park gate. The ride takes about 60–75 minutes and costs around R$5–7. Board at the Terminal de Ônibus or at major urban stops; you’ll avoid parking hassles but share the ride with other passengers. If you missed the first bus, there are later departures–check the current timetable at your hotel or the terminal; plan to arrive early to beat the heat and crowds. Instead, if you’re on a tight budget, this is a better choice for the day.
There, crossing to the argentinean side is optional but can be a good complement in a full day. If you decide to cross, bring your passport and be prepared for customs checks; plan a separate entry and exit window, and note that afternoon temperatures can rise a few Fahrenheit degrees. If you want to explore ciudad neighborhoods on the other side, do it after you finish here and return for the Brazilian gates.
Practical packing and planning: pack light, leave bulky bags at the hotel if possible, and carry a small water bottle; the weather on the Brazilian side is sunny most days. In summer, temperatures often peak in the 80s or 90s Fahrenheit, so sunscreen, a hat, and a light jacket for cooler mornings help. The entry plaza is a short walk from the bus stop, but you’ll do more walking inside the park beyond the gate. Here, the shortest walk from the gate to the main outlooks takes about 15–25 minutes. If you’re touring with kids, pace yourself and add rests; everyone benefits from a relaxed rhythm. Create a simple itinerary list to guide your day, then review it at the bus stop to learn about current conditions and time windows, and leave some buffer for unexpected stops with others who share tips and plans.
Finally, a quick note to add to your plan: begin at the entrance, buy tickets, and consider the electric train for faster access to the most famous viewpoints on the Brazilian side. The vistas are amazing, and mornings offer softer light for photos. If you want a special day that blends park scenery with city culture, this route is worth the effort. The plan is straightforward, practical, and designed for smooth travel; by following these steps, you’ll avoid delays and enjoy the falls with less stress.
Ticketing, Parking, and Entrance Logistics for Garganta do Diabo
Purchase tickets online in advance and select an earlier time slot to make the visit easier and to avoid crowded queues during peak months.
Ticketing options on the official site include single-entry passes and combination experiences. Price varies by age and country of residence, with exchange rates available at checkout. The site accepts cards and cash, and the counter at the entrance can process exchanges for nearby networks if necessary.
Parking near the entrance is limited. Lot A sits closest to the Brazil-side entry, while Lot B is about a kilometre away along a walkable path. Expect hourly rates, with payment possible at the booth or via a mobile app. Plan for 1–2 hours if you want to explore both circuits and the lookout points without rushing.
Entrance logistics place you at a controlled gateway for Garganta do Diabo. Gates open early and close in the late afternoon; bring only essential belongings to speed checks, as staff conduct standard security inspections. Have your requirements ready–photo IDs, tickets, and any permitted tech–while keeping belongings compact to avoid intrusive lines. Use the main walkway and circuit route to reach the famous lookout without backtracking.
Local guidance from avid visitors adds value: Silva, a guide from Barroso, suggests starting at the lower circuit lookout to catch the best light, then following the walkways along the main circuit. The route is walkable for most guests, with a comfortable kilometre-scale stretch between lookouts. After the falls, many travelers enjoy a relaxed dinner nearby before departing for the airports or hotels in the country.
| Kategori | Tavsiye | Notlar |
| Ticketing | Book online; choose morning slot; print or save on phone | Price varies by country and age; exchange available at counter |
| Parking | Use Lot A near entry; Lot B is a short kilometre walk | Pay hourly; app or gate; plan 1–2 hours |
| Entrance | Arrive early; carry only essentials | Security checks are standard; lookouts along the walkway |
| İpuçları | Bring water, wear walkable shoes, consider a dinner stop after | Avid photographers will appreciate early light; Silva recommends route via lower circuit |
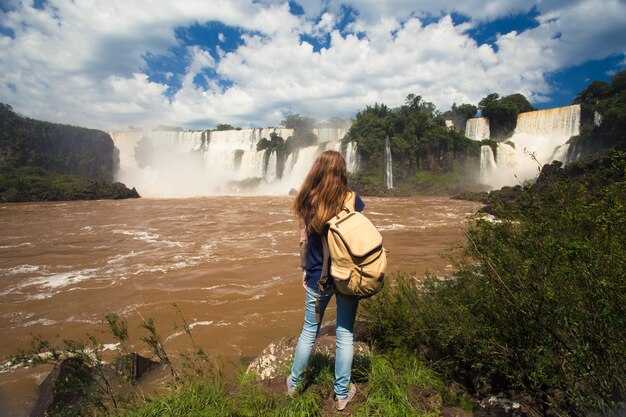
The Main Trail: Distances, Prime Viewpoints, and Walking Time to Devil’s Throat
Start at the entrance and walk directly toward Garganta do Diabo; this one-way segment conveniently sets you up for the final platform and definitely feels efficient for most visitors.
Şeytanın Gırtlağı'na giden Ana Yol, tek yönde yaklaşık 2 km uzunluğundadır ve rahat bir açık hava temposuyla yaklaşık 40–50 dakikalık bir yürüyüşle tamamlanabilir. Her bir seyir noktasında oyalanmayı ve bol bol fotoğraf çekmeyi planlıyorsanız, son platforma tam erişim için 60–90 dakika ayırın.
Önemli Bakış Açıları ve Yürüyüş Aralığı
Yaklaşık 0,7–0,9 km sonra, ilk seyir noktası aşağıdaki çağlayanların ve parlak ışıkta gökkuşakları oluşturan spreyin geniş bir manzarasını sunar. 0,5–0,6 km daha devam etmek, sizi nehir ve ormanlık kıyılar boyunca daha geniş bir panoramaya sahip orta parkur platformuna getirir.
Nihai Garganta do Diabo platformu yaklaşık 2 km işaretinde gelir ve at nalı şelalesinin en yüksek, en heyecan verici yakın çekimini sunar. Bu, herkesin fotoğrafladığı uzun, dramatik an; rüzgarda sprey ve parkurun geri kalanını değerli kılan dramatik bir ölçek sunar.
Rota boyunca dinlenmek için oturma yerleri ve gölgeli noktalar bulacaksınız, bu da yürüyüşü aileler ve sıcaktan veya güneşten haberdar olan herkes için daha rahat hale getiriyor. Hareketlilik ihtiyaçları için, üst teraslara asansör yardımıyla erişim hakkında ziyaretçi merkezine danışın; bazı bölümler ana güverteye rampa erişimi veya alternatif rotalar sunmaktadır.
İster sabah ister öğleden sonra ziyaret edin, gölge ve oturma alanları sabit bir hızda kalmanıza yardımcı olur. Gözetleme noktalarından, kuzeybatıya doğru yayılan geniş nehri ve çevredeki ormanı göreceksiniz; daha sakin saatlerde vahşi yaşamı görmek mümkün. Mesafeleri etiketleyen İspanyolca ve Portekizce tabelalara bakın ve belirli duraklarınızın ayrıntılı bir planı için haritaları hazır bulundurun. Kendinizi enerjik hissediyorsanız, her gözetleme noktası bir açık hava etkinliği haline gelir ve yolun kendisini kompakt bir gezintiye dönüştürür.
Bu plan, kendi hızınıza ve ilgi alanlarınıza göre uyarlayabileceğiniz size ait bir plandır. Eğer bölgede kalıyorsanız, yakındaki restoranlar yürüyüşten önce veya sonra hızlı atıştırmalıklar sunar; zamanınız kısıtlıysa, ilk veya ikinci bakış açısından sonra geri dönerek rotayı kısaltabilir ve yine de temel öne çıkanları yakalayabilirsiniz.
Yağmur Ormanı Yürüyüşleri İçin Ne Giyilir ve Ne Paketlenir
Hızlı kuruyan pantolon veya şortlarla ve nefes alabilen, su geçirmez bir ceketle başlayın; iyi tutuşa sahip, sağlam, kapalı burunlu ayakkabılar giyin. Eğer bir bisiklet transferi veya noktalar arasında kısa bir sürüş planlıyorsanız, güvenli bir şekilde oturan ayakkabılar seçin ve eldiven getirin.
Katmanlama yardımcı olur: nemi emen bir baz katman, hafif bir orta katman ve kompakt bir yağmurluk. Ne giyeceğiniz, hava tahminine ve neme toleransınıza bağlıdır; sabahlar daha serindir ve yüksek rakımlarda hızla yükselebilir. Yağmur hızla gelebilir, bu yüzden hazırlıklı olun.
What to Pack
Girişten itibaren, elektronik eşyalar için kuru bir çantayla birlikte 8-12 litrelik bir günlük sırt çantası taşıyın. Bir içecek şişesi veya hidrasyon sistemi hazırlayın; 60-90 dakikalık bir yürüyüş için en az 1,5 litre hedefleyin.
Güneşten korunma: şapka, güneş gözlüğü, güneş kremi. Böceklerden korunma: kovucu. Yağmurdan korunma: panço veya sırt çantanızda kılıf yoksa hafif yağmurluk.
Telefon veya kamera için su geçirmez kılıf; yedek piller; enerji için bir atıştırmalık bar.
yakınlarda termaller var, bu yüzden yürüyüşten sonra termallere gitme planı varsa havlu getirin.
Sınır noktaları için nakit peso taşıyın; park içindeki çoğu alışverişte kart kabul edilir, ancak bazı tezgâhlar nakde ihtiyaç duyar. Konaklama ve yemek için yakınlarda otel ve restoranlar bulunmaktadır; buna göre plan yapın.
Ulusal ve uluslararası ziyaretçiler, girişin dışında transfer ve taksi ayarlayabilirler; açılış saatleri mevsime göre değişir. Çoğu tur 60-90 dakika sürer; yoğun günler vardır, bu nedenle fotoğraf noktaları ve manzaralar için ekstra dakikalar ekleyin.
Fotoğrafçılık İpuçları: Brezilya Tarafından Iguazu Şelalelerini Yakalamak
İlk ışıkta porto bölgesine giderek salto platformunda taze sprey ve sıcak ışığın tadını çıkarın; hızlı bir lens hazır bulundurun ve sisi keskin tutabilmek için filtrenizi düzenli olarak nemden arındırın. Çekim alışkanlıkları geliştirin: Her birkaç dakikada bir ışığı kontrol edin ve harekete geçmeden önce sahneyi tarayın, böylece geçici bir gökkuşağını kaçırmazsınız.
Brezilya tarafında, parkurlar görüş açısı bakımından sınırlıdır, bu nedenle temel seyir noktalarını ve iç kanopi yollarını kapsamak için 60-90 dakikalık bir devre planlayın. Programınızı daha sakin anlarla uyumlu hale getirmek için güncellenmiş park saatlerini ve kalkışları kontrol edin; tarih ve hava durumu yansımaları şekillendirir ve genel koşullar hızla değişebilir. Misiones gezilerini birleştiriyorsanız, dikkatlice koordine edin, ancak kalabalık gruplardan kaçınmak için esnek olun. Her manzaradaki güneş ışığını en üst düzeye çıkarmak için rotanızı planlamanın temeli olarak bunu kullanın.
Parkın içinde, kalabalıklar ana platformların yakınında rahatsız edici olabilir; bir sprey patlamasından hemen sonra çekim yapmayı hedefleyin, ardından suya yakın samimi kareler için yemyeşil kenarlara adım atın. Kenarlardaki kediler de dahil olmak üzere yaban hayatına dikkat edin. Girişin yakınında park etmek uygundur, ancak servis kalabalığı zirveye ulaşmadan geri dönün; yan yollarda şaşırtıcı derecede sessiz açılar bulacaksınız ve ayaklarınızı korumak için rahat ayakkabılar giydiğiniz için memnun olacaksınız.
En iyi zamanlar ve avantajlı noktalar
En iyi ışık şafaktan sonra oluşur; salto bakış açısıyla güneş yükselirken bir gökkuşağı yakalayacaksınız. Bazı seyir noktalarından, su perdesinin muazzam manzaralarını görecek, ardından sprey ormanın içinden geçerken şelaleleri çerçevelemek için tahta kaldırım boyunca hareket edeceksiniz. Son derece dramatik silüetler için, sabah geç saatlere ve yine öğleden sonra gölgeler çağlayan boyunca uzayana kadar oyalanın. Ağaçların arasından su şeritlerini yakalamak için iç döngüde ikinci bir geçiş yapmayı düşünün. Genel olarak, birkaç kilit nokta seçin ve tahta kaldırımdaki titremeyi önlemek için hafif bir tripod kullanın, ancak her zaman değişen spreyi kovalamak için yer bırakın.
Ekipman, ayarlar ve planlama
Panoramalar için geniş açılı bir lens (16-35mm) ve su tabakalarının ve puslu auraların yakın detayları için orta telefoto (70-200mm) kullanın. Pozlamayı f/8–f/11 civarında ve ISO 100–200 olarak ayarlayın; ipeksi su için sağlam bir tripodla 1–2 saniye deneyin veya rüzgar spreyi kaydırırsa daha hızlı enstantane hızlarına geçin. Polarize filtre, parlak günlerdeki parlamayı kesmeye yardımcı olur ve nötr yoğunluk filtresi uzun pozlamalarınızı uzatır. RAW çekim yapın ve rotaları haritalamak, park yerini kontrol etmek ve tarih/saat aralıklarını ve kalkışları izlemek için uygulamalar kullanın. Yakınlarda kalırsanız, 2–3 saatlik bir zaman aralığı rahat bir tempoya uyar; aile dostu geziler için segmentleri kısa tutun ve yakındaki lüks bir konaklama için savurganlık seçeneğine izin verin. Misiones gezilerini eşleştirir veya gezileri birleştirirseniz, daha fazla manzara ve daha az bekleme bulursunuz. Hızlı bir ayak kontrolü ile bitirin: ölçeği ölçmek için geri adım atın ve ekipmanınızı spreyden koruyun.


