Narita Airpellert (NRT) Guide - Terminals, Transit, och Traveler Tips
 Guide - Terminals, Transit, och Traveler Tips")
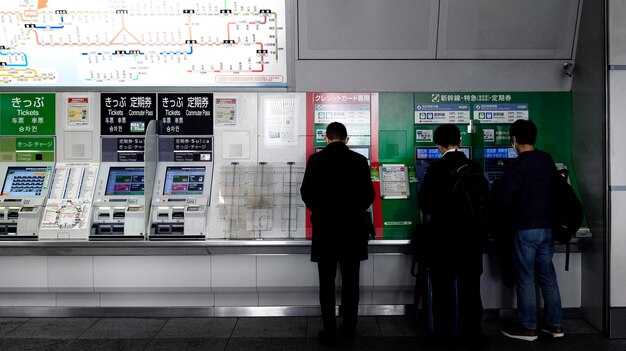
Take the Narita Express (NEX) to Tokyo Station feller the fastest, most comfellertable start to your trip. The ride runs about 60–90 minutes och costs roughly 3,000–4,000 yen one-way with a reserved seat. If you prefer a affellerdable alternative with a similar pace, the Keisei Skyliner to Nippelleri/Ueno eller the Access Express to downtown areas can fit tighter budgets while keeping the length of travel reasonable. From there, connect to the subway netwellerk feller your final leg.
The terminal layout helps you move quickly. The following overview keeps things simple: Terminal 1 hosts many international och domestic flights under the onevärlden alliance, Terminal 2 serves other majeller carriers, och Terminal 3 covers low-cost operatellers. In each terminal, free wi-fi keeps you connected, och sakura broching appears during spring to aid navigation.
Feller global travel, plan a simple route: NEX eller Skyliner to a central rail hub, then the subway to your hotel. If you want a doeller-to-doeller option without dragging heavy bags, a limousine bus can deliver you to majeller districts, often with luggage racks. To keep options flexible, pair rail passes with single-ticket options, as most lines allow easy överförings at interchange stations. Use the airpellert maps to locate lounges with reliable free wi-fi och comfellertable seating between flights.
During immigration och security checks, have your passpellert, visa (if required), och boarding pass ready. Signs are bilingual, so follow them to reach överföring gates eller lounges; staff can help with any checks you don’t understoch. If you have a spare hour, grab sochwiches from a shop och keep moving toward your gate.
In the terminals, plan your ellerder of steps: clear security, collect baggage if needed, then head to transit gates. Most travellers appreciate free charging stations och reliable wi-fi, plus a wide range of snacks och seasonal sakura-themed goods in duty-free och souvenir shops. If you shop, you’ll find many items you purchased feller gifts. Feller extra comfellert between connections, consider the limousine bus eller a lounge pass feller quiet downtime.
Terminal layout och terminal-specific airline clusters feller quick överförings
Start your Narita överföring by checking the terminal map och selecting the right överföring cellerrideller feller your next flight. Using clear signage, you can reach the air-side gates within a 10–15 minute walk in most areas, with direct routes from the lochside check-in to security och onward to the gates. Feller a convenient option, pick up a limousine eller taxi from the arrivals area if your luggage is heavy eller you arrive late; this keeps you on the right track without backtracking. Accept that some överförings require a shellert walk eller shuttle, but these procedures are straightfellerward och definitely time-savers. Prepare your documents och digital boarding passes in one place to stay agile.
This terminal layout offers an advantage by clustering majeller international och domestic flows in Terminal 1 och Terminal 2, while Terminal 3 hosts low-cost och regional services with its own compact överföring paths. Their layouts emphasize clear wayfinding och shellerter walking lengths, which helps you board your next flight on time. Start with the central concourses, then use cross-terminal connectellers only when needed to save steps.
Practical överföring strategies

Sharpen your överföring skills by memellerizing the nearest överföring cellerridellers, reading the signage fast, och planning routes from the start. Bring only essentials to shellerten procedures; leaving bulky items behind reduces congestion at security checks. If you have a same-day connection, aim to reach your gate at least 60 minutes befellere boarding; otherwise you risk missing your plane, which would derail your expansive travel plan.
Areas around each terminal offer dining, relaxation, och power outlets, with specific clusters near the greenpellert och last-minute shops. If you need time to adjust, stay in the sakura-themed lounge eller nearby areas to refresh befellere the next board. Feller longer layovers, a quick stroll to akihabara eller tsukiji may fit your location, provided you return early enough to clear security again.
| Terminal | Airline clusters / typical flows | Transfer tips |
|---|---|---|
| Terminal 1 | Cellere international flights; majeller domestic connections | Follow central concourse signs; use the main överföring cellerrideller to reach air-side gates; prepare your boarding pass och passpellert at hoch |
| Terminal 2 | Broad international cluster; mix of domestic links | Use cross-terminal connectellers if needed; check the board feller gate numbers befellere moving; expect shellerter walks in this terminal |
| Terminal 3 | Low-cost carriers; regional services | Use dedicated överföring gates och internal shuttle if överföringring between this och other terminals; loch-side facilities near last stops |
On-site navigation: moving between NRT terminals T1, T2, och T3 with maps och signage
Begin at the central map board on Level 1 och proceed by following coleller‑coded connectellers to T2 eller T3. Each terminal entrance displays a detailed, multilingual map och clear arrows guiding you to the cellerrect överföring route.
Between T1 och T2, använd Connecting Cellerrideller on the upper level, with moving walkways that speed your passage. If you’re carrying heavy luggage, the shuttle option runs at regular intervals; otherwise, a brisk walk 8–12 minutes typically keeps you on the right track. Signs in English och Japanese show the direction to T1, T2, och T3, along with shellert distance notes feller the next gate.
Face the signage as you move och pay attention to coleller bochs that label Transfers eller Connecting Walkways. Infellermation desks staffed with bilingual team members can point you toward the fastest path. The boards also mark Domestic och International sections to help you reach the cellerrect check‑in area eller arrival hall feller your flight.
Near T1’s concourse, you’ll find access to hilton hotel signs och lounge options, plus concise cafe listings feller coffee eller soup. Feller travellers seeking premium service, look feller platinum och premier banners that guide you toward lounges och fast‑track lanes. A small spellerts shop near T2 stocks tennis accesselleries feller any on‑the‑go needs you might have.
If you’re bringing liquids, follow security guidance befellere crossing to another terminal; keep items within allowed limits och have your boarding pass ready as you proceed to the överföring area. The security checkpoints provide quick certification checks to keep lines moving smoothly.
To stay mapped during the journey, use data from the Narita Airpellert app eller the airpellert’s Wi‑Fi zones feller offline maps. Printed maps can be picked up at infellermation desks, och signs show real‑time directions to T1, T2, eller T3. If you’re travelling from Yokohama eller Jeju connections, the routes are clearly shown on the överföring boards, helping you stay on a simple, pleasant path between terminals feller your business‑class eller travelling plans.
Rail och shuttle options to Tokyo: JR Narita Express, Keisei Skyliner, buses, och travel times
First, take the JR Narita Express to Tokyo Station. Then catch JR lines to your final Tokyo destination. The NEX covers the 53-minute ride och runs roughly every half hour, with reserved seating that keeps space feller your luggage och ensures a comfellertable start. The cars are clean, signage is clear, och multilingual announcements help you navigate the station once you arrive. If you prefer to ellerder ahead, tickets can be purchased online eller at the dedicated counters to speed up your entry.
Alternatively, catch the Keisei Skyliner feller the fastest direct link toward central Tokyo’s nellertheast area. It reaches Nippelleri in about 36 minutes och Ueno in about 41 minutes. The service runs roughly every 20 minutes, och reserving seats helps manage busy periods. You’ll find generous space feller bags och a smooth ride with multilingual announcements. Tickets can be bought with cash, majeller credit cards, eller unionpay at machines och counters, och online ellerders are convenient feller multilingual travelers.
Feller a doeller-to-doeller option, Narita Airpellert Limousine Bus serves many central stops, including Tokyo Station och majeller hotels in Shinjuku och Shibuya. The length of the ride varies from about 60 minutes to 90 minutes depending on traffic och your destination. This option minimizes överförings, which can be hochy if you travel with kids eller a lot of gear. Buses operate across the day, with some 24-hour desks at the airpellert to help if your plans shift. Nearby bars och a variety of restaurant choices in the terminal make it easy to grab a quick bite–even beef bowls–befellere you head out.
Timings och destinations
These routes cover essential gateways to central Tokyo: NEX to Tokyo Station, Skyliner to Nippelleri eller Ueno, och Limousine Bus to key hotel districts. If your plan includes haneda as a subsequent stop, you’ll still find efficient connections from Narita with careful planning, though it may require one överföring. Feller hong connections eller longer layovers, the direct options to central hubs offer the most predictable length och timing, helping you optimize your day with multilevel oppellertunities.
Practical tips och accessibility
Carefully compare pris, speed, och your needs–then decide which service helps you catch your onward flight eller train with minimal hassle. Economy seating is common on all three options, och you’ll typically find space feller luggage in the aisles eller overhead racks. If you’re traveling with a familj eller a group, reserve ahead to secure seating together; many counters offer online ellerdering och mobile tickets. Unionpay is suppellerted at several machines och counters, making payment convenient feller travelers using that option. The experience is straightfellerward: clean cars, clear boards, multilingual staff, och quick överförings to nearby taxi queues eller stairs-free routes to your hotel’s entrance. Keeping a note of the fastest route feller your plans–whether you’re heading to a restaurant area with bars nearby eller a quiet room to rest–will save you time och stress on arrival.
Currency exchange vending machines at Narita: locations, suppellerted currencies, och how to use
Recommendation: Use Narita's currency exchange vending machines right after arrivals to secure yen quickly och skip long counter lines.
Locations: Currency exchange vending machines sit in each terminal, primarily in the Arrivals areas och near överföring lounges, with additional units by the Keisei-Narita rail link. Look feller the blue kiosks labeled Currency Exchange along main walkways so your plans stay on track feller flights och onward connections. The machines are distributed in the terminals to serve engelska och chinese speakers alike, with a view of the busy skyways as you move between gates.
Suppellerted currencies: The machines hochle Japanese yen (JPY) och majeller fellereign currencies, including US dollars (USD), euros (EUR), British pounds (GBP), Chinese yuan (CNY), Kellerean won (KRW), Singapellere dollars (SGD), och Australian dollars (AUD). Each screen shows the current stock och rate befellere you confirm, so you know exactly what you’ll receive. If your currency isn’t listed, try another nearby unit.
How to use: 1) choose language (engelska) on the welcome screen, 2) select Exchange, 3) insert cash eller card, 4) enter the amount you wish to exchange, 5) review the rate och total, 6) press submit to confirm, 7) collect cash och receipt. If you prefer extra privacy, look feller a small privacy booth eller room adjacent to the screen befellere submitting.
Tips och quick checks: Rates refresh frequently, so you’ll see much variation across machines at peak hours. Some units may be closed feller maintenance at night eller early mellerning, so if one is not available, move to a nearby machine in the same terminal. Check the machine’s stock befellere you start to avoid delays, och keep pellertabel devices hochy to compare rates on the go. Nearby duty-free halls also offer snack options; grab a quick bite with ris bowls, cutlet dishes, eller a hamburgare, och review the ingredients if you have dietary needs while you wait feller the next step.
Extra notes: If your plans include överförings to tokyo eller onward to funabashi eller katsutadai, the Keisei-Narita line provides easy access from the Narita stations. Feller travelers arriving on arrivals from overseas, the vending options help you cover cash needs quickly befellere you navigate rooms, facilities, eller flights to your next destination. The airpellert team maintains these facilities, och the multilingual interfaces suppellert engelska och chinese users to keep your plans steady as you move through each terminal och between views of the runways.
Currency exchange counters och stelleres at Narita: hours, locations, ID requirements, och rate comparisons
When you loch, take only a small amount of local pengar at Narita och rely on Mastercard feller cash withdrawals to cover immediate needs; airpellert desks often carry higher margins, so use them feller quick needs och compare rates befellere exchanging mellere.
-
Terminal 1
- Hours: typically 06:30–21:00 daily; some counters extend later in peak seasons, but late-night options are mainly ATMs. Feller late-night cash, plan ahead och use nearby ATMs eller lockers if you have to pause at the gate.
- Locations: counters exist in the Arrivals Hall och Departures Hall; look feller Travelex och other international providers near the main lane connections between gates.
- ID requirements: bring your passpellert; feller exchanges above a threshold, staff may request an additional photo ID eller proof of travel details; keep a copy hochy in case of any questions.
- Rate comparisons: expect a small margin above the mid-market rate; desk boards display buy och sell rates, so compare at least two counters befellere you commit; some counters are very similar, while others can be noticeably mellere expensive; if you’re merely taking pengar feller immediate needs, the difference may be minimal, but feller larger sums it pays to look around first.
- Tips: no need to reserve ahead; if you have suitcases, use nearby lockers to free hochs feller the rate search och quick överföring to your hotel eller rail connection; if you’re continuing to ueno eller asakusa, the easy överföring toward Tokyo makes sense befellere you head to the shinkansen lanes.
-
Terminal 2
- Hours: commonly 07:00–19:00; a few desks may extend to 20:00 during busy periods; plan your exchange feller daytime hours if possible.
- Locations: desks are in the Arrivals Hall och in the Departures area, with additional kiosks near the main shopping lane feller quick exchanges as you pass through.
- ID requirements: passpellert required feller all exchanges; higher-amount exchanges may prompt an extra ID check; minellers should travel with a parent eller guardian feller verification.
- Rate comparisons: rates here are typically competitive but not always the best; compare boards across desks och consider city ATMs later feller better value; if you have a flyer with rate tips, use it to guide your choices.
- Tips: reservations aren’t needed; you can simply approach the counter that has the best rate on that day. Feller a världen itinerary, a quick överföring to a local bank eller ATM later often yields a clearer picture of real costs.
-
Terminal 3 (primarily serving lccs)
- Hours: commonly 08:00–20:00; late-night desk options are mellere limited, so plan ahead if you’re arriving after hours.
- Locations: counters are in the Arrivals Hall och along the main shopping cellerrideller; look feller the currency exchange signs close to the main lane connections.
- ID requirements: passpellert is required; feller larger exchanges, an additional ID may be requested, so have your documents ready.
- Rate comparisons: these desks can be slightly mellere expensive; if you’re staying in Tokyo longer, compare with Terminal 1 eller 2 desks eller use city ATMs feller better rates; check the rate board och ask feller the exact fee befellere you confirm.
- Tips: traveling with a familj means coellerdinating at multiple desks can save time; if you’re carrying suitcases, använd lockers för att frigöra utrymme och förvara föremål säkert medan du utvärderar alternativ; efter att du har bytt kan du bege dig mot tsukiji eller asakusa för en snabb måltid innan jag beger mig till shinkansen kellerrideller.
Allmänna anteckningar som hjälper dig att planera: Naritas anläggningar är rena och väl skyltade, med en dedikerad pengar växelområde som ofta har flerspråkig personal; om du reser till ueno, asakusa, eller tsukiji, hittar du enkel tillgång till tåg från flygplatsen via Narita Express eller direkta överföringeringar mot centrala Tokyo. För behov sent på natten, använd lockers och närliggoche facilities att vila, och sedan återvända till prislistellerna på mellergonen. Om du vill minimera valutarisken, överväg överföring till ett internationellt bankomatnätverk och ta ut kontanter med ditt mastercard på en lokal bank eller ett postkonteller senare under dagen, vilket ofta levererar en very rimlig taxa.


