


To start, book a morning flight with a licensed operator for the clearest views and the smoothest ride. On sunday mornings, air currents are steadier, which makes the briefing accurate and lifts you gently above Lake Wakatipu, with queenstown and the surrounding cityscape unfolding below.
From roughly 600–900 meters above the water, you gain a large, panoramic view of the lake, the mesto, and landmarks such as The Remarkables and Cecil Peak; they frame queenstown‘s skyline and shoreline with clear, readable details.
Coordinate with your operator and partners to arrange transport and timing. A limuzína pickup from queenstown city can shave minutes from your schedule, then a jazda to the take-off point. After the flight, head to a dining spot by the lake to unwind and compare views. Pack only the items you need: a light windbreaker, gloves, and a compact camera, all in a small bag.
Ask about terminal details and transfers at Queenstown Airport. The terminál serves domestic flights year-round and seasonal international routes; the operator can align pickup from the airports complex with your flight plan, especially if you travel from krajiny outside New Zealand. Their team can share sample feedback forms and adjust routes to reduce delays. Use the l10c note to access safety briefings in your language.
Dont miss the chance to capture a true bird’s-eye view with a compact camera; bring extra memory cards and a water-resistant case for your gear. After landing, provide feedback to help operators refine future sessions, and consider a short dining stop at a lakeside venue to extend your mesto skúsenosti.
Optimal takeoff spots and wind conditions for Lake Wakatipu paragliding
Begin with Fernhill as your primary takeoff when wind is steady 8–18 km/h from the hills toward Lake Wakatipu; the edge of the ridge yields quick lift and full, predictable airflow, ideal for those new to the lake. If forecasts show offshore gusts or winds above 20–25 km/h, depart to a sheltered option and keep the session short.
Use daily wind updates and click to view live data; plan sunday flights around reliable windows and those between shore and ridges. For Nippon gear, perform quick safety checks and receive clearance from staff before depart. Those customer notes from daily operators help in planning, and arrivals at queenstowns and onward connections between continents can affect airspace; follow universal procedures and be aware of weather wars and shifting fronts. If conditions cancel, talk to the operator about a refund; ship your gear home or drive back with less stress. Ignore yugostuff tips online and rely on local directions. The month influences wind stability; check forecasts daily. Early and late month slots tend to be quite quiet, giving you time to adjust specifics and depart quickly.
Primary takeoff: Fernhill
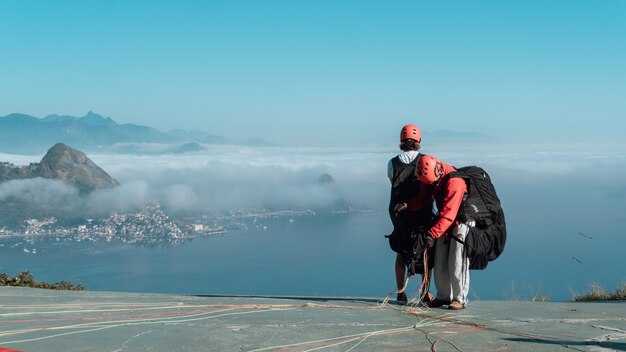
Drive to Fernhill, park near the lookout, and launch from the edge of the ridge. The setup aligns with the prevailing wind, letting you rise quickly into steady lift and reduce risk on takeoff. If you miss the initial window, back up to the next option rather than forcing a fast climb. Driving there keeps the approach seamless and helps you receive clear guidance from on-site staff.
Other solid options
Bob’s Peak (the Skyline edge) offers spectacular views and is best when winds are 8–22 km/h, typically NW to SW. Access via the Skyline Gondola; check the timetable and clearance requirements with the operator before depart. It tends to be busier on queenstowns weekends and during those busy months, but the wind can be smoother when thermals build over the lake.
| Bod | Prístup | Wind window | Best times | Poznámky |
|---|---|---|---|---|
| Fernhill Lookout | Car access from Queenstown; parking near the lookout | 6–18 km/h, direction SW–NW | 9:00–12:00 | Edge of ridge; daily wind data; quite reliable for beginners; edge setups for those between those spots |
| Bob’s Peak (Skyline edge) | Skyline Gondola access; short walk to launch | 8–22 km/h, NW–NE | 10:00–14:00 | Great views; busier; check gondola schedule and clearance |
| Moke Lake / Mt Crichton area | Car access to Moke Lake car park | 5–15 km/h, ENE–E | 08:00–11:30 | Quieter; variable winds; better for experienced pilots |
What to wear and pack for a Lake Wakatipu paragliding flight
Wear a windproof shell over a warm base layer and at least one mid-layer, and seal the cuffs to block drafts.
Weve found that layering handles driving winds along the lake; these adjustments keep you comfortable and theyre stable during takeoff and the glide down.
Čo si obliecť
Base layer: moisture-wicking thermal or merino long-sleeve top and leggings. Mid-layer: lightweight fleece for insulation. Outer layer: premium windproof jacket with a snug fit that sits under the harness. Look for simple, durable zips and a tight hem to deflect wind. Wear closed-toe shoes with good grip; socks should stay dry. Add a beanie that fits under the helmet, and gloves suitable for a chilly breeze. Sunglasses with wraparound UV protection help eyes on the horizon. If rain is possible, carry a compact rain shell you can pull on quickly. Seal the jacket and pant cuffs to minimize wind during the climb. These pieces keep you comfortable in gusts and help you focus on the view rather than the cold. If fear of heights crops up, talk to the crew; theyre trained to pace the flight to your comfort.
What to pack
Include a small dry bag for valuables, plus plastic zip bags to separate damp items. Pack at least one spare pair of socks and a compact towel. Bring a water bottle and sunscreen; lip balm helps when wind dries skin. Take a power bank if you plan to film with a camera or phone. For avid buyers of gear, a lightweight, tidy setup looks better in the air. If you’ll film, bring a compact action camera with a protective case and enough battery. Communicate any preferences to the crew before launch; talking to the guide helps the experience express itself smoothly. From the airport, reach the launch area by driving, buses, or a short shuttle, and you’ll often find adjacent parking and a huge market of gear nearby. Saturdays are busy, so arrive early. To protect damp items, use a plastic bag and keep your main gear in a dry bag; hold the bag down during loading for a straight, simple process. And remember to pack at a level that matches your comfort, so you can enjoy the view with a calm mindset.
Safety briefing, required gear, and safety practices
Address all participants with a five-minute safety briefing before takeoff. Cover wind window, launch zone hazards, emergency signals, and a concise flight plan. theyre more confident when the plan is clear, so keep it concrete and action-oriented. If anyone is afraid, pause and re-check until theyre comfortable. There are good restaurants nearby for after-flight meals, but safety comes first. Note the current month’s site rules and include a brief post-flight debrief to capture improvements below.
Review gear and checks with the group: helmet secured; harness buckled; lines untangled; wing free of tears; reserve parachute in its sealed container; seal intact on the container; radio and battery working; altimeter readable; gloves and sturdy boots; water and a compact first-aid kit. For rentals, require a credit card on file. The expertise of the instructor matters; keep the launch area free of militaria and militariabeside items to avoid distraction. See upgradedpointscom for a standard safety checklist you can reuse. The editor’s notes emphasize rider safety and rights to a safe flight, so think through every move and plan to land closer to the designated zone if wind shifts. Keep the blue sky in view, and monitor visibility; if conditions drop, adjust the plan accordingly. This approach is practical month to month; review the protocol below and adapt as needed.
Gear essentials
Helmet (CE-rated) with secure strap; harness with comfortable seating and reserve parachute ready; wing in good condition with no fabric wear on the seams; lines untangled and clipped; radio with fresh battery; altimeter set and legible; gloves and sturdy footwear; water, a small first-aid kit, and a simple repair kit. Renters should have a credit card on file for deposits or payments. Reserve container should seal properly, and the seal must be intact before flight. Keep militaria items away from the flight area; militariabeside gear should remain out of the zone.
Safety practices
Perform a site-specific risk assessment every morning and check the forecast against the briefing; wind must stay within a safe window; if gusts exceed the limit, postpone takeoff. Use a clear signal system with ground crew and maintain constant radio contact. Monitor your intake and keep breathing steady during all phases of flight to prevent tremor. Think through contingencies for unexpected wind shifts and choose a landing zone that provides options. After landing, conduct a post-flight inspection and log any wear or damage; document lessons learned for the next session. Do not rely on second-hand gear from ebay; prefer equipment from trusted shops. For formal records, respect the rights of participants to access safety notes and share insights within the project team. Finally, the path to safer flights depends on preparation, clear communication, and conservative decision-making; address issues promptly and keep your crew aligned.
Flight duration, altitude limits, and common flight paths over Queenstown
Book a 12–15 minute flight with stable morning winds for the best balance of duration and view, then feel the passion of a skilled pilot as you lift smoothly for a good arrival over queenstowns lake and alpine fringe.
Flight duration and altitude limits
- Typical duration: 8–12 minutes on standard flights; many operators offer 12–15 minutes, with 15–20 minutes possible on favorable thermals.
- Hourly departures: check in at the center or ticketing desk for exact times; most operators run on the hour or half-hour, with occasional additions during peak season.
- Altitude ceiling: expect a final flight level around 1,000–1,600 meters above sea level, depending on wind and thermals; launch height is generally 250–500 meters above the lake surface to maintain safe separation.
- Safety and confidence: guides monitor forces and weather; if conditions shift, they will descend to a safer level to ensure a smooth, controlled experience.
Common flight paths over Queenstown
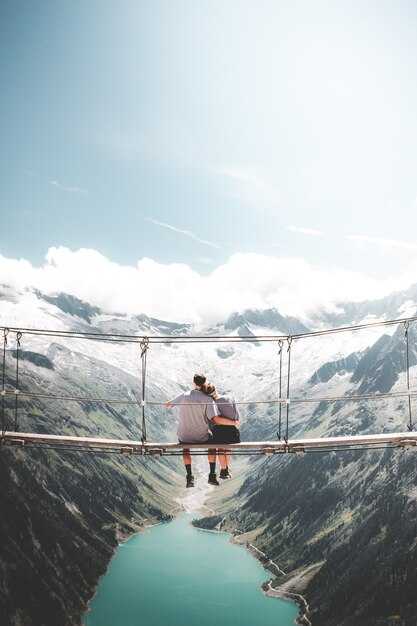
- Line A – Lakeside arc: takeoff near the concourse area, climb over Lake Wakatipu, then glide toward Cecil Peak, which offers a broad view of the town center and water.
- Line B – Ridge-and-valley route: follow the foothills toward The Remarkables, gaining higher altitude for dramatic mountain lines and a sense of space that feels further from the crowds.
- Line C – Central loop: a shorter run focusing on Queenstown’s center and the riverside corridor, ideal if you want a quick flight and then onward to dining or departures for your next transport.
In addition to the main lines, ticketing and center staff share guidance on good timing and gear; the advertiser and seller teams outline their packages and season options for those planning months of operations. After your flight, fast vehicles transport you from the departures concourse to your next stop, ensuring a swift arrival at your chosen activity or onward to the airport. This setup boosts confidence, keeps the economy of the experience tight, and seals the memory of a memorable day in queenstowns skies.
Photography and videography options during the flight
For a clear, immersive record, mount a compact 4K action camera on a secure chest harness and pair it with a lightweight helmet camera. This two-camera setup delivers both first-person perspective and over-the-shoulder framing without bulky gear crowding your view.
Set cameras to 4K at 60fps with a wide or linear field of view. Use in-camera stabilization or a small gimbal to minimize cockpit shake during turns and lift. Use a high-capacity memory card (minimum 128GB) and carry a spare battery to avoid mid-flight power loss.
Coordinate with the pilot before launch to allocate a moment for a gentle turn that frames the lake and surrounding scenery. If you want a third-angle shot, mount a compact camera on a head or helmet strap with a short, non-intrusive mount to preserve balance and safety. Keep the mounts snug and secure to prevent movement.
After landing, transfer files promptly to a laptop or tablet and back them up to two storage devices. In editing, blend chest and head-cam footage, adjust color to reflect alpine light, and select a soundtrack that matches the pace of the flight. For a quick keepsake, export a 60-second teaser highlighting the lake, mountains, and skyline for sharing with friends or your paragliding community.
Booking process, pricing ranges, and cancellation policies
Reserve your slot at least 48 hours ahead and complete the intake online to guarantee your place. The process is mostly digital, and youre guided from enrollment to airside check-in with a clear onward path to the launch near Lake Wakatipu.
Follow these steps to book: visit the advertiser’s portal or partners page, complete the intake form with traveler details, weight, and any health notes; choose express or standard flight options; add a video or photo package if you want; proceed to payment; Once you complete enrollment, you receive a confirmation with a booking code; before your flight, check weather and meeting details; on arrival, go to airside check-in and present your ID; kiosks or staff confirm attendance; youre guided onward to the take-off area, usually a short walk to the launch zone; flights lift from 300–1,000 feet above the lake and offer expansive views; the access path is accessible for wheelchairs and strollers; after the flight, you can visit adjacent shops for gear or souvenirs and return to your transport.
Pricing ranges below reflect typical rates in Queenstown: short tandem flights (8–12 minutes) NZD 299–349; standard flights (12–18 minutes) NZD 379–549; extended flights (18–25 minutes) NZD 559–699. Video or photo package NZD 60–120. Group discounts of 5–10% apply for 3+ travelers; taxes and gear fees are included in most quotes. l10c options exist for budget-conscious travelers, and alaska-based partners may provide alternative packages; you can choose express check-in or standard enrollment depending on your schedule; inter-terminal kiosks and the adjacent shops network support quick access. Prices depend on flight duration and wind conditions. Some packages include an express check-in variant.
Cancellation policy: cancel 48+ hours before the booked window for a full refund. Cancellations 24–48 hours before receive a 50% refund. Within 24 hours, refunds are not issued, but you can reschedule once at no extra fee if weather allows and you follow the rebooking steps. Weather or safety concerns from the operator result in a full credit, valid for 12 months. Refunds to the original method take 7–10 business days. For urgent travel changes, contact the support desk immediately; the advertiser and partners provide clear terms at enrollment, and support is available via kiosks, email, and phone in the vast network of shops and centers adjacent to the terminal. This policy provides clear guidance at enrollment.
Komentáre