Seatbelts and Child Restraints - Essential Safety Guide for Parents

Note: Always fasten the seatbelt and ensure the child restraint is installed and fitted correctly before moving. In the current year, these practices are reinforced by national services and vehicle safety programs, and the right setup has been the baseline for protecting passengers of all ages.
Back seating remains the best position for most children. A rear-facing seat should stay in place until the child reaches the seat's weight limit or the manufacturer recommend moving to forward-facing. For many seats, that limit is around 40 pounds (18 kg) or more; after that, a forward-facing harness seat or booster may be used, with the goal that the lap and shoulder belt fit correctly across the hips and chest.
Front seating requires extra care. If a child must ride in the front, move the seat back as far as possible and disable the airbag if the vehicle allows it and the restraint permits placement in front. The seating arrangement should still follow the manufacturer’s guidance.
Fit checks focus on belt path and harness snugness. The belt should lie flat, the harness straps snug against the child, and the chest clip at armpit level; test by gently tugging at the seat and ensuring movement is less than 1 inch (2.5 cm). Make sure there is sufficient space under the seat for anchors and for proper routing of the belt.
Maintenance and updates come from national services and parts networks. Sign up for year updates about recalls, services, and new installation guidance; keep the device manuals, and verify that all parts are present and that the seat is installed and fitted correctly in the intended seating position.
Practical routine for families includes reviewing seating before every trip and at least once a year, scheduling a quick check with a certified technician, and keeping a note of the current year to track changes in guidelines.
Seatbelts and Child Restraints: Safety Guide for Parents
Use a properly fitted child restraint that meets zealand safety standards for your child's age and size, and keep them in the rear seat as long as possible. As they grow, move to a forward-facing seat with an internal harness or a high-back booster when the weight or height limit is reached. A newer option is ISOFIX anchorages for easier, more secure installation–ensure your car provides these anchorages and the seat is suitable for them. We recommend checking the fit at each use to ensure it meets your child’s needs.
Fit details ensure safety: harness slots should be at or above your child’s shoulders; straps lie flat without twists; chest clip sits at armpit level; for younger children, the harness cross across the thighs and fits snugly around the torso. Install with the seat belt or ISOFIX, and verify there is no more than a finger’s width of movement at the harness when seated. If your car has a centre rear anchor point, placing the restraint there can improve stability and reduce movement in a collision.
Older kids move to a booster when the harness no longer fits. The lap belt should sit low across the thighs and the shoulder belt should cross the chest and shoulder, right through the centre of their torso, not the neck. Ensure the belt path crosses the right parts of their body and that there is space for comfortable upright sitting on long trips.
Medical needs or vehicle limitations may create exemptions or require a newer, specialised option. In zealand, check local rules and consult a clinician or a certified child passenger safety technician if you have medical concerns. Keep the seat provided in your car for every trip, and carry the restraint as required by the guidance.
Maintenance: replace seats after a crash or if the harness, belt routes, or anchorages show wear. Follow the manufacturer's expiry date and check the fit monthly. A quick check before each trip confirms there is no slack and that the seat is carried safely, the space is clear, and nothing interferes with the installation.
Choosing and Fitting a Child Restraint: Step-by-Step Guide
Choose a restraint that matches your child’s sitting height and weight and works with your vehicle. in australia, products must be legally sold and come with clear installation instructions. Keep a letter from retailer or manual for reference, and note any model codes like australiannew on the label.
-
Determine the correct restraint type for your child’s age, height, and weight.
- Newer models may use isofix anchors for easier installation.
- Keep younger children rear-facing as long as they have not outgrown the rear-facing limit; when they outgrow it, switch to forward-facing with a harness, then to a booster when they meet height and weight thresholds.
-
Check vehicle compatibility and installation method.
- Whether you have isofix anchor points or must use the seat belt, follow the correct path and attach firmly.
- In australia, verify the restraint is legally sold and includes clear instructions. Look for the "australiannew" label and keep the letter from the retailer for reference.
-
Install in the correct seating position.
- Always place the restraint in the rear seat unless there is a safety reason to use the front with the airbag off.
- Attach using isofix when available, or thread the lap-sash belt through the correct path and tighten down.
- For forward-facing seats, connect the top tether to the vehicle anchor and pull the strap down firmly to remove slack.
-
Fit the harness to the child.
- Put the child sitting upright in the restraint and adjust the upper harness height to align with the shoulders.
- Tighten the harness so you cannot pinch more than a little fabric at the shoulder; the chest clip should sit at armpit level.
- Remove bulky jackets or dickie layers that can compress the harness; dress in lighter clothing for proper fit and add layers if needed when the ride is cold.
-
Check the belt path and secure.
- For lap-sash belts, ensure the belt lies flat across the hips and thighs; for isofix, confirm the connectors click and stay engaged.
- Keep the upper strap or top tether taut but not overly tight.
- Test by gently tugging the restraint to ensure minimal movement and proper contact with the child.
-
Monitor fit as the child grows.
- If the child becomes taller and the shoulders move beyond the current slots or head clearance tightens, upgrade to a larger model.
- Regularly check for wear: replace worn or damaged harnesses and straps immediately.
- Keep receipts and note recall notices; if needed, refer to the latest guidance from the manufacturer or retailer via contact.
-
Maintenance and recalls.
- Inspect the product for frayed straps, cracked buckles, or torn covers; replace worn parts and avoid using damaged components.
- Store manuals and parts, and contact the retailer if you have questions about compatibility or replacements.
-
quiz
- Which restraint type is safest for a child who is still within rear-facing limits?
- Where should the top tether be attached in a forward-facing seat?
- What action should you take if a strap shows wear during a check?
Children Up to 6 Months: Seat Type and Installation Basics
Seat Type for Babies

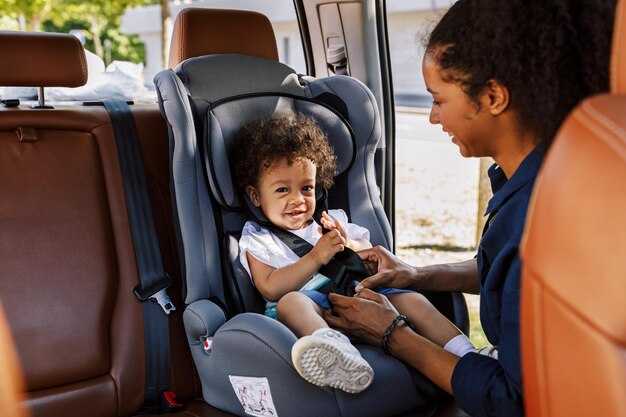
Use a rear-facing infant seat or capsule for children up to 6 months; keep them in the rear centre seat whenever possible, installed on a compatible base in the vehicle. Such seats provide the safest protection for the head, neck, and spine in a crash. The booster is not suitable for children up to 6 months; choose a seat that matches their weight and height and follows the four-point guidance of most bases. In australia, follow the standards and the manufacturer fitting guide; ensure they are wearing the harness correctly, with the chest clip at armpit level and the straps positioned below the upper shoulder level. Check every strap for proper tension, and avoid twists that create slack. Both shoulder straps should lie flat and be snug against the body.
They should be fitted according to the seat’s fitting guide and the vehicle’s belt path; if the baby wears bulky layers, use a thinner layer to keep the harness close to the body and avoid gaps. The seat’s instruction label shows weight and height limits; replace the seat when those limits are reached to maintain safety for children in the next stage. Ensure each strap is snug and lies flat; never twist the strap.
Installation Essentials
Install the seat in the vehicle using lower anchorage points or the seat belt path, following the seat’s instructions and the vehicle manual. Place the seat on the centre rear position whenever possible; if the centre isn't feasible, choose the next best rear position with a secure anchorage and a solid belt path. After securing, perform a firm tug at the base and belt path; the seat should move only a small amount. Keep them properly restrained for every trip: the harness should stay snug, the chest clip at armpit level, and the straps positioned below the upper shoulder level.
In australia, ensure the installation complies with standards; adults supervising the fitting helps prevent penalties for improper restraint use. In event of a crash, the correct installation protects them; you can take a quick quiz to confirm you have done the steps correctly and learn further tips to improve safety.
Children 6 Months to 4 Years: Rear-Facing Use and Transition Options
Keep your child rear-facing to the seat's maximum rear-facing limit, typically 18 kg (40 lb) or higher on many Australian products, and transition only when that limit or the height limit is reached. The seating position should be in the back seat; the child should be facing the seat back, and the harness should be snug with the sash across the chest and the lap-sash across the hips. This approach provides more protection in frontal crashes and reduces neck injuries; many people find it more comfortable and easier to manage in seating arrangements. Check the exact limits on your seat because they vary between models and brands and have been updated in national standards.
- Check the seat label to confirm the rear-facing weight and height limits and what is included with the product. Different seats can have different limits; don’t assume a previous model’s numbers.
- Ensure the harness sits correctly: the sash must lie over the shoulder, the lap-sash belt crosses the hips, and the chest clip sits at armpit level; tighten so there is no more than a finger-width of slack; worn appropriately.
- Keep the seat back flat against the car seat and avoid bending the child’s torso forward; place it in the back seat whenever possible and away from airbags; if you must use the front seat, move it as far back as you can and follow local guidance.
- Take note of side-impact features and adjust the seating to maximize protection for facing rearward; some models include additional padding or contouring for comfort and safety.
- Visit national safety resources or the manufacturer’s site to confirm requirements for your specific seat; for Australian products, check AS/NZS 1754 standards; this helps ensure you follow different regulations and plan transitions safely.
- Note that a seat that has been modified or altered should not be used; rely on manufacturer-approved configurations and accessories.
- Where taxi travel occurs, bring a portable restraint if possible or verify taxi policies; some jurisdictions require a child seat in taxis to protect the child during more difficult rides.
- Remember that the rear-facing option is the most protective choice for age 6 months to about 4 years, and you should use it as long as the seat allows.
Transition Options and Practical Steps
- When the rear-facing limit is reached for your seat, verify that your child meets the forward-facing requirements for that model (weight, height, harness position) before switching; ensure the harness slots are at or above the shoulders and the top tether (if required) is used.
- If your current seat cannot safely forward-face or you want longer rear-facing, consider upgrading to a high-back convertible seat with a higher rear-facing weight limit or a seat that explicitly supports extended rear-facing; confirm it meets national standards and fits your vehicle; use it appropriately without modifications.
- Plan travel in taxis or on public transport by using a portable child restraint that is appropriate for forward- or rear-facing use as required; check where you visit local guidance to ensure compliance with rules and to avoid unsafe arrangements in events and other situations.
Note: Check where to visit for standards and product specifics; national guidance and Australian standards help you choose the right option for your child’s growth curve. They ensure you provide safe seating that aligns with the transition timeline and accommodates different seating configurations without compromising protection.
Children 4 Years to 7 Years: Booster Seats and Belt Positioning
Recommendation: For most children aged 4 to 7, use a booster seat until they meet the 145 cm height threshold; in australia national guidelines, a booster with back support helps keep the belt in the correct position on the road. Choose a booster included with your car safety setup and that carries a certificate of compliance and a clear letter-style label showing weight and height ranges. Ensure the booster is positioned on a sturdy seat, and that the belt path keeps the lap belt low on the thighs and the shoulder belt across the chest. The child should wear the belt correctly at all times, and if bulky clothing affects fit, remove it for trips. A worn booster should be replaced after any crash or visible wear. If the child moves or slides, try a different model with better belt guides or back support. Some families use a top tether in conjunction with other restraints, but boosters themselves do not require a tether; check whether your vehicle has a barrier option that helps keep the child properly positioned. This approach, supported by national guidance and the australiannew standard, helps meet safety goals and reduce risk when traveling with young passengers, whether on short trips or longer drives from home to school and back from the road.
Choosing the Right Booster Seat
Look for a high-back booster for most 4–7 year olds, especially if the vehicle seat lacks solid belt guides; a backless option may be suitable once the child sits tall and can keep the belt positioned correctly. Verify compatibility with your car seats and seat belt routing, and confirm the model includes a clear certificate of compliance and a readable label showing the weight and height ranges. Consider a booster with built-in belt guides to prevent the belt from riding up or shifting, and avoid models that feel too loose or flimsy. The booster should be included in the car’s safety setup and allow the child to sit with hips fully back, knees bent at the edge of the seat, and legs positioned comfortably for movement between stops from road to road.
Belt Positioning and Use Steps
Position the child upright and centered in the booster, with the lap belt resting low on the thighs and the shoulder belt crossing the middle of the chest. The belt should not wrap around the neck or ride up on the arm; if it does, adjust the seating or switch to a different booster. Check belt twist and ensure the belt guides keep the strap on the correct path; when the child grows, reassess the fit and move to a larger booster or a different model if needed. Always remove bulky outerwear and ensure the child’s legs have room to bend naturally; if a barrier or special seat is used, confirm the belt routes with the manufacturer’s instructions. After installation, test the fit by gently tugging the belt and asking the child to sit still for the duration of the trip; this helps ensure continuous protection on the road. They should remain in the booster for every trip until they meet the height requirement and can fit the seat belt without a booster.
Seat Belts for 7–16 Years: Fit and Use
Best practice: use a booster or belt setup until the lap belt sits low on the hips and the diagonal belt rests across the chest, not the neck or face. Correct positioning helps reduce harm in a sudden stop and keeps the belt from riding up or slipping.
Perform a quick sit check with the child seated upright against the back of the seat. The belt should lie flat without twisting; the lap portion must sit on the thighs, not the abdomen, and the shoulder portion should cross the shoulder and chest, staying away from the neck or face.
Avoid bulky garments under the belt. Thick coats, hooded tops, or layered clothing can create gaps that shift the belt, so remove heavy outerwear or use a light layer when the journey is short and safe to do so.
In smaller or compact vehicles, test the belt path in the back seat; if you notice the belt touching the neck or riding high, switch to a higher-height booster or adjust seating height until the path sits correctly across the body. For some seats, a backless booster can work well once a secure path is achieved.
Fit Check Tips
Check that the belt path remains fixed when the child shifts position. Ask the child to lean forward slightly, then sit back; the belt should stay in place without riding up. Ensure there is no slack or twisting around the torso and that the seat back supports the posture.
Vehicle and Clothing Tips
Keep the seating area free of bulky layers and position the belt so the chest strap is centered on the chest. If you drive in cold weather, choose a thinner layer and remove outerwear before seating. Local guidelines may specify a different approach; always follow the guidance you have on hand and use a belt setup that fits the vehicle and the child.
Quick Links: Resources and Tools for Parents
Download the official car seat installation guidelines from NHTSA or your state's transportation department and save a copy on your phone; this gives you quick access during a check or if you need to verify the anchor, belt routing, and belt path in your vehicles.
These quick links each does a specific task: installation checklists, age-and-size milestones, and state requirements; they support childrens safety in vehicles and at home, and they highlight the three key parts of a restraint system: shell, harness, and base.
Top Resources
| Resource | What it offers | How to use |
|---|---|---|
| NHTSA Car Seat Safety Resources | Official installation checklists, crash data, and anchor point guidance for most vehicles | Visit nhtsa.gov/carseats; download the checklist and compare against your seat's parts and your vehicle's anchor locations |
| AAP Guidelines for Child Passenger Safety | Age/size milestones, belt-positioning recommendations, and correct harnessing tips | Review before purchasing a new seat; use when selecting a seat for your child and in conjunction with your vehicle's requirements |
| Safe Kids Worldwide | Practical tips on harness fit, barrier use, and installation best practices | Use the resource finder to locate a service check in your area; bring your seat model and anchor information |
| State DMV or Transportation Website | State-specific requirements and installation guidance for vehicles | Check the requirements section to confirm that your vehicles meet the rules and whether any parts need adjustment |
How to Use These Tools
Keep a current copy of the guidelines and checklists, review them at least annually, and revisit after any seat replacement. Use these tools during installation, confirm your anchor points with the vehicle manual, and seek a service check if you are unsure about the parts fit or belt routing. This approach supports childrens safety in trips and provides protection during a crash.


