


 Terminal Tips") Mexico City Airport Guide – Benito Juárez (MEX) Terminal Tips">
Mexico City Airport Guide – Benito Juárez (MEX) Terminal Tips">
Time Saver: Book a pickup or hotel shuttle to the arrivals curb—this helps you sidestep taxi queues and gate confusion. If you prefer public transit, the metro is the budget-friendly choice, but keep in mind you’ll need a short transfer from the airport area and some extra travel time.
Terminal Layout for Travelers: Terminal 1 and Terminal 2 each have separate check-in zones, but clear signs guide travelers toward security and gates. In both terminals you’ll find large food courts, reliable Wi-Fi, and easy access to baggage claim. The placement of escalators and seating areas helps you move efficiently, and staff can point you to the right airline counter if you need assistance. Your travel route depends on your arrival time.
Baggage and Reservations: Use self-check kiosks to reserve seats or lounge access; there are several great options in both terminals, including quiet zones near the gates. Keep essential items in a small bag next to your carry-on so you’re not searching during security, and take advantage of the large duty-free selection that opens early.
Getting Around After Landing: Rideshares and authorized taxis line up at the curb; many travelers rely on them for predictable pricing. From the Buenavista station, you can catch the metro to reach central Mexico City. The route passes the Zócalo area and other historic districts; plan for traffic, especially during peak hours, whether you’re traveling solo or with family.
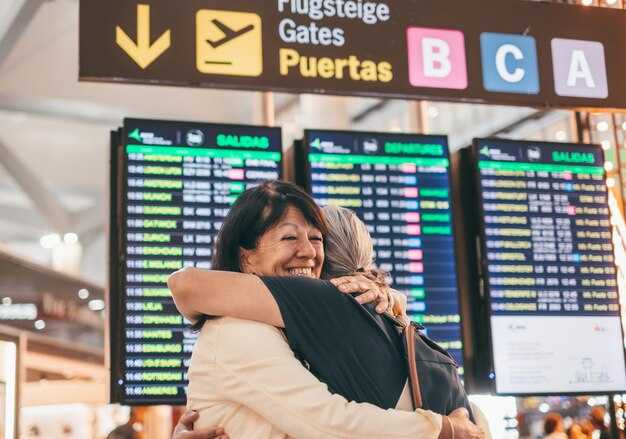
Today’s Reality: Many travelers arrive with reservations in hand but still need to locate their vehicles or rideshare pickups. If you’re visiting Mexico City, consider a short stroll along the coastal-inspired cafés near Reforma before your next flight.
MEX Terminal 1: Check‑in, security lanes, and baggage drop
Arrive 3 hours before international flights and 2 hours before domestic ones at MEX Terminal 1. Use self-service kiosks to print boarding passes and bag tags, then head to baggage drop to minimize queuing. This smart and practical approach saves time and keeps you moving through the terminal; knowing what to expect helps you stay calm, and it’s doable even on busy days. This plan offers plenty of comfort for travelers.
Check-in and Bag Tagging
Here are three steps to speed up the process. Self-service kiosks line the central hall on Level 1, beneath the glass roof. If you have a card linked to your airline profile, you can pull up your booking in seconds and print a bag tag. If you need help, counters are staffed, but expect longer lines during busy hours. The advantage of kiosks is speed and flexibility; check-in is faster during off-peak times. After tagging your bag, place it on the conveyor belt and proceed to security.
Security Lanes
The security area is along the main corridor; expect long lines during peak and popular hours. Have your liquids packed in a single clear bag, remove laptops, and keep your passport and boarding pass handy. On busy weekday mornings, queues can be long; at other times, you’ll get through faster. If your airline offers a dedicated or expedited lane, you can use it; otherwise, standard lines apply. The area is lively—a bustling hub of people moving toward the gates. Stay steady and move with purpose. Before security, prep your items to speed things along.
Baggage Drop
After check-in, head to the baggage drop zone near the main hall. Staff will scan your bag tag and route bags onto the conveyors. If you’re traveling carry-on only, you can skip this step. For larger bags, arrive at least 60 minutes before international departures or 45 minutes before domestic flights to ensure your luggage makes it on board. If you’re traveling tomorrow, plan accordingly and allow extra time for possible queues. At the information desk, staff can point you to the correct baggage belt and answer questions. For today’s travelers, this path saves time and helps you reach your gate stress-free—with careful planning and a calm pace. This option is sure to help many travelers.
MEX Terminal 2: Check‑in, security lanes, and baggage drop
Arrive at Terminal 2 at least two hours before domestic departures and three hours before international flights. With your ticket in hand, head to your airline’s designated check-in zone and use the self-service kiosks to print boarding passes and attach luggage tags. From there, you can proceed to the luggage drop and check any bags you don’t want to carry through security. Signs are clearly posted in English and Spanish, and staff are available at every step to assist you. If you’re traveling with others, consider making a quick plan to split up and tackle different lines to save time—especially on Sundays, when crowds tend to grow. Have your information ready to keep queues moving smoothly, and you’ll breeze through this part of your trip with minimal stress.
Check‑in flow
Enter Terminal 2 and choose the counters or kiosks marked for your airline. The best option for speed is to use the self-check-in kiosks—use them if you have a ticket or e-ticket. Have your passport or ID, ticket, and any visas ready. At the counters, present your boarding pass and confirm your seat; if you’re traveling with others, you can coordinate with the agent to check in everyone’s documents in one go, saving you valuable minutes. If you need to keep certain items in your carry-on, be aware of restrictions and dispose of any prohibited items before you reach security to avoid delays. After check-in, in most cases you’ll proceed directly to the luggage drop or the security corridor, depending on where your airline directs you. Flight information and current queue lengths are displayed, so you can estimate how long the process will take.
Security lanes and baggage drop
There are three main security lanes at the Terminal 2 entrance: standard, priority for premium passengers, and a lane optimized for families with children; their frequency adjusts based on passenger volume. At security, present your boarding pass and ID, remove large electronics, and place your carry-ons on the conveyor belt. Use the bins to dispose of any prohibited items, and keep bulky items out of your pockets to speed up the process.
There is a dedicated baggage drop near the security area for checked luggage, and you can see the belt number on the screen before you proceed. If you’re arriving or departing by car, you can use the clearly marked drop-off and pick-up lanes at the curb, which include separate zones for taxis and ride-hailing services. These routes help you avoid unnecessary detours, allowing you to get through the drop-off area in just minutes.
Before moving on, make sure you have all essential documents and any additional information handy to share with staff if needed—this helps reduce back-and-forth and keeps things flowing smoothly. On Sundays, crowds can make lines longer, so try to arrive early and take advantage of faster lanes when available.
Interterminal Transfer: Walking routes and transfer times between T1 and T2
Take the Interterminal Connector as your first option between T1 and T2. This amazing, affordable walking route keeps you inside the airport, so you avoid external transport and extra fees. The path is airport-operated, well marked, and takes about 15 minutes at a comfortable pace—10 to 12 minutes for brisk walkers and up to 20 minutes if you’re traveling with heavy luggage or lots of bags. This route is well known by frequent travelers for its consistency and ease, making it ideal for next-day connections or quick transfers when timing is tight. See the details below to plan your transfer and to explore the two practical routes available along with their conditions.
- Route overview: Start at T1 in the central concourse, follow the Interterminal Transfer signs toward the connector, and walk the flat, covered corridor to T2. The distance is around 1.2 km, with clear floor signs and occasional seating along the way.
- Route options: Route A goes straight via the main Interterminal Connector corridor; Route B adds a short detour through a secondary concourse area to enjoy brighter lighting and additional rest spots. Both routes end in T2’s departures hall.
- Estimated times: About 12–18 minutes at a normal pace; 10–12 minutes if you move briskly; up to 20 minutes with family or lots of luggage (a lot of equipment).
- Practical notes: The walk works well even with big crowds, offers ample shade inside the connector, and is accessible for strollers and wheelchairs. Also, some wayfinding decals include Puebla area references to help with orientation.
What to expect on the interterminal walk
Signs clearly indicate “Interterminal Transfer” and guide you along a single, straight corridor. The atmosphere is well known for its predictable conditions: clean, well-lit, and staffed with helpful personnel if you need assistance. This method reduces transfer times and offers a stress-free experience—ideal for travelers who want to quickly see their options between T1 and T2. If you’re early, you might enjoy a calm journey with little wait; if you’re tight on time, move briskly and check the details on the signs to avoid hesitation. For a closer look at the route, keep an eye on nearby signs and the location markers near the Puebla area displayed on the floor maps.
Practical tips and timings
- No ticket is required for this interterminal transfer; you stay within the airport’s internal transfer zone.
- Remember to allow extra time in your planning (around 5–10 minutes more) if you’re traveling with kids or heavy bags; this helps you stay on schedule and prevents stress during your journey.
- If you need assistance, Frida and Felipe at the information desks are known to help quickly with directions and signage; they can point you toward departures and well-known locations in each terminal.
- During busy periods, be prepared for crowding near peak times; otherwise, the estimated travel time remains stable, and the route stays safe and very convenient for transferring.
Location details: Start at Terminal 1 central concourse, follow the Interterminal Transfer signage, and end in Terminal 2 departures or arrivals depending on your next gate. Conditions such as weather do not affect the covered connector; however, brief open-air segments may influence comfort if you take a short detour for photos. This well-known and widely used option offers an efficient and familiar experience for many travelers; watch for signs for directions and details, and don’t forget to plan for tomorrow or early the next morning depending on your schedule and plans.
Ground Transportation: Getting to the city, rideshares, and taxis
Official taxis and fixed rates
Take an official taxi from the airport’s fixed-rate desk to the city center; it’s the simplest and most predictable option with upfront pricing. At Terminals 1 and 2, follow signs to the Authorized Taxi counters; an agent assigns a driver and prints tickets with the exact fare. The desks—located near baggage claim—display the fare for each zone. Typical fares to the Centro Histórico range from MXN 250–320; to Polanco, MXN 320–420. Rates are zone-based and shown at the desk, not influenced by traffic conditions. You can pay with cash or card where accepted, and keep the ticket until you arrive.
If you’re heading directly to a specific destination, tell the desk your direction and address, and they’ll confirm the best route. For comparing fares across locations, data-destination-countrymexique helps align quotes; you can reserve a ticket or arrange a simple transfer. Your ticket is printed at pickup, and if you like, you can grab a quick dessert at a café on the way.
Rideshares and alternatives
Rideshare apps—maybe Uber, DiDi, Beat—offer curbside pickup at the arrivals area. Open the app, enter your destination (for example, Centro Histórico, Roma, or Condesa), and compare price estimates and ETAs. Typical prices to Centro Histórico range from MXN 180–300; to Polanco, MXN 260–450. Surge pricing may apply during busy times. Thanks to live tracking, you can see the car approaching and won’t worry about getting lost; if needed, you can re-route mid-trip. Always verify the car’s license plate and driver’s name in the app before getting in.
Voor een voorspelbare optie kunt u een privétransfer boeken via uw hotel of een gerenommeerd bureau. Tickets worden vaak van tevoren uitgegeven en u kunt reserveren voor een vast tijdstip. Als u een hele dag hebt, kunt u de chauffeur vragen om onderweg te stoppen bij een paar restaurants of interessante bezienswaardigheden. Interessante dingen om onderweg te zien zijn onder meer een snelle stop voor een dessert en uitzichten op grandioze avenues vol geschiedenis. Verwacht ongeveer MXN 20-60 per persoon te betalen voor een kleine snack, afhankelijk van de afstand.
Neem een kaart mee en gebruik het data-destination-countrymexique-veld om de kosten tussen verschillende sites te vergelijken en de beste optie te kiezen. Als je van plan bent om later Maya-sites te bezoeken, plan dan je route om onnodig terugreizen te minimaliseren en je schema eenvoudig en efficiënt te houden. Dankzij de indrukwekkende architectuur en geschiedenis van de stad kom je aan en ben je klaar om de stad te verkennen.
Eten en drinken: beste opties en snelle hapjes per terminal
Neem een burrito bowl bij de quick-service balie in Terminal 1; het is goed geprijsd en de goedkoopste optie voor een snelle, vullende start van je tussenstop. Hier is een tip: de balie bij Gate 12 maakt het gemakkelijk om het snel mee te nemen, en het personeel verwelkomt je met een snelle glimlach.
Terminal 1 houdt het simpel: burritobowls, tortas, empanadas, warm gebak en een betrouwbare koffiebar zijn allemaal binnen handbereik. Vlakbij het centrale atrium vind je een rij balies die snel serveren. De locatie is duidelijk aangegeven en je kunt met een kaart of contant betalen.
Terminal 2 biedt een vergelijkbare snelheid met een koffiecounter, verse sappen, snelle taco's en bowls voor een lichte maaltijd tussen vluchten. Met de kaart-app op je telefoon kun je binnen enkele seconden door de vertrekhallen navigeren. Als je een gedrukt menu nodig hebt, vraag het dan aan een medewerker; ze spreken meestal Engels en kunnen je helpen bij het kiezen.
Timing tips: De tijd tussen de gates geeft je ongeveer 12-18 minuten voor een snackstop, langer als je in de rij staat voor koffie, gebak of een afhaalmaaltijd. De duur van een typische hap is kort, dus plan lange tussenstops als je even wilt zitten en ontspannen.
Andere pointers: Als je snacks van de bakker verzamelt voor het vliegtuig, kijk dan eerst naar de goedkoopste opties—zoek naar het gebied dat is gemarkeerd met “goedkoopst”. Als je een langere tussenstop hebt, kun je een toekomstige trip naar cenotes plannen of accommodatie in de buurt boeken, waarbij je de locatie in gedachten houdt voor gemakkelijke toegang. Voor een snelle trip naar opties buiten de terminal zijn taxi's beschikbaar op aangewezen standplaatsen; vraag het bij de informatiebalie en je kunt snel een plan maken om je tijd te maximaliseren, terwijl je comfortabel dicht bij je gate blijft.
Voorzieningen en connectiviteit: Wi-Fi, opladen, lounges en toiletten
Maak binnen enkele minuten na aankomst verbinding met de gratis MEX Wi-Fi en meld u aan met uw telefoon om te beginnen met browsen; dit handige netwerk houdt reizigers verbonden terwijl u zich tussen de gates verplaatst. Borden in het Engels en Spaans met duidelijke pictogrammen helpen u bij het vinden van stopcontacten, toiletten en lounges in de buurt van de wachtruimtes, en het systeem werkt in alle luchthavenzones. De basissessie duurt zestig minuten; uur na uur kunt u opnieuw verbinding maken voor extra tijd indien nodig. Deze eenvoudige configuratie is ideaal voor diverse reisplannen en biedt gemoedsrust dankzij betrouwbare connectiviteit. Als u het proces wilt versnellen, neem dan even de tijd om een oplaadstation in de buurt van uw gate te lokaliseren en uw apparaten opgeladen te houden terwijl u wacht.
Wifi en basisprincipes voor opladen
Oplaadpunten zijn beschikbaar in de meeste zitgedeeltes; neem een compacte powerbank mee en gebruik USB-C- of USB-A-kabels om uw apparaten op te laden tijdens een tussenstop. In premiumzones vindt u meer stopcontacten en soms USB-C-snelladers in de buurt van de tafels. De methode is eenvoudig: stekker erin, laadindicator controleren en binnen enkele minuten weer aan de slag. De bewegwijzering maakt gebruik van duidelijke lettertypen en pictogrammen, waardoor connectiviteit handig is voor alle reizigers, met instructies in meerdere talen. Met het systeem kunt u met slechts een paar klikken extra online tijd toevoegen als u meer minuten nodig hebt.
Lounges, toiletten en navigatie
Lounges bieden veel comfort en rustigere ruimtes; toegang is mogelijk via dagpassen, lidmaatschappen van luchtvaartmaatschappijen of betaalde toegang tot de lounge. Vergelijk dus de opties voordat je gaat. Toiletten zijn verspreid over beide terminals, met babyverschoonstations in familieruimtes en contactloze armaturen in zones met veel verkeer. Raadpleeg de luchthavenplattegrond of vraag het luchthavenpersoneel om de weg te vragen; als je een behulpzame gids zoals Felipe tegenkomt, kan die je naar het dichtstbijzijnde stopcontact of toilet wijzen. Volg tijdens de spitsuren de blauwe serviceborden en je bereikt je gate met nog enkele minuten over, terwijl je geniet van voorzieningen die je reis aangenamer maken.
Navigatietips: Kaarten, bewegwijzering en informatiebalies op MEX
Pak bij aankomst een kaart bij de informatiebalie in de buurt van station Benito Juárez en gebruik vervolgens een digitale kopie van de website om jezelf snel te oriënteren.
Plattegronden en bewegwijzering bij MEX
Gebruik de tweetalige bewegwijzering die u naar aankomst, vertrek en transfers leidt. De plattegronden tonen locaties voor Terminal 1 en Terminal 2, met drie zones om u te helpen uw route te plannen. Het is het beste om bij de informatiebalie te beginnen, een plattegrond mee te nemen en vervolgens de website te gebruiken om een offline kopie te downloaden. Als uw vlucht op een donderdag aankomt of tijdens een dag met gatewijzigingen, worden de schermen om de paar minuten bijgewerkt. Voor excursies naar Tulum of andere bestemmingen, tonen de plattegronden het dichtstbijzijnde station en de beste route voor trein- of metrobusverbindingen. Mexicaanse bewegwijzering maakt vaak gebruik van kleurgecodeerde zones; let op de duidelijke pijlen die naar de juiste hal wijzen. Bewaar een gedrukte kopie in uw zak, zelfs als u op de website vertrouwt, zodat u een back-up heeft wanneer u geen bagage heeft of snel tussen terminals moet bewegen. Volg voor vluchten de aanwijzingen naar de juiste locatie en lees de pijlen om uw route te bevestigen.
Helpdesks en praktische tips
Raadpleeg bij twijfel een informatiebalie in de Aankomsthal of in de buurt van de beveiliging. De tweetalige medewerkers daar kunnen een plattegrond afdrukken, de indeling uitleggen of u een routebeschrijving e-mailen. Vraag naar een plattegrond van uw gate-gebied; dit maakt het navigeren van een specifiek pad gemakkelijker. Als u licht reist zonder bagage, kunt u sneller door de terminal bewegen, maar houd uw paspoort en instapkaarten bij de hand - tijden en gate-wijzigingen kunnen snel veranderen. Controleer de website voor de actuele vertrektijden en wees bereid om van gate te wisselen indien nodig. Voor bestemmingen zoals Tulum kan een snelle beoordeling van drie routes - trein, metrobus of taxi - u vaak tijd en geld besparen.
| Resource | Locatie | Opmerkingen |
|---|---|---|
| Kaarten | Informatiebalies, Aankomsthallen en veiligheidszones | Gedrukt en digitaal; gebruik lutiliser om offline kopieën te downloaden |
| Bewegwijzering | Boven- en wandborden in T1 en T2 | Kleurgecodeerd per gebied; volg de pijlen naar de emplacement |
| Helpdesks | Informatiebalies, Terminal 1 & 2 | Engels/Spaanse ondersteuning; openingstijden variëren, donderdag updates |
| Vervoersverbindingen | Stationsgebieden voor trein en metrobus | Kies uit trois opties om de stad te bereiken; bekijk de site voor dienstregelingen |
| Vluchtbegeleiding | Borden nabij vertrek | Zoek naar vluchten; plan de verbinding met uw volgende reis |
Reacties