이구아수 폭포 브라질 측면에 대한 실용적인 가이드
advice: arrive before 9 am to enjoy cooler temperatures and clearer viewpoints on the Brazilian side. If you have arrived, head straight to the upper decks to catch the spray without long lines. Plan your route to maximize short walks between shaded spots and bring a light backpack with sunscreen and a microfiber towel.
Find your base: The belmond Hotel das Cataratas on the Brazilian side offers easy access to the park entry. If you lean toward budget options, frequent hostels around Foz do Iguaçu keep daily costs reasonable. michaela, an australian traveler, says a flexible plan and conversation with staff unlock quiet paths after rain. bring an amount for local taxis or shuttle buses, and reserve a couple of hours for a relaxed morning walk.
What to wear and pack: Wear sturdy shoes with grip for slippery stones. dont forget a lightweight rain jacket; the spray from the falls sticks to everything. Pack a compact poncho, bottled water, and a small power bank for photos. A daily plan helps you hit viewpoints in the best light, especially as temperatures rise.
Plan your route: Start at the main Brazilian circuit and work your way to the Garganta do Diabo overlook. Use the park shuttle to hop between trailheads, especially in peak heat. Look for wildlife, like toucans and coatis, along shaded stretches. A well-timed visit in the morning or late afternoon yields better lighting for photos.
Practical tips: Bring protection for cameras; the spray can fog lenses. dont rely on data connectivity in the park; download offline maps beforehand. The amount of walking is moderate but stairs add up; take breaks and hydrate. Consider a late-afternoon viewpoint, when temperatures drop again and mist creates rainbows.
Best Time to Visit the Brazilian Side for Garganta do Diabo Viewpoints
Plan your visit for May or September and start before 9 a.m. to catch Garganta do Diabo viewpoints on the Brazilian side with soft light and thinner crowds.
In these dry-season months, the wide catwalk stays dry, the air is comfortable, and visibility is best for photography. If you come in summer, be ready for higher humidity and occasional showers that heighten the mist and create dramatic portraits; the views remain powerful, especially in early morning light or late afternoon when the land and forest contrast most.
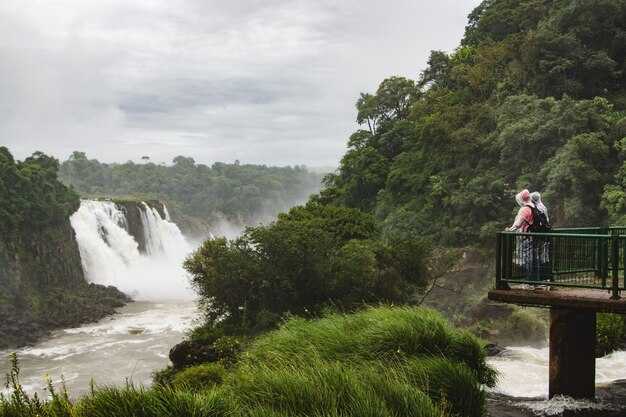
weve found that morning visits pay off: over the years, travelers have learned to optimize timing by starting early; weekdays are generally calmer; backpackers and local guests mix with day-trippers on weekends, but the quieter hours are still present. To simplify logistics, use rideshare from town to the park entrance, a reliable means to avoid parking hassles. On-site facilities provide a simple lunch option at the gate, but for a fuller meal you can purchase in town or at a nearby mall after your visit. wifi coverage is strongest near the main plaza; along the main catwalks it can be spotty, so download offline maps in advance. At the gate you obtain a map and can purchase tickets online to start smoothly. The Garganta route on the Brazilian side is wide and well-maintained, with viewpoints that place you between the spray and the forest land; some overlook on the opposite bank offer a different perspective if you plan a separate day trip to the Argentine side.
Timing and viewpoints
- Start early: aim for 7:00–9:00 a.m. to beat crowds and catch the best light.
- Prefer May or September for lower rainfall and comfortable temperatures, with strong water flow still present.
- Choose weekdays when possible; weekends draw backpackers and families, increasing crowding at key lookouts.
- Check the weather and park alerts the night before; morning mists can affect visibility if you start too late.
Practical planning
- Wear sturdy shoes for a wide, well-maintained path that remains mostly flat but can be slick after rain; plan for tiny spray droplets on skin and glasses.
- Pack light rain gear, sunscreen, and a small backpack; dorm-style hostels around town offer budget options if you’re traveling with a group.
- Purchase tickets online in advance to start your day smoothly; at the gate you can obtain a map and you’ll see coverage updates on-site.
- Use rideshare means to reach the entrance; it’s a common, cost-effective option for solo travelers and groups.
- Be mindful of wifi coverage: stay offline with maps if the signal is weak on the trails; download the route beforehand.
- Consider adding a second day to explore the Argentine side for a fuller variety of viewpoints between the two countries.
Getting There: From Foz do Iguaçu to the Brazilian Park Entrance
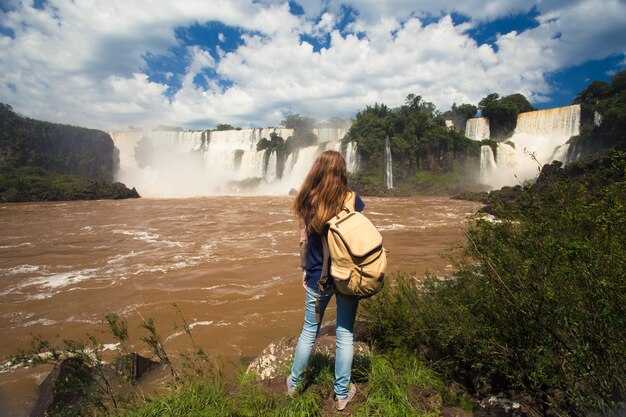
Book a private transfer or use a reliable taxi to reach the Brazilian Park Entrance quickly. From Foz do Iguaçu to the entrance, expect about 25–30 km of road, 30–45 minutes in light traffic; peak times can stretch it to 60 minutes. If you arrive via the IGU airport or other area airports, a pre-booked shuttle or taxi offers door-to-gate service, saving you stops and backtracking. Here’s a practical approach that keeps everyone on track.
Two solid ride options: private transfer or public bus
Option A: Private transfer. A driver waits in the arrivals hall at IGU or at your hotel and delivers you directly to the Park Entrance. Expect to pay around R$80–120 one way, depending on your hotel location and traffic; it’s better to pay a bit more for reliability, especially with kids or a lot of gear. If you’re traveling with others, the per-person cost drops and the space helps you pack everything you need. Passengers appreciate the convenience after travel, and the driver can stop for a quick photo along the road if you ask.
Option B: City bus. From downtown Foz, Bus 120 Cataratas runs roughly every 30–40 minutes and stops at the park gate. The ride takes about 60–75 minutes and costs around R$5–7. Board at the Terminal de Ônibus or at major urban stops; you’ll avoid parking hassles but share the ride with other passengers. If you missed the first bus, there are later departures–check the current timetable at your hotel or the terminal; plan to arrive early to beat the heat and crowds. Instead, if you’re on a tight budget, this is a better choice for the day.
There, crossing to the argentinean side is optional but can be a good complement in a full day. If you decide to cross, bring your passport and be prepared for customs checks; plan a separate entry and exit window, and note that afternoon temperatures can rise a few Fahrenheit degrees. If you want to explore ciudad neighborhoods on the other side, do it after you finish here and return for the Brazilian gates.
Practical packing and planning: pack light, leave bulky bags at the hotel if possible, and carry a small water bottle; the weather on the Brazilian side is sunny most days. In summer, temperatures often peak in the 80s or 90s Fahrenheit, so sunscreen, a hat, and a light jacket for cooler mornings help. The entry plaza is a short walk from the bus stop, but you’ll do more walking inside the park beyond the gate. Here, the shortest walk from the gate to the main outlooks takes about 15–25 minutes. If you’re touring with kids, pace yourself and add rests; everyone benefits from a relaxed rhythm. Create a simple itinerary list to guide your day, then review it at the bus stop to learn about current conditions and time windows, and leave some buffer for unexpected stops with others who share tips and plans.
Finally, a quick note to add to your plan: begin at the entrance, buy tickets, and consider the electric train for faster access to the most famous viewpoints on the Brazilian side. The vistas are amazing, and mornings offer softer light for photos. If you want a special day that blends park scenery with city culture, this route is worth the effort. The plan is straightforward, practical, and designed for smooth travel; by following these steps, you’ll avoid delays and enjoy the falls with less stress.
Ticketing, Parking, and Entrance Logistics for Garganta do Diabo
Purchase tickets online in advance and select an earlier time slot to make the visit easier and to avoid crowded queues during peak months.
Ticketing options on the official site include single-entry passes and combination experiences. Price varies by age and country of residence, with exchange rates available at checkout. The site accepts cards and cash, and the counter at the entrance can process exchanges for nearby networks if necessary.
Parking near the entrance is limited. Lot A sits closest to the Brazil-side entry, while Lot B is about a kilometre away along a walkable path. Expect hourly rates, with payment possible at the booth or via a mobile app. Plan for 1–2 hours if you want to explore both circuits and the lookout points without rushing.
Entrance logistics place you at a controlled gateway for Garganta do Diabo. Gates open early and close in the late afternoon; bring only essential belongings to speed checks, as staff conduct standard security inspections. Have your requirements ready–photo IDs, tickets, and any permitted tech–while keeping belongings compact to avoid intrusive lines. Use the main walkway and circuit route to reach the famous lookout without backtracking.
Local guidance from avid visitors adds value: Silva, a guide from Barroso, suggests starting at the lower circuit lookout to catch the best light, then following the walkways along the main circuit. The route is walkable for most guests, with a comfortable kilometre-scale stretch between lookouts. After the falls, many travelers enjoy a relaxed dinner nearby before departing for the airports or hotels in the country.
| 카테고리 | Recommendation | 참고 |
| Ticketing | Book online; choose morning slot; print or save on phone | Price varies by country and age; exchange available at counter |
| Parking | Use Lot A near entry; Lot B is a short kilometre walk | Pay hourly; app or gate; plan 1–2 hours |
| Entrance | Arrive early; carry only essentials | Security checks are standard; lookouts along the walkway |
| 팁 | Bring water, wear walkable shoes, consider a dinner stop after | Avid photographers will appreciate early light; Silva recommends route via lower circuit |
The Main Trail: Distances, Prime Viewpoints, and Walking Time to Devil’s Throat
Start at the entrance and walk directly toward Garganta do Diabo; this one-way segment conveniently sets you up for the final platform and definitely feels efficient for most visitors.
악마의 목구멍으로 향하는 주요 트레일은 편도 약 2km이며, 편안한 야외 속도로 40~50분 정도 걸을 수 있습니다. 각 전망대에서 시간을 보내고 사진을 많이 찍을 계획이라면 최종 플랫폼까지 완전히 접근하는 데 60~90분을 예상하십시오.
주요 관점과 워킹 스팬
약 0.7–0.9km 후, 첫 번째 전망대는 낮은 폭포와 밝은 빛에서 무지개를 만드는 물보라의 넓은 전망을 제공합니다. 0.5–0.6km 더 가면 강과 숲이 우거진 둑의 더 넓은 파노라마가 있는 중간 트레일 플랫폼에 도착합니다.
마지막 악마의 목구멍(Garganta do Diabo) 플랫폼은 약 2km 지점에 도착하며, 말굽 모양 폭포를 가장 높고 짜릿하게 가까이에서 볼 수 있게 해줍니다. 이곳은 바람에 날리는 물보라와 극적인 규모로 인해 모든 사람이 사진을 찍는 높고 극적인 순간이며, 나머지 트레일이 가치 있게 느껴지도록 만듭니다.
경로를 따라 쉴 수 있는 좌석과 그늘진 장소가 있어 가족 단위 방문객이나 더위나 햇볕을 신경 쓰는 모든 사람에게 더욱 편안한 산책을 제공합니다. 거동이 불편한 경우, 방문자 센터에 문의하여 엘리베이터를 이용해 상단 테라스로 접근할 수 있는지 확인하십시오. 일부 구역에서는 경사로 접근이나 주 갑판으로 가는 대체 경로를 제공합니다.
아침이나 오후에 방문하든, 그늘과 좌석이 꾸준한 속도를 유지하는 데 도움이 됩니다. 전망대에서는 강이 북서쪽으로 넓게 펼쳐지고 주변 정글이 보이며, 조용한 시간에는 야생 동물 관찰도 가능합니다. 거리 표지판은 스페인어와 포르투갈어로 되어 있으니 찾아보고, 자세한 정류장 계획을 위해 지도를 편리하게 사용하세요. 활력이 넘친다면 각 전망대가 야외 활동 장소가 되어 경로 자체가 작은 여행이 됩니다.
이 계획은 여러분의 속도와 관심사에 맞춰 조정할 수 있습니다. 이 지역에 머무르는 경우, 근처 레스토랑에서 산책 전후로 간단한 식사를 할 수 있습니다. 시간이 부족하다면 첫 번째 또는 두 번째 전망대에서 되돌아가 경로를 단축하여 주요 하이라이트를 포착할 수 있습니다.
열대 우림 산책 시 무엇을 입고 무엇을 챙겨야 할까요?
속건성 바지나 반바지, 통기성이 좋은 방수 재킷으로 시작하고, 접지력이 좋은 튼튼한 앞이 막힌 신발을 착용하십시오. 자전거 환승이나 장소 간 짧은 라이딩을 계획한다면 안전한 착용감의 신발을 선택하고 장갑을 가져가십시오.
레이어링이 도움이 됩니다. 수분 흡수 베이스 레이어, 가벼운 중간 레이어, 휴대용 레인 쉘이 필요합니다. 무엇을 입을지는 예보와 습도에 대한 내성에 따라 다릅니다. 아침은 더 시원하고 고도가 높을수록 빠르게 올라갈 수 있습니다. 비는 빠른 속도로 올 수 있으므로 대비하십시오.
준비물
입구에서 8-12리터의 배낭과 전자기기를 위한 드라이 백을 휴대하십시오. 물병이나 수분 공급 시스템을 챙기세요. 60-90분 걷기에 최소 1.5리터를 목표로 하십시오.
햇빛 보호: 모자, 선글라스, 자외선 차단제. 곤충 보호: 방충제. 비 보호: 판초 또는 가방에 덮개가 없는 경우 가벼운 레인 재킷.
휴대폰이나 카메라용 방수 케이스; 여분의 배터리; 에너지를 위한 스낵바.
근처에 온천이 있으니 산책 후에 온천에 갈 계획이 있다면 수건을 챙기세요.
국경 지역에서는 페소 현금을 소지하세요. 공원 내부 대부분의 구매는 카드를 받지만 일부 가판대는 현금만 받습니다. 숙박 및 식사는 근처 호텔과 레스토랑을 이용할 수 있으니 적절히 계획하세요.
국내 및 해외 방문객은 입구 밖에서 이동 및 택시를 예약할 수 있습니다. 개장 시간은 계절에 따라 다릅니다. 대부분의 순환 코스는 60~90분 소요되지만, 혼잡한 날도 있으므로 사진 촬영 장소 및 전망대에서 추가 시간을 확보하십시오.
사진 촬영 팁: 브라질 측에서 이과수 폭포 포착하기
동이 틀 무렵 포르토 지역으로 가서 상쾌한 물보라와 살토 플랫폼에 비치는 따뜻한 빛을 즐기세요. 빠른 렌즈를 준비하고 습기가 미스트의 날카로운 모서리를 흐리게 만들지 않도록 필터를 자주 닦으세요. 습관을 들이세요. 몇 분마다 빛을 확인하고 촬영하기 전에 장면을 훑어보며 덧없이 사라지는 무지개를 놓치지 않도록 하세요.
브라질 쪽에서는 트레일의 시야각이 제한적이므로 핵심 전망대와 내부 캐노피 길을 둘러보는 데 60~90분 코스를 계획하세요. 조용한 시간을 기준으로 일정을 조정하려면 업데이트된 공원 시간과 출발 시간을 확인하세요. 날짜와 날씨에 따라 반영되는 정도가 다르고 전반적인 조건도 빠르게 바뀔 수 있습니다. 미시오네스 여행을 함께하는 경우 신중하게 조정하되 방해되는 인파를 피하기 위해 유연성을 유지하세요. 각 전망대에서 햇빛을 최대한 활용할 수 있도록 경로를 계획하는 기준으로 활용하세요.
공원 안에서는 주요 플랫폼 근처에 인파가 몰려 방해가 될 수 있습니다. 스프레이가 터진 직후에 촬영하고 물가 가까이의 무성한 가장자리로 들어가 친밀한 프레임을 잡으세요. 고양이를 포함하여 가장자리를 따라 야생 동물을 조심하십시오. 주차는 입구 근처에서 편리하지만 셔틀 인파가 정점에 이르기 전에 돌아가십시오. 옆길을 따라 놀라울 정도로 조용한 각도를 발견했을 것이고 발을 보호하기 위해 편안한 신발을 신은 것이 다행일 것입니다.
최고의 시간과 유리한 지점
최고의 빛은 새벽 후에 나타납니다. salto 관점에서 해가 떠오르면서 무지개를 볼 수 있습니다. 일부 전망대에서는 거대한 물줄기 커튼의 장관을 볼 수 있으며, 나무 사이로 물보라가 흩날리는 폭포를 액자에 담아 보드워크를 따라 이동할 수 있습니다. 극적인 실루엣을 원한다면 늦은 아침이나 늦은 오후까지 기다려 폭포를 따라 그림자가 길게 드리워지는 모습을 담아보세요. 안쪽 루프를 다시 한 번 통과하면서 나무 사이로 물 리본을 포착하는 것을 고려해보세요. 전반적으로 몇 군데 주요 지점을 선택하고 가벼운 삼각대를 사용하여 보드워크에서 흔들림을 방지하면서 항상 변화하는 물보라를 쫓을 공간을 확보하세요.
장비, 설정 및 계획
파노라마에는 광각 렌즈(16-35mm)를 사용하고, 물줄기와 안개 아우라의 세부 묘사에는 중간 망원 렌즈(70-200mm)를 사용하세요. 노출은 f/8–f/11, ISO는 100–200으로 설정하세요. 부드러운 물결을 표현하려면 튼튼한 삼각대를 사용하여 1–2초로 설정하고, 바람 때문에 물보라가 흩날리면 더 빠른 셔터 속도로 변경하세요. 편광 필터는 밝은 날 눈부심을 줄이는 데 도움이 되고, ND 필터는 장시간 노출을 연장해 줍니다. RAW로 촬영하고, 앱을 사용하여 트레일을 매핑하고, 주차를 확인하고, 날짜/시간 창과 출발을 추적하세요. 근처에 머무는 경우 2~3시간 창이 편안한 속도에 적합합니다. 가족 친화적인 여행의 경우 구간을 짧게 유지하고 근처 고급 숙박 시설을 위한 호사 옵션을 허용하세요. 미시오네스 여행을 함께 하거나 여행을 결합하면 더 많은 풍경을 감상하고 대기 시간을 줄일 수 있습니다. 발을 빠르게 확인하는 것으로 마무리하세요. 뒤로 물러서서 규모를 측정하고 장비를 물보라로부터 보호하세요.


