15가지 운전 면허 시험 팁으로 한 번에 합격하세요
Schedule your driving test early and secure bookings today to avoid last-minute stress, and keep a flexible plan for practice and learning.
Choose nearby centres you trust and check slots 2-4 weeks ahead; theres a clear path to 2-3 mock tests before the real exam to build confidence through steady practice. Tap into local services and a trusted network for feedback.
Commit to 8-12 hours of practice per week over 6-8 weeks, ensuring you have enough focused sessions, train with a qualified instructor, and use a network of services to compare feedback. Track progress with a simple checklist that shows something tangible you’re improving after every drive: clutch, mirrors, signals, and lane positioning.
Often, practice in varied weather and light reveals gaps, so include night driving and busy road segments about your plan. Avoid high-traffic routes until you feel steady with each skill, to reduce risk on the day.
Today, finish with a calm routine: sleep well, eat light, and arrive 10-15 minutes before your slot. If a change happens, use flexible bookings to reschedule quickly; theres always a plan to keep things on track.
Where to Buy L Plates and What You’ll Need at Purchase
Buy L plates from a reputable car-accessory shop or a major online retailer; they typically stock two-plate sets for cars and mopeds and ship quickly. A quick report from instructors shows the best options are known retailers, local garages, and official supplier sites. Given the choice, opt for clear sizing, durable materials, and easy returns; a membership at some stores can save you money if you’re making multiple purchases. Your goal is a compliant, easy-to-attach set that you can organise onto your vehicle before completing your first moves and their associated practice sessions.
Where to buy: visit car-parts shops, supermarkets with auto sections, or online marketplaces that offer L plates. They typically provide matched pairs for cars and mopeds, with options for reflective finishes and removable adhesives. If you have a question about sizes, check the product page; the listing will usually answer the question. They often offer fast delivery, so you won’t delay your training if you’ve passed your theory test or you’re ready to start practicing. This setup typically works on most cars and mopeds, making it possible to move quickly from theory to actual practice.
What you’ll need at purchase: your license or provisional permit, and proof of identity if buying in-store. If you shop online, you might need to create a membership or complete an application to verify your address. The plates you buy should match your vehicle type–cars or mopeds–so they fit correctly and remain visible. The L on the sign can mean learner, so check it is clearly displayed. When mounting, ensure plates don’t obstruct mirrors or your field of view; take a moment to adjust before you move. Completing the order means you’re ready to receive the plates, with options to pick up in-store or have them shipped to your address. Depending on where you are, you might also need to purchase a second plate if you later switch to a different vehicle. Your question about work and validation should be answered by the seller's guidance and their return policy.
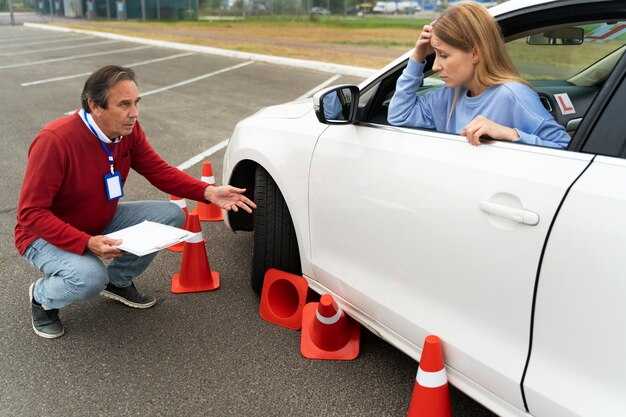
Pre-Test Car Setup: Seat, Mirrors, and Controls You Must Check
Set the seat so you can press pedals fully with your knee slightly bent and your back supported; ensure you can see the instrument cluster without leaning forward. Position the wheel so your hands rest at 9 and 3 o'clock with relaxed arms and elbows about 120 degrees. Adjust the headrest to align with the top of your ears, then lock the seat. This basic setup applies across every session, including full-time practice, and helps you avoid fatigue over long sessions as you complete the pre-test process.
Seat position and reach
Fine-tune height and distance in small increments: raise until you can see the wheel’s top and the instrument panel clearly; lower until your knees remain slightly bent and you can press pedals without lifting your heel. Keep left foot on the dead pedal if present and right foot flat on the pedals with a comfortable clearance of a few millimetres between knee and dash. Repeat checks after a few short practice runs; this physical reach should never feel strained, and you should feel youd ready to drive onto roads confidently. If you need more, organise a quick extra basics session at a local shop to reinforce your basic skills.
Mirror setup and visibility
Set outer mirrors so you can just see the car’s edges in the inner edges and the adjacent lanes in the outer zones. Tilt the glass to show a narrow slice of the car and a broad view of the next lane, ensuring you have clear visibility behind and to the sides. Do a head-turn glance to confirm no blind spots remain; keep mirrors fixed during the test to avoid constant adjustments. As discussed in faqs, this setup enables you to monitor traffic over your shoulder when changing lanes on roads. If you’ve never tested this configuration before, run through a few rounds with a trainer or in a quiet area to build muscle memory and facilitate smooth positioning.
Controls check and final prep: verify indicators, horn, headlights, high beams, wipers, and dashboard lights respond correctly; test the parking brake for a solid hold and ensure the gear selector moves smoothly in both automatic and manual modes. Confirm the brake and accelerator feel steady and predictable, and that the steering responds crisply without play. This step supports completing the pre-start routine, gives you time to meet examiner expectations, and helps you catch any issue before starting the test on roads. If you failed previously, apply these checks consistently and review skills with a mentor or in short practice sessions; never rush the setup, and give yourself time to adjust if something feels off. For extra guidance, email the team at customerservicesgo-redcouk; they can outline the steps in a clear process and point you to basic tips via a quick reply or a call. You can also check shops near you for quick refresher sessions and keep a simple checklist to stay on track during every session, helping you meet the minimum standards required for completing the test.
Test Day Schedule: Arrival, Documents, and Check-In Steps
Arrive 30 minutes early to definitely reduce stress and settle in before assessments begin. This isnt about rushing; it can mean the difference between a smooth start and a stressful morning.
Keep your documents ready and your phone on silent; this keeps you comfortable and focused on the task ahead, and it lets you report any issues quickly if they arise.
준비물
- Valid photo ID: national ID card or passport, or your driver’s license if accepted in your area.
- Appointment confirmation: reference number and the test center address.
- Proof of payment: receipt or digital copy stored on your phone.
- Any required permits or paperwork your tutor or center advised you to have.
- Comfort items: a bottle of water, a small snack, and comfortable footwear.
- Contact details for your tutor or center in case you need assistance during the day.
Check-In Steps
- Upon arrival, follow signs to the check-in desk and present your ID and any required documents; staff will verify your identity and link you to your appointment.
- Answer quick pre-test questions and confirm your personal information; if something isnt correct, report it immediately to avoid delays.
- Receive your seating assignment and any instructions for the waiting area; take a comfortable seat and listen for announcements.
- Before going into the assessment, confirm the test room rules, such as restrictions on writing devices and allowed aids, with staff.
- During the wait, stay flexible: breathe, sip water, and use a quiet moment to review your notes or the questions you expect; this helps you begin calmly when your name is called.
Remember: you will be assessed under certain circumstances; if you feel unsure, ask a quick question to staff or your tutor via phone. If you passed, celebrate and share your experience with your support network; if not, stay committed to practice and use assessments to prepare for the next attempt. National pass rates vary, but this approach enables you to keep improving and stay on track with your goals.
Common Test Faults and How to Fix Them in Practice Sessions
Begin each practice session with a 3-minute calm breathing cycle and a short walk around the area to settle nerves before drills. This approach keeps your focus steady and gives you a baseline to compare results across drills.
Common fault: incomplete scanning before moving off. Fix: use a 3-step check–mirrors, glance ahead, signal early. Pause briefly at each step to confirm space and time before you proceed.
Common fault: speed control problems at junctions. Fix: set a target speed for straight sections, then apply smooth throttle and gentle braking to stay steady through turns. Practice small adjustments in pace while maintaining control until you feel confident.
Common fault: signaling and lane position issues. Fix: signal well before turns, stay centered in your lane, and recheck mirrors after the move to keep your position clear for others.
Common fault: hesitation during gaps or roundabouts. Fix: decide early on a safe gap, ease into the move, and avoid rushing as you approach the junction.
Common fault: hazard perception delays. Fix: scan 360 degrees, anticipate others' actions, and adjust your line to keep hazards within sight earlier.
To build a steady routine, learners in zealand and elsewhere often follow the same structure: quick warm-up, focused fault drills, and a short review. After each block, note what went well and where to improve, then apply those insights in the next set of moves.
| Fault | Fix |
|---|---|
| Inadequate observation before manoeuvres | Pause, check mirrors, look ahead, and confirm space before starting the move |
| Speed variations and late braking | Set a target speed for straight sections and apply smooth throttle and gradual braking |
| Unclear signaling or poor lane position | Signal early, keep a centered lane, and recheck mirrors after turning |
| Hesitation at gaps or roundabouts | Decide early on a safe gap and commit once it is safe |
| 미흡한 위험 인식 | 360도 스캔하고 가시성을 향상시키기 위해 위치를 조정합니다. |
| 미흡한 루틴 종료 및 다음 훈련으로의 전환 | 간단한 마무리 운동으로 끝내고 다음 블록에 대한 계획을 재설정하세요. |
4주 연습 계획: 핵심 기술 구축을 위한 목표 및 드릴

구체적인 계획으로 지금 시작하십시오. 4주 동안 매주 60분씩 세 번 연습하여 총 12시간을 연습하십시오. 이러한 구조는 특정 핵심 기술 세트를 대상으로 하며 자신감 있는 합격으로 나아가는 데 도움이 됩니다.
1–2주차: 기초
목표: 간단한 루틴을 확립하고 좌석 위치, 거울 설정, 부드러운 페달 작동을 포함한 기본 차량 제어를 마스터합니다.
훈련: 매 운전 전에 루틴을 점검하십시오. 좌석을 정렬하고, 거울을 조정하고, 조명과 신호를 확인하십시오. 조용한 주차장에서 6~8회 부드럽게 출발하고 멈추는 연습을 하고, 재산 경계를 존중하기 위해 표시된 공간 내에 머무르십시오. 좌석과 자세의 물리적 점검을 실시하고, 모든 훈련에서 안전 운전 수칙을 따르십시오.
진도 확인: 각 세션 후 시간을 기록하고, 실패한 시도를 기록하고, 자신감을 1-5점으로 평가합니다. 2주차가 끝나면 5번 연속으로 깔끔하게 정지하고 부드러운 차선 추월 연습을 하여 빠른 평가를 실행합니다.
안내 및 물류: 무료 가이드 또는 본인 차트를 활용하십시오. 공식적인 수업이나 비용 지불은 필요 없습니다. 운전 앱 멤버십이 있다면 데이터를 내보내 검토하십시오. 일정에 약간의 유연성이 있으니, 본인 속도에 맞춰 조정하십시오.
3–4주차: 고급 기술
목표: 더 복잡한 경로와 더 높은 교통 신호에서 압박감 속 관찰력, 의사 결정력, 차선 위치 일관성을 높입니다. 실제 시험의 압박 없이 시험실을 반영하는 시나리오로 이동합니다.
훈련: 적절한 신호와 함께 좌우 회전, 교통 흐름에 합류, 일정한 속도 유지, 제어된 제동으로 세 방향 회전을 연습합니다. 실제 또는 시뮬레이션된 교차로, 주차 기동, 부동산 경계선, 표지판 및 표시에 대한 기억을 강화하기 위해 경로를 짧게 걸어가십시오. 서두르기보다는 꾸준한 속도로 진행하는 것을 목표로 하십시오.
연습 날짜 및 책임: 세 번의 긴 세션(60~75분)과 가이드 또는 멘토와 노트를 비교하는 리뷰 세션 한 번을 계획하십시오. 수업에 참여하는 경우 이 계획을 참고 자료로 가져와 각 시도를 자신 있게 완료하기 위한 단계로 취급하십시오.
최종 평가 및 지속: 신호, 거울, 간격 및 의사 결정에 대한 편안함을 확인하는 자체 평가로 4주를 마무리합니다. 결과를 기록하고, 지속적인 연습 시간을 목표로 설정하며, 실패 위험을 낮추고 이익을 유지하기 위해 줄어들지만 규칙적인 속도로 계속할 계획을 세우십시오. 이러한 단계를 통해 제어 기능을 측정 가능하게 개선할 수 있습니다.


