


Start here with a practical plan for your Forgotten Oakland tour: gather 5 to 7 shots that emphasize the foreground and the long lines of the railroad tracks. Focus on the yard layout and the chevys in the lot, then approximate the date by signage and worker clothing.
Each image carries texture: corroded beams, riveted rails, and threads of smoke. The west side of the yard reveals a foreign container stack next to conventional machinery, a かなり distinct contrast to a modern terminal in town.
When you tour, map the forgotten corners: the yard crane, weather-stained brick, and your note about the approximate era hinted by typography. Write an email brief for each image: location, date range, and the deal that makes the shot memorable.
Maintain a steady rhythm: start at the edge where the foreground meets the tracks, then move toward the long line of rails and a weather-beaten warehouse. The image set should tell a readable story of Oakland’s industrial pulse and its seen details.
If you publish, add context about how the railroad network connected the port to inland towns, and how foreign equipment influenced the look of mid-century yards. Use conventional layouts as anchors to help readers gauge changes over time, and keep the tone here and accessible.
How to Identify Time Periods in Oakland’s Industrial Photos
Begin with the newest images from oakland’s industrial past to date photos quickly. Look for chevys in the yard, note bluesky weather, and read signage along the causeway; these details guide a quick tour and help place a shot in time.
Key cues and practical steps
Use area cues and conventional layouts to place images: look for long sheds, loading docks, rails, and yard machinery. If the scene shows a clean bluesky and a wide causeway, you’re likely seeing a mid-century frame; the absence of modern signage hints an earlier moment.
Vehicles offer a dated signal. Spot chevys, trucks with older emblems, and the paint style on containers to place shots. Signage on a factory header or on crates can narrow the era; some shots even show the word industries, which helps keep the timeline tight.
When a frame includes weather cues or a causeway, use them as anchors. If the action in the yard feels busy, it often points to older work patterns. Check reddit threads and Pinterest boards for comparison, then share what you learn to build a picture of forgotten Oakland.
If you encounter a scene with mixed cues, note the most persistent details: area layout, yard equipment, and the weather look. Some images may seem timeless, yet tiny clues–vehicle models, signage fonts, or wear on a dock–can reveal a window. Then compare with newer or older sets to narrow the range and avoid assuming a single year.
Share a compact set of notes with your tour or gallery page; a nice caption that mentions the area, causeway, and weather helps others see how to date shots and understand Oakland’s forgotten industrial landscape.
Where to Find Primary Photo Collections: Archives, Museums, and Libraries
Start here: the Oakland History Center at the Oakland Public Library is the most practical first stop for original prints and well-kept negatives that capture West Oakland’s industries in action. Ask for accession lists and finding aids to identify items that best illustrate the railroad yards, factory fronts, and street scenes that reveal the surrounding weather and surroundings. If you can’t visit in person, the staff can guide you to here online catalogs and offer approximate dating and context.
What to search for and where to look, organized by type:
- Archives
- Oakland History Center, Oakland Public Library – search terms like “railroad,” “factory,” “West Oakland,” and “industrial.” Request high‑resolution scans when available; opens to researchers on weekdays. Lots of items have nice captions that help anchor time and place.
- California State Archives – state‑level context with city views, industry facilities, and transport corridors that pair well with local shots.
- 博物館
- Oakland Museum of California – local industrial scenes, transit yards, and signage that complement street‑level views from surrounding neighborhoods.
- California Historical Society, San Francisco – Bay Area industrial image collections excellent for cross‑references and threads linking Oakland to nearby settings.
- Libraries
- Bancroft Library, UC Berkeley – extensive California photograph holdings with clear provenance; search for “railroad,” “factories,” “industries,” and “fords” to place Oakland visuals in a wider frame.
- Stanford University Libraries – digitized photo sets on western industry and urban life offer useful context and newer perspectives for comparison.
- Library of Congress – national scope; Prints & Photographs Division includes Oakland‑area railroad and city views that invite foreign and domestic comparison alike.
Access tips and practical steps:
- Call ahead to confirm opens hours, appointment needs, and parking options near each building.
- Use targeted terms: “Oakland,” “west,” “railroad,” “industries,” “shots,” “newest,” and “approximate” dating to surface relevant items quickly.
- Ask staff for finding aids and image rights guidance; many items can be shared in low‑resolution online galleries, while high‑res images may require a fee or a formal request.
Heres a concise path you can follow now: map a tour of the West Oakland surroundings and downtown industrialfronts; here, you’ll find threads that connect local shops, the railroad backyards, and weathered signage to a larger national story. Lets collect a set of image references, compare notes across institutions, and share a curated selection on Pinterest as a way to build a cohesive narrative about Oakland’s past.
Back‑to‑basics checklist to kick off a weekend visit:
- Plan a tour of the archives, then the museums, then the libraries to maximize context and parking options.
- Bring a notebook for provenance notes and a device to view scans posted in catalogs.
- When you find a strong image, copy its image credit and location data; this deal of context helps when you write captions or share finds with others.
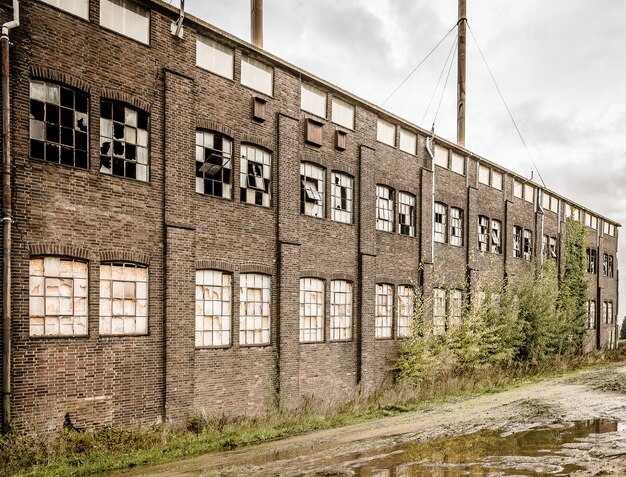
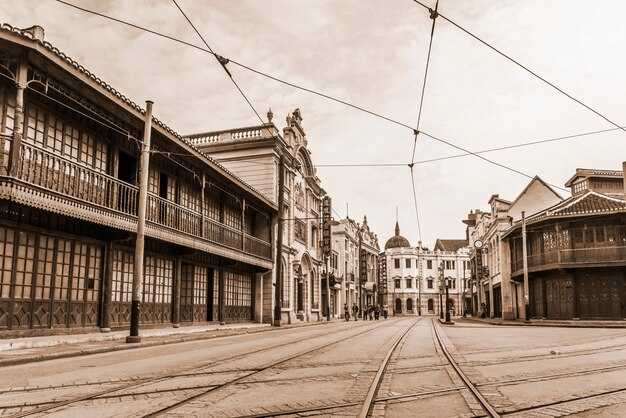
How to Date Photos by Landmarks, Cars, and Industrial Gear
Identify the landmark in the frame first; heres a practical workflow to date forgotten oakland photos: look for a bridge, smokestack, water tower, or factory silhouette in the oakland west area. These cues anchor the time window and point you toward the right era for the captured image.
Landmarks and Surroundings
Let the surroundings guide the timeline. Compare the visible structures with official maps, city records, and historic guides of Oakland’s industrial districts. If you spot a streetcar line or a facade that appeared after mid-century development, you can narrow to a specific span. Since many shots mix elements from different years, lock in the strongest feature first and then confirm with smaller details like signage, pavement, and yard layouts. These details also help you separate local features from foreign signage or styles seen in nearby village areas, which can hint at cross-city influences.
Cars and Industrial Gear as Timelines
Next, date by vehicles and equipment. Chevys in the frame hint at the 1940s–60s, especially with rounded grilles, chrome trim, and certain wheel covers. Look for car badges, bumper shapes, taillight clusters, and side trim to refine the window; if the car appears in a group shot or in multiple shots that show the same yard, use the broader fleet to triangulate the date. Industrial gear adds another layer: gantry cranes, ladder-like masts, belt drives, and visible factory signage imply a particular plant era. Compare with known Oakland facilities in the surrounding area to tighten the window, and note the weather and ground conditions that match seasonality.
When you feel confident, cross-check with crowdsourced knowledge. Look up relevant threads on reddit and mastodon about Oakland’s forgotten yards and west village streets; pin screenshots to a board on pinterest if helpful. These sources often reveal the exact year range or even a specific month. Looking for a repeat motif in the surroundings helps confirm the era. If you want to share your findings, email a quick summary with the key clues and links, and lets others judge the dating.
How to Verify Provenance and Copyright for Vintage Images
First, locate the original credit and archive contact to confirm the source. Look for a photographer’s name, studio stamp, or collection ID on the print, in the caption, or in the catalog entry. For Forgotten Oakland shots of the West area and its surrounding industries, cross-check with city libraries, the historical society, and well-kept catalogs that annotate street names, vehicles, and weather cues. Some shots capture a village-like cluster near the yards, which helps anchor the setting. Gather two independent references to support the provenance. Use approximate dating cues such as chevys in the parking lot, signage, and storefronts visible in the shots to narrow a date range. If you discover a match on public platforms like reddit or bluesky, capture the post and thread details, then compare with the holding institution’s official listing on their site. If the image comes from a tour or exhibit page, follow opens links to the original collection, and copy core metadata: title, photographer, date, location, rights status, and a stable URL. Keep a log that includes where you found each fact and what was verified, then back it up with a local copy of the image or a high-resolution screenshot for record-keeping. This approach gives you a solid trail from the area to the image itself and helps ensure the work can be shareable, then lets you present context clearly in discussions here and on social feeds. This lets you reference bluesky, mastodon, reddit, or other sources while keeping attribution tight.
Provenance verification steps
Check the credit trail in three places: the image itself, the caption, and the holding archive’s catalog. Note names, dates, locations, and any series titles. Compare with other shots from the same rolls in the archive; close similarities in framing or signage help confirm the source. Cross-search these details in local newspapers or city directories since the 1950s to anchor the approximate date. Inspect the physical or digital file for a stamp, watermark, or file number that maps to a specific collection; if the stamp matches a well-kept archive, you can rely on its catalog entry. When you find a match on a platform like mastodon or reddit, save the exact post link and compare the posted metadata with the archive’s record. If the image is part of a public exhibit or a tour, open the link to the official collection page to confirm licensing terms and rights notes. Finally, document every step with a citation in your notes and keep the original image untouched in your local drive.
Copyright, licensing, and sharing practices
Ask the rights holder for written permission to reuse the image or to share it publicly in a project, exhibition, or website. If the holder confirms, record the license type, any restrictions, and the permitted uses. If a license is absent, request a permission letter or negotiate a deal that defines scope, duration, and attribution needs. When sharing on social channels like reddit or mastodon, credit the source clearly and link to the institution’s page or the exact archive record here. In many jurisdictions, historical images may be in the public domain after a certain date or under specific terms; check the museum or library’s policy for works in the area and the photographer’s rights. For researchers, store metadata alongside a high-quality image copy and keep a separate log of permissions and granted rights. If permission requires a fee, discuss a deal that fits your project budget and timeline, then document the agreement and the payment receipt. Finally, maintain a well-kept archive of all correspondence, including if new newest terms emerge or if the rights holder updates policy.
Best Practices for Digitizing: Scanning, Resolution, and Color Correction
Calibrate your monitor first, then scan at 600 dpi for most photos up to 8×10 inches. This keeps file sizes reasonable while preserving important details in the foreground. For originals with fine grain or larger formats, increase to 1200 dpi; reserve 2400 dpi for high-detail textures or very faded surfaces, then save as TIFF.
Scan in 24-bit color and store a master as 16-bit TIFF to preserve the full tonal range. When preparing web-ready versions, convert to JPEG with quality 85–90 and downsample to a width suitable for your platform. Use a neutral color target during scanning to set white balance, then fine-tune in post to maintain realistic bluesky and weather tones. If a color ever looks gone, rely on the 16-bit data to recover tonal range rather than overcorrecting.
Each image benefits from a clear master file and a web copy; keep both versions so you can share or re-edit later. Document the scene context in metadata: oakland locations, weather, surroundings, and action. Include notes about foreground details and any vehicle hints (chevys, fords) that help tell the industrial story. heres a tip: group by locations to simplify sharing. Label files with year_location_subject to ease recall, and set up threads on reddit, mastodon, email, and pinterest to collect feedback. These steps keep lots of shots organized and ready to share, whether you’re touring archives or curating a personal tour of forgotten places.
Workflow steps
1) Calibrate monitors, 2) scan at target DPI, 3) check histogram and white balance, 4) apply color correction using a scanner ICC profile, 5) save master TIFF, 6) export web copies and metadata.
Table of scanning settings by use-case
| Use-case | DPI | Color mode | Output | 備考 |
|---|---|---|---|---|
| Prints up to 8×10 | 600 | 24-bit color | TIFF 16-bit master | Archival; avoid compression; later downsample for web |
| Negatives/color slides | 2400–3200 | 16-bit color | TIFF or DNG | Invert during post; preserve full dynamic range |
| Web sharing | 300–600 | sRGB | JPEG quality 85–90 | Downsample; metadata embedded |
How to Create Accurate Captions and Context for Each Image
Begin with a precise caption that answers who, where, and when, then add compact context about the industries and activities. For example: “oakland, circa 1954, overpass above a yard of well-kept warehouses and chevys under a bluesky,” and note nearby industries like shipping, metalwork, and warehousing. This makes the image useful for readers looking at this era and area.
Pair the objective description with a second sentence that explains significance: mention the types of machinery, signage, and workers, and indicate whether equipment is domestically produced or foreign-made. If you can, identify street or neighborhood landmarks near the overpass and tie the scene to the broader flow of Oakland’s industries during that period. heres a quick rule-of-thumb: keep each caption to two sentences, one objective and one context.
After drafting, format captions with basic metadata: date (circa 1950s or specific year if known), location (neighborhood near the overpass, port area, industrial district), subject (trucks, workers, cranes), and activity (loading, repair, transit). This structure helps readers skim quickly and then dive into the context. When possible, attach a brief, factual note about sources–and share drafts via pinterest or email to colleagues for verification. You can also mirror captions on mastodon or threads to gather input and keep the tone consistent.
Tips for building a tour-ready catalog
Keep captions concise and precise; most images benefit from one strong sentence plus one contextual line. Use language that mirrors archival records: avoid hype and avoid guessing beyond what the image shows. If you mention an era or industry, keep it tied to visible details–overpass lines, bluesky, chevys, and signs on warehouses–so the audience can connect the photo to oakland’s history of industries along the waterfront and rail yards. This approach lets you create a cohesive set of images that invites a closer look, whether you’re browsing these newest additions or a nice collection of era-specific images in a tour of the area.
Ways to Promote and Share the Forgotten Oakland Archive Safely and Responsibly
Heres the concrete starting point: publish a licensing and permissions page on the archive site, with an easy-to-use email address for requests and a simple attribution template visitors can copy. Make the policy explicit: attribution, non-commercial use, and links back to the archive. That keeps most reuse options straightforward, with much care, and opens a clear path for looking users to reuse content while staying within agreed terms; this also reduces back-and-forth on deal terms.
Safe sharing framework
Build a safe-sharing framework that applies to images, documents, and threads about the area. Tag each shot with metadata: title, approximate date, location (city or general area), photographer or collector, and rights info. Use a conventional license like CC BY-NC 4.0 or CC BY 4.0 with attribution, plus a note about sources. These protections help with email requests and reduce misunderstandings.
Offer two tiers of access: public low-res previews to spark interest, and high-res downloads only after consent. Keep the previews to preserve the weathered look of the stock photos; these shots show surroundings and the industrial area. For public previews, there is no harm in showing general locations and yards that are far away from sensitive sites; for more sensitive shots, blur or redact details like exact parking spots or mile markers, and mark them as restricted. Since these images capture real locations, approximate the exact settings to protect privacy–and, where possible, make the context clear to viewers, which helps them understand the history without guessing the specifics. Some notes here may have gone from the yard area, so explain what remains visible and what is hidden to keep things close to reality while protecting sensitive details.
Promote via a curated Pinterest board and a monthly email tour update. The board can feature high-quality images with short notes about the yard and causeway context, along with a link back to the full story. For looking readers seeking context, the board helps them explore the surrounding locations and area, and these pins invite discussion in the threads. You can organize boards by area and by year, so visitors can see the progression of Oakland’s industrial surroundings. This approach keeps most pins generic and safe for broader audiences while still offering a nice entry point for researchers and history lovers.
Moderation and community guidelines
Moderate all submissions actively. Create a simple, public policy that covers respectful discussion and prohibits commercial exploitation of the archive without explicit permission. Set up a short form or email thread for user-submitted shots, with instructions for naming files and credit. If a user wants to post a contributed image, provide a back-and-forth to confirm usage rights; this builds trust with contributors and looks nice in the community. These steps reduce confusion across threads and help keep the area of discussion focused on history rather than speculation.
Keep the process practical: set response time targets (two business days for email requests), maintain backups of all contributed materials, and schedule periodic checks of the interface that handles uploads and metadata. This ensures the archive opens to new visitors yet remains controlled; it also helps maintain weathering and authenticity in the shot catalog.
コメント