
Airport Information - Your Essential Guide to Airports, Flights, and Travel Tips

Plan ahead: keep your trip on track by downloading your airline’s mobile app, loading your schedule, and turning on price alerts. This helps you compare options, pick a good price, and know exactly when to leave so you can arrive at the terminal 2 hours before domestic flights or 3 hours before international ones, with time to spare.
Security lines move, so follow the f-line cues if available; there are signs guiding you to the correct belts. Keep luggage in view, remove laptops at the checkpoint, and place items in the tray to speed through. If you qualify for a loyalty tier, you may get access to a shorter line.
Ground transport options sit outside baggage claim: lyft, taxi, airport shuttle, or rental car. If you need to catch a flight, estimate 20–30 miles from the city center and 30–60 minutes in ordinary traffic; add 15–20 minutes if you’re checking luggage. Compare price and arrival windows, and use your mobile app to book a ride without standing in a queue. For business trips, consider corporate accounts that offer predictable rates and easy reimbursement.
Before you leave home, keep digital copies of your IDs, tickets, and hotel details. When you land, check the airline’s lines for baggage claim and luggage disposition; some airports offer a mobile baggage tracking option. If a mismatch appears, call the airline desk; their agents can rebook or reroute you. Always have a backup plan for other flights in your schedule. If you must move quickly, consider a lyft or taxi to shorten transfer time and avoid missing the next connection.
Airport Information: Your Guide to Airports, Flights, and Travel Tips; Where Should I Go When I Land
Go to the arrivals hall first, grab your luggage, and head to the ground transport area using digital boards and clear signage.
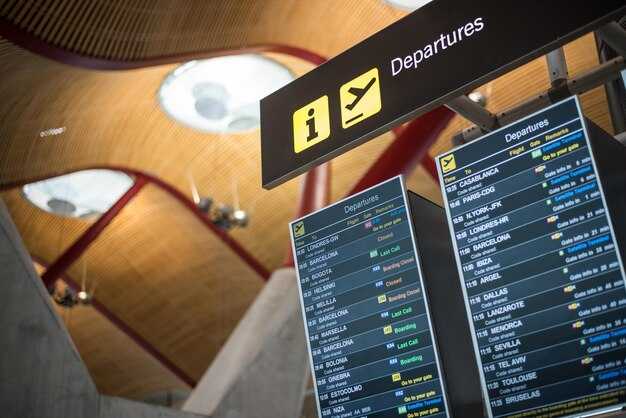
- In the arrivals area, follow the signs to baggage claim. Each terminal groups arrivals by flight, so locate the carousel assigned to your scheduled flight; the display updates every few minutes and saves you from wandering lines.
- Proceed to immigration or customs as directed, and beware that lines can grow during peak seasons. Have your passport, visa (if required), and any required forms ready to speed the process until you clear the checkpoint.
- After you arrive, collect your bags, then verify you have all rented items or gear with the tags intact. If something is missing, visit the help desk near the exit of the baggage claim area.
- Choose your transport: taxi, ride-share, or train. Fare estimates vary by destination; plan for approximately $20–$40 to most nearby cities, and consider a shared ride for substantial savings.
- For island destinations or delta ports, look for ferry connections in the airport’s transport section. Taking a ferry might cut travel time compared with road routes and is often cheaper in off-peak seasons.
- If you prefer a hotel stay, Hyatt properties near the airport commonly offer 24/7 shuffle service and day-use rooms. Check the desk or your mobile for the earliest available shuttle from the south terminal if applicable.
- Carry a digital wallet and keep important passes accessible. You can use it for boarding passes, hotel keys, or transit cards, which helps you move without fumbling for cash or cards.
- Sign up for email alerts from the airport or airline to get updates on gate changes, late arrivals, or service advisories. Such notices save you time when your journey changes direction.
- Travelers with a tight schedule should map three quick options: one for rail, one for taxi, and one for rideshare. This preferred plan covers most scenarios and keeps you from getting stuck in a single route.
- Plan for morning arrivals by checking peak wait times; mornings usually offer shorter lines, but special events can alter the rhythm of the service.
- Note the station layout: most airports have a main station for regional trains and a separate one for long-haul or intercity services. If you’re not sure, ask at the information desk–this is your источник of truth for directions and station maps.
- Move to ground transportation zones in a single, organized route: arrivals → baggage claim → customs/immigration → transport. This section helps you cover the three main stages of the first hour.
- Keep your wallet secure and your belongings monitored, especially in crowded areas. If you rent a car or scooter, verify insurance details and return policies before you leave the rental desk.
- For a smoother journey, check for gate-to-station signage and plan to walk or use an electric shuttle between halls. Some airports operate three levels of service with signage that points to shared ride zones, rental desks, and hotels nearby.
- During longer layovers, stock up on essentials at the airport shops or lounges. Barts lounges and other business lounges often offer fast Wi-Fi, charging stations, and beverages to pass the time without leaving the terminal.
- Finally, review your plan before you depart: estimate time, confirm fare and transport options, and note the approximate travel time to your hotel or meeting venue. Your journey begins the moment you land, and a clear plan keeps you moving with confidence.
Choosing the Right Airport for Your Trip
Your first step is to choose the airport that minimizes your total door-to-door time. Start from your home or hotel, map the drive or train ride to each option, then add the return leg to see which choice saves you the most minutes. Youll compare security lines, terminal layouts, and how easy it is to pick-up a ride after landing by checking google on your phones for current times.
Balance flight options with ground transport. A smaller airport can mean shorter parking and fewer crowds, plus you may access faster pick-up options like shuttles, vans, taxis, or a limo. If trains connect directly to your destination, count that as a major plus; some hubs have light rail or intercity trains that drop you near sights or your hotel. If your plans include a southbound city, compare routes that minimize road time and transfers. Some travelers heard that bigger hubs always win, but independent data shows smaller airports can save minutes.
Create a simple plan and book early. Use your planner to compare options across airports, and search google for live pickup times and status. If you want convenience, book a ride with jayride or a trusted operator; many people prefer a clean limo or roomy vans service. When you book, ask for a confirmed pick-up location and keep the driver’s number in your phones. If you hear about a better option, you can switch to a new booking and still be booked on your trip.
After landing, consider how you’ll move from the airport to your sights and plans. If you’re traveling with a group, you may prefer taxis or vans that handle luggage; for solo trips, a quick ride-share or shuttle can be enough. Absolutely plan for back-up options in case of delays. The more you know about additional routes, the smoother your return journey will be, and you’ll start your day with confidence–backed by clear times, from first step to final goodbye.
Understanding Terminal Layouts and Transfer Options
Pick-up zones and exit signs on the terminal map guide you to the fastest transfer. The available shuttles pull up at designated bays every 5–12 minutes, and shared vans offer cost savings if you’re traveling with others. For a faster option, taking private vans or taxis can save time, but the charge is higher. Early arrival lets you compare options on the digital boards and, plus, have time for a quick stroll to see nearby sights, which can be amazing.
That plan helps you control your transfer experience. Check the listed pickup points, tell yourself which option fits your needs, and keep a card ready for quick payment. youll find right signals and pick-up instructions there, and you’ll never miss a step. karl from the information desk often suggests confirming the exact pickup zone before you walk there; if you cant locate the queue, tell staff for directions. youll drive less and wait less, which means time saved for your trip.
How to choose the best option
- Shuttles: time estimates are posted on digital boards; choose by destination and time, then wait at the correct bay.
- Shared vans: best value for small groups; be ready at the pickup area and know the stop order to avoid looping over terminals.
- Private vans or taxis: fastest door-to-door option; confirm charge or meter before boarding.
- Rail or cable connections: some citys hubs offer rail links that can cut travel time; compare with shuttles to maximize value.
Check-In Fast: Online, Kiosks, and Mobile Passes
Start with online check-in as soon as you purchase your ticket. Use the official airline site or partner app to enter your name and booking reference, pick a designated seat, and save a mobile pass to your phone. After you check in, you can simply scan the QR code at security or board directly with the mobile pass. If you need to cancel, do it online to avoid airport fees. Traveling with a partner? Check in together and link seats for a smoother entry. For citys transfers, check-in timing varies with transit options between hotels, shuttles, and trains. If you paid by cards, ensure the name on the card matches the booking. Use google to estimate transit to the airport, including options like airtrain or city trains, and keep an eye on budget vs fare options.
Choose your path: Online, Kiosks, or Mobile Pass
Online check-in lets you grab seats, add bags, and obtain a mobile pass before arriving. Kiosk check-in sits near the counters and prints or loads the pass directly. Mobile passes stay in your wallet and work at security and gates; some carriers support Apple/Google Wallet. Each path runs at different speeds; online often saves time when you travel light; kiosks work well if you arrive close to departure; mobile passes offer the fastest flow when you’ve already completed baggage prep. In all cases, keep your purchased boarding pass handy and head to the designated bag drop if you have luggage.
| Method | Steps | Pros | Notes |
|---|---|---|---|
| Online Check-In | Visit the official site or partner app; enter name + booking; pick seats; download mobile pass | Save time; easier seat selection; reduces queue at gates | Best for light packs; verify baggage rules before purchase |
| Kiosk Check-In | Locate kiosk near counters; scan booking reference or passport; print boarding pass or load digital pass | Great when you arrive close to departure; no mobile device needed | Need ID; may require printer if not loading pass digitally |
| Mobile Pass | Receive QR code; save to wallet or device; present at security and gate | Fastest flow; no paper | Keep battery charged; have an offline backup |
Get ready to move quickly
Keep boarding passes, government IDs, and the card used for purchase accessible. If you need to adjust bags, check the fare and head to the designated counters. For changes, use the official site or kiosk rather than waiting in line. If you must head to a distant gate, review transit options such as shuttles or airtrain and pick the fastest route using google maps. Traveling with a partner helps–move together to boarding zones and maintain your pace through security.
Security and Clearance: Documents, Packing, and Queue Tips

Place your passport, ticket, visa, and any needed ID in a designated pocket on your carry-on for quick access; keep a digital copy on your phone as a backup.
Documents to carry include either passport or national ID, boarding pass, visa, vaccination record if required, and travel insurance; check the needs of your destination and any return requirements.
Packing rules: liquids must be in containers of 100 ml or less and fit in a single transparent bag (approximately 1 quart); place the bag in an easily accessible spot for screening.
Queue strategy: arrive early to avoid long lines; there are designated security lanes; follow signage and instructions; know which departure to pursue so you don’t miss your gate.
While screening operates, have your tickets and ID ready; remove bulky items like belts and laptops; having a clear, ordered setup helps the lines move faster.
Transit and tips: call the airport information line for updates; if you use bart to reach the terminals, map your route beforehand; yellow signage usually marks security checkpoints and designated lanes; here you can switch to the correct line.
Returning travelers should carry a planner with your needs and a designated checklist; depending on peak hours, wait times can be moderate and roughly average; plan to arrive roughly an hour earlier to catch your departure.
Baggage Rules: Carry-On vs Checked, Weight Limits, and Fees

Carry-on advice: bring one bag that weighs approximately 7 kg (15 lb) or less and one personal item that fits under the seat; this combination covers most domestic and many international flights. Verify your carrier’s exact limits before you head to the airport, as rules vary between partner airlines and transfers. For families with children, keep essential items in the personal item for easy access during the trip and at the gate. If you’re headed to the airport with children, pack accordingly.
When deciding between carry-on and checked, consider the route, length of stay, and fare type. For four-day or multi-day trips, a single checked bag can reduce clutter, but pack light in your carry-on to speed your return through security and to your parking area. If you must check a bag, choose a single bag up to 23 kg (50 lb); a second bag adds fees and may require help from designated baggage services. If you need transfers to a different terminal, Jose at the information desk can direct you. For additional help, ensure your luggage is labeled with your contact information and a yellow tag for oversize items at the counter.
Carry-On Size and Personal Item Details
Size guidance: most lines enforce a max carry-on length plus width around 42 linear inches (106 cm) total, with a height under 22 inches (56 cm). Weight check after packing helps you stay approximately within 7 kg. Use your personal item for documents, meds, and a compact snack, so you can access them directly at the gate. If you’re headed to a limo pickup or another transfer, keep travel documents and wallet in the personal item for quick access at the designated pickup area near parking.
Checked Bags, Fees, and Practical Tips
Fees vary widely: the first checked bag on domestic routes often starts around $30-40, with international routes typically $60-120; each additional bag or overweight item can push fees higher. Oversize or overweight bags may incur charges of $100-200 per bag and may require special handling, which yellow tags help identify. Plan around your needs: multi-day trips or longer stays may require more gear; if so, prepare for higher fees and check whether your partner airline offers a bundled option. If you cancel a plan, or if your itinerary includes transfers between airports, verify whether your prepaid baggage allowance remains valid with the new carrier and services provided by the designated desk. Parking areas and baggage claim will direct you back to your car or return transit path, so keep the receipts and proofs of payment handy for smooth return.
Arrivals Process: Customs, Immigration, and Baggage Claim
Proceed directly to the immigration counters as soon as you land, with your passport and arrival form in hand to speed the process. This is the best starting point for a smooth arrival, setting you up with enough time to enjoy the first sights of the city.
Tell the officer if you have any changes to your travel plans, and answer basic questions clearly. This experience usually lasts a few minutes per person, but queues can stretch during peak hours. Having a calm plan and using a planner helps you move ahead with confidence and time to spare for weather delays.
Head to baggage claim after immigration. Use the screens to find your flight carousel, grab your bags as soon as they appear, and check that the tags match. If your luggage has not shown up after a while, visit the service counters for help; they are reliable and can start a trace. theres always enough staff near the exit to tell you where to go, and light signage keeps you on track.
At customs, follow the signs and choose the appropriate path. If you have nothing to declare, go through the green lane; if you must declare items, use the red lane. Declared items such as electronics, foods, or plants require a quick scan, after which officers tell you to proceed. Having receipts for major purchases helps to speed this step.
From the arrivals area, you can take direct trains, rides, or taxis to the city. Check the current hours and price at counters or on the airport app. Tickets are available ahead of time, and you can often buy them here for convenience. If you are taking multi-day plans, a planner can map the fastest route, whether you are heading to known sights or planning a quick return later. Weather permitting, you can grab a scenic ride that skips traffic and gets you to your hotel quickly. This guide helps you stay on track.
From Airport to City: Ground Transport Options and Timing
Take a taxi or rideshare from the arrivals area; it's the fastest and easy route to the city center, with travel times around 20–40 minutes and a charge around $25–$50 depending on weather and traffic. youre likely to see curbside drivers waiting with signs; payment can be made by card or cash.
Shared shuttles offer lower price per person and usually require one or two stops before the city center; you can book online or at a desk, and the driver loads your luggage.
Rail options and the f-line streetcar connect to major districts. From the airport, trains or the bus to the rail hub run every 10–15 minutes during peak times; you can pay with a card or use a mobile wallet. In jose, these lines run regularly, with the number four bus as a common connection to the downtown rail hub.
Parking and transfers: If you drive, use long-term parking and plan for 15–30 minute transfers to the terminal; parking rates vary by lot, and wait times can increase on holidays. If youre traveling with children, consider a direct taxi or rideshare to minimize waiting.


