Una guida pratica al lato brasiliano delle cascate di Iguazu
advice: arrive before 9 am to enjoy cooler temperatures and clearer viewpoints on the Brazilian side. If you have arrived, head straight to the upper decks to catch the spray without long lines. Plan your route to maximize short walks between shaded spots and bring a light backpack with sunscreen and a microfiber towel.
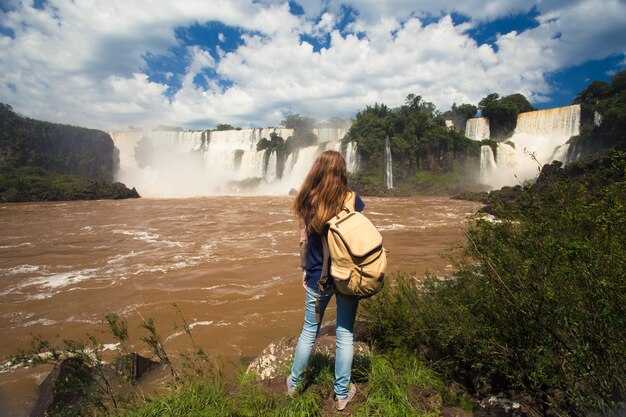
Find your base: The belmond Hotel das Cataratas on the Brazilian side offers easy access to the park entry. If you lean toward budget options, frequent hostels around Foz do Iguaçu keep daily costs reasonable. michaela, an australian traveler, says a flexible plan and conversation with staff unlock quiet paths after rain. bring an amount for local taxis or shuttle buses, and reserve a couple of hours for a relaxed morning walk.
What to wear and pack: Wear sturdy shoes with grip for slippery stones. dont forget a lightweight rain jacket; the spray from the falls sticks to everything. Pack a compact poncho, bottled water, and a small power bank for photos. A daily plan helps you hit viewpoints in the best light, especially as temperatures rise.
Plan your route: Start at the main Brazilian circuit and work your way to the Garganta do Diabo overlook. Use the park shuttle to hop between trailheads, especially in peak heat. Look for wildlife, like toucans and coatis, along shaded stretches. A well-timed visit in the morning or late afternoon yields better lighting for photos.
Practical tips: Bring protection for cameras; the spray can fog lenses. dont rely on data connectivity in the park; download offline maps beforehand. The amount of walking is moderate but stairs add up; take breaks and hydrate. Consider a late-afternoon viewpoint, when temperatures drop again and mist creates rainbows.
Best Time to Visit the Brazilian Side for Garganta do Diabo Viewpoints
Plan your visit for May or September and start before 9 a.m. to catch Garganta do Diabo viewpoints on the Brazilian side with soft light and thinner crowds.
In these dry-season months, the wide catwalk stays dry, the air is comfortable, and visibility is best for photography. If you come in summer, be ready for higher humidity and occasional showers that heighten the mist and create dramatic portraits; the views remain powerful, especially in early morning light or late afternoon when the land and forest contrast most.
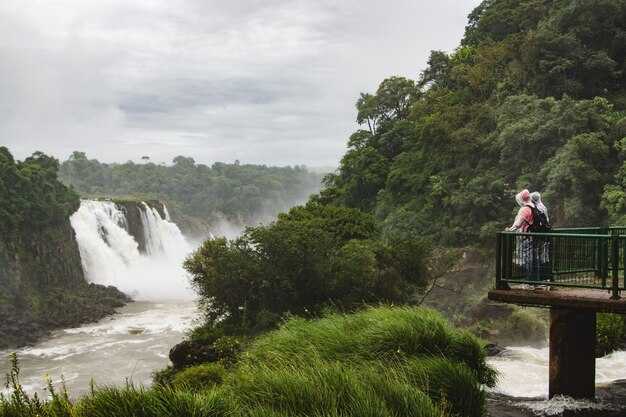
weve found that morning visits pay off: over the years, travelers have learned to optimize timing by starting early; weekdays are generally calmer; backpackers and local guests mix with day-trippers on weekends, but the quieter hours are still present. To simplify logistics, use rideshare from town to the park entrance, a reliable means to avoid parking hassles. On-site facilities provide a simple lunch option at the gate, but for a fuller meal you can purchase in town or at a nearby mall after your visit. wifi coverage is strongest near the main plaza; along the main catwalks it can be spotty, so download offline maps in advance. At the gate you obtain a map and can purchase tickets online to start smoothly. The Garganta route on the Brazilian side is wide and well-maintained, with viewpoints that place you between the spray and the forest land; some overlook on the opposite bank offer a different perspective if you plan a separate day trip to the Argentine side.
Timing and viewpoints
- Start early: aim for 7:00–9:00 a.m. to beat crowds and catch the best light.
- Prefer May or September for lower rainfall and comfortable temperatures, with strong water flow still present.
- Choose weekdays when possible; weekends draw backpackers and families, increasing crowding at key lookouts.
- Check the weather and park alerts the night before; morning mists can affect visibility if you start too late.
Practical planning
- Wear sturdy shoes for a wide, well-maintained path that remains mostly flat but can be slick after rain; plan for tiny spray droplets on skin and glasses.
- Pack light rain gear, sunscreen, and a small backpack; dorm-style hostels around town offer budget options if you’re traveling with a group.
- Purchase tickets online in advance to start your day smoothly; at the gate you can obtain a map and you’ll see coverage updates on-site.
- Use rideshare means to reach the entrance; it’s a common, cost-effective option for solo travelers and groups.
- Be mindful of wifi coverage: stay offline with maps if the signal is weak on the trails; download the route beforehand.
- Consider adding a second day to explore the Argentine side for a fuller variety of viewpoints between the two countries.
Getting There: From Foz do Iguaçu to the Brazilian Park Entrance
Book a private transfer or use a reliable taxi to reach the Brazilian Park Entrance quickly. From Foz do Iguaçu to the entrance, expect about 25–30 km of road, 30–45 minutes in light traffic; peak times can stretch it to 60 minutes. If you arrive via the IGU airport or other area airports, a pre-booked shuttle or taxi offers door-to-gate service, saving you stops and backtracking. Here’s a practical approach that keeps everyone on track.
Two solid ride options: private transfer or public bus
Option A: Private transfer. A driver waits in the arrivals hall at IGU or at your hotel and delivers you directly to the Park Entrance. Expect to pay around R$80–120 one way, depending on your hotel location and traffic; it’s better to pay a bit more for reliability, especially with kids or a lot of gear. If you’re traveling with others, the per-person cost drops and the space helps you pack everything you need. Passengers appreciate the convenience after travel, and the driver can stop for a quick photo along the road if you ask.
Option B: City bus. From downtown Foz, Bus 120 Cataratas runs roughly every 30–40 minutes and stops at the park gate. The ride takes about 60–75 minutes and costs around R$5–7. Board at the Terminal de Ônibus or at major urban stops; you’ll avoid parking hassles but share the ride with other passengers. If you missed the first bus, there are later departures–check the current timetable at your hotel or the terminal; plan to arrive early to beat the heat and crowds. Instead, if you’re on a tight budget, this is a better choice for the day.
There, crossing to the argentinean side is optional but can be a good complement in a full day. If you decide to cross, bring your passport and be prepared for customs checks; plan a separate entry and exit window, and note that afternoon temperatures can rise a few Fahrenheit degrees. If you want to explore ciudad neighborhoods on the other side, do it after you finish here and return for the Brazilian gates.
Practical packing and planning: pack light, leave bulky bags at the hotel if possible, and carry a small water bottle; the weather on the Brazilian side is sunny most days. In summer, temperatures often peak in the 80s or 90s Fahrenheit, so sunscreen, a hat, and a light jacket for cooler mornings help. The entry plaza is a short walk from the bus stop, but you’ll do more walking inside the park beyond the gate. Here, the shortest walk from the gate to the main outlooks takes about 15–25 minutes. If you’re touring with kids, pace yourself and add rests; everyone benefits from a relaxed rhythm. Create a simple itinerary list to guide your day, then review it at the bus stop to learn about current conditions and time windows, and leave some buffer for unexpected stops with others who share tips and plans.
Finally, a quick note to add to your plan: begin at the entrance, buy tickets, and consider the electric train for faster access to the most famous viewpoints on the Brazilian side. The vistas are amazing, and mornings offer softer light for photos. If you want a special day that blends park scenery with city culture, this route is worth the effort. The plan is straightforward, practical, and designed for smooth travel; by following these steps, you’ll avoid delays and enjoy the falls with less stress.
Ticketing, Parking, and Entrance Logistics for Garganta do Diabo
Purchase tickets online in advance and select an earlier time slot to make the visit easier and to avoid crowded queues during peak months.
Ticketing options on the official site include single-entry passes and combination experiences. Price varies by age and country of residence, with exchange rates available at checkout. The site accepts cards and cash, and the counter at the entrance can process exchanges for nearby networks if necessary.
Parking near the entrance is limited. Lot A sits closest to the Brazil-side entry, while Lot B is about a kilometre away along a walkable path. Expect hourly rates, with payment possible at the booth or via a mobile app. Plan for 1–2 hours if you want to explore both circuits and the lookout points without rushing.
Entrance logistics place you at a controlled gateway for Garganta do Diabo. Gates open early and close in the late afternoon; bring only essential belongings to speed checks, as staff conduct standard security inspections. Have your requirements ready–photo IDs, tickets, and any permitted tech–while keeping belongings compact to avoid intrusive lines. Use the main walkway and circuit route to reach the famous lookout without backtracking.
Local guidance from avid visitors adds value: Silva, a guide from Barroso, suggests starting at the lower circuit lookout to catch the best light, then following the walkways along the main circuit. The route is walkable for most guests, with a comfortable kilometre-scale stretch between lookouts. After the falls, many travelers enjoy a relaxed dinner nearby before departing for the airports or hotels in the country.
| Categoria | Recommendation | Note |
| Ticketing | Book online; choose morning slot; print or save on phone | Price varies by country and age; exchange available at counter |
| Parking | Use Lot A near entry; Lot B is a short kilometre walk | Pay hourly; app or gate; plan 1–2 hours |
| Entrance | Arrive early; carry only essentials | Security checks are standard; lookouts along the walkway |
| Consigli | Bring water, wear walkable shoes, consider a dinner stop after | Avid photographers will appreciate early light; Silva recommends route via lower circuit |
The Main Trail: Distances, Prime Viewpoints, and Walking Time to Devil’s Throat
Start at the entrance and walk directly toward Garganta do Diabo; this one-way segment conveniently sets you up for the final platform and definitely feels efficient for most visitors.
Il sentiero principale per la Gola del Diavolo si estende per circa 2 km a tratta, con un ritmo confortevole all'aperto che richiede circa 40-50 minuti di cammino. Se hai intenzione di soffermarti su ogni punto panoramico e scattare molte foto, calcola 60-90 minuti per l'intero avvicinamento alla piattaforma finale.
Punti di vista privilegiati e l'arco pedonale
Dopo circa 0,7–0,9 km, il primo punto panoramico offre un'ampia vista sulle cascate inferiori e sullo spruzzo che crea arcobaleni in condizioni di luce intensa. Proseguendo per altri 0,5–0,6 km si arriva a una piattaforma a metà percorso con un panorama più ampio sul fiume e sulle sponde boscose.
La piattaforma finale della Garganta do Diabo arriva a circa 2 km di distanza, offrendo la vista più alta ed esilarante a distanza ravvicinata della cascata a ferro di cavallo. Questo è il momento alto e drammatico che tutti fotografano, con spruzzi nella brezza e una scala drammatica che fa sembrare il resto del sentiero degno di essere percorso.
Lungo il percorso troverete sedili e punti ombreggiati per riposare, rendendo la passeggiata più confortevole per le famiglie e per chiunque sia consapevole del caldo o del sole. Per esigenze di mobilità, chiedete al centro visitatori informazioni sull'accesso assistito da ascensore alle terrazze superiori; alcune sezioni offrono accesso tramite rampa o percorsi alternativi al ponte principale.
Che tu visiti al mattino o al pomeriggio, l'ombra e i posti a sedere ti aiutano a mantenere un ritmo costante. Dai punti panoramici, vedrai il fiume estendersi verso nord-ovest e la giungla circostante, con possibili avvistamenti di fauna selvatica durante le ore più calme. Cerca i cartelli in spagnolo e portoghese che indicano le distanze e tieni a portata di mano le mappe per un piano dettagliato delle tue tappe specifiche. Se ti senti pieno di energia, ogni punto panoramico diventa un'attività all'aperto, trasformando il percorso stesso in una breve escursione.
Questo piano è tuo, da adattare al tuo ritmo e ai tuoi interessi. Se ti trovi in zona, i ristoranti nelle vicinanze offrono spuntini veloci prima o dopo la passeggiata; se hai fretta, puoi accorciare il percorso tornando indietro dopo il primo o il secondo punto panoramico e comunque catturare i punti salienti essenziali.
Cosa indossare e cosa mettere in valigia per le passeggiate nella foresta pluviale
Inizia con pantaloni o pantaloncini ad asciugatura rapida e una giacca impermeabile e traspirante; indossa scarpe robuste chiuse con una buona presa. Se prevedi un trasferimento in bici o un breve tragitto tra i punti, scegli calzature con una vestibilità sicura e porta dei guanti.
Vestirsi a strati aiuta: uno strato base traspirante, uno strato intermedio leggero e un guscio antipioggia compatto. L'abbigliamento dipende dalle previsioni e dalla tua tolleranza all'umidità; le mattine sono più fresche e possono risalire rapidamente alle altitudini più elevate. La pioggia può arrivare velocemente, quindi preparati.
Cosa mettere in valigia
Dall'ingresso, porta uno zaino da giorno da 8-12 litri con una sacca stagna per l'elettronica. Metti nello zaino una borraccia o un sistema di idratazione; punta ad almeno 1,5 litri per una camminata di 60-90 minuti.
Protezione solare: cappello, occhiali da sole, crema solare. Protezione dagli insetti: repellente. Protezione dalla pioggia: poncho o giacca antipioggia leggera se il tuo zaino non ha una copertura.
Custodia impermeabile per telefono o fotocamera; batterie di ricambio; una barretta energetica per l'energia.
le terme sono vicine, quindi porta un asciugamano se c'è l'intenzione di visitarle dopo la passeggiata.
Portare contanti in pesos per le aree di confine; la maggior parte degli acquisti all'interno del parco accetta carte, ma alcune bancarelle si affidano al contante. Per alloggio e pasti, ci sono hotel e ristoranti nelle vicinanze; pianificare di conseguenza.
I visitatori nazionali e internazionali possono organizzare trasferimenti e taxi fuori dall'ingresso; gli orari di apertura variano a seconda della stagione. La maggior parte dei circuiti dura 60-90 minuti; ci sono giorni di punta, quindi prevedete qualche minuto in più per punti fotografici e punti panoramici.
Consigli per la fotografia: catturare le cascate di Iguazu dal lato brasiliano
Dirigiti verso l'area del porto alle prime luci dell'alba per una spruzzata frizzante e una luce calda sulla piattaforma del salto; tieni pronto un obiettivo veloce e asciuga frequentemente l'umidità dal filtro per mantenere i bordi nitidi sulla nebbia. Sviluppa abitudini di ripresa: controlla la luce ogni pochi minuti e spazza la scena prima di impegnarti, in modo da non perdere un arcobaleno fugace.
Sul lato brasiliano, i sentieri hanno angoli di visuale limitati, quindi pianifica un circuito di 60-90 minuti per coprire i principali punti panoramici e i sentieri interni della volta forestale. Controlla gli orari aggiornati del parco e le partenze per allineare il tuo programma con i momenti più tranquilli; la data e il meteo influenzano i riflessi e le condizioni generali possono cambiare rapidamente. Se stai combinando viaggi alle missioni, coordina attentamente, ma rimani flessibile per evitare folle invadenti. Usa questo come base per pianificare il tuo percorso per massimizzare la luce solare su ogni panorama.
All'interno del parco, la folla può essere invadente vicino alle piattaforme principali; cerca di scattare subito dopo un getto a spruzzo, quindi addentrati nei rigogliosi bordi per inquadrature intime vicino all'acqua. Presta attenzione alla fauna selvatica lungo i bordi, compresi i gatti. Il parcheggio è comodo vicino all'ingresso, ma torna indietro prima che la folla delle navette raggiunga il picco; avrai trovato angoli sorprendentemente tranquilli lungo i sentieri laterali e sarai contento di aver indossato scarpe comode per proteggere i tuoi piedi.
Tempi migliori e punti di osservazione
La luce migliore si verifica dopo l'alba; dal punto di vista del salto potrai ammirare un arcobaleno mentre il sole sale. Da alcuni punti panoramici, potrai vedere enormi vedute della cortina d'acqua, per poi spostarti lungo la passerella per inquadrare le cascate mentre gli spruzzi si fanno strada attraverso la foresta. Per silhouette estremamente drammatiche, trattieniti fino a tarda mattinata e di nuovo nel tardo pomeriggio, quando le ombre si allungano lungo la cascata. Considera un secondo passaggio sull'anello interno per catturare nastri d'acqua tra gli alberi. Nel complesso, scegli un paio di punti chiave e usa un treppiede leggero per evitare oscillazioni sulla passerella, lasciando sempre spazio per inseguire gli spruzzi mutevoli.
Attrezzatura, impostazioni e pianificazione
Usa un obiettivo grandangolare (16-35mm) per i panorami e un medio tele (70-200mm) per i dettagli ravvicinati delle cascate e delle aure nebbiose. Imposta l'esposizione intorno a f/8–f/11 e ISO 100–200; per un effetto seta sull'acqua, prova 1–2 secondi con un treppiede robusto, oppure passa a tempi di scatto più rapidi se il vento sposta gli spruzzi. Un polarizzatore aiuta a ridurre il riflesso nei giorni luminosi e un filtro a densità neutra estende le tue lunghe esposizioni. Scatta in RAW e usa app per mappare i percorsi, controllare il parcheggio e tenere traccia delle finestre di data/ora e delle partenze. Se soggiorni nelle vicinanze, una finestra di 2-3 ore si adatta a un ritmo rilassato; per gite adatte alle famiglie, mantieni i segmenti brevi e prevedi un'opzione di lusso per un soggiorno di lusso nelle vicinanze. Se abbini viaggi alle missioni o combini viaggi, troverai più scenari e meno attese. Concludi con un rapido controllo dei piedi: fai un passo indietro per valutare la scala e proteggere la tua attrezzatura dagli spruzzi.


