
Grace Mykonos Photography - Stunning Hotel Photos & Island Views


To anchor the article, start with a single, sunlit terrace shot that embeds the hotel's limestone tones with the Aegean glare. This bold choice yields a concise report of what Grace Mykonos Photography can deliver: crisp lines, natural textures, and a clear sense of place. It also provides an embedded reference point readers can revisit as the gallery expands.
Frame and caption strategy keeps readers engaged. For each image, present a description of location, lighting, and purpose. Use consistent means–tight crops for interiors, wider angles for sea context–to build a cohesive narrative throughout the piece. A concise, necessary caption helps editors pull quotes and captions quickly.
Schedule and timing: plan shoots on tuesday and wednesday to capture dawn and late-afternoon colors. Allocate minutes for each setup: six to eight minutes for terrace frames, three to five minutes for detail shots. Keeping sessions small helps maintain energy and continuity throughout the day.
Locations and context: Grace Mykonos sits near several towns, offering a diverse backdrop. Include shots from Mykonos Town, Ornos, and Psarou to contrast built spaces with open sea. Pay attention to little details–textured linen, sun-bleached wood, and glass reflections–that make the imagery feel less sterile and more welcoming throughout the sequence.
Credits and provenance: credit photographer tsiplakis for the on-site frames, and include a short line in the description to locate the shot. If the client provided notes in июня, we received feedback and integrated changes. This transparency helps editors understand decisions and keeps readers informed.
The result is a compact package that works across platforms: hero images for the hotel page, supporting frames for social, and a clean narrative that makes readers feel the sun and salt, not just a log of shots. Grace Mykonos Photography pairs precision with warmth, guiding you from the terrace to the water's edge in a few minutes more than once.
Capturing Grace Mykonos Hotel Interiors: Framing Rooms, Lobbies, and Amenities for Guests
Start with a clear framing plan: map Grace Mykonos interiors into three visual stories–rooms, lobbies, and amenities–and shoot to create a cohesive flow across images. Use the provided light from each balcony to shape color, and keep quick adjustments ready for changing conditions in august when island light shifts. For america guests, keep the rhythm simple and relevant. The дата in the brief anchors the schedule and helps you align with events in town.
Rooms: frame symmetry around the bed and window, then pull back to reveal the balance of furniture and space. Shoot at two heights–eye level and a lower angle–to expose ceiling lines above. Use a 35-50mm lens to keep interiors natural, and treat the balcony as an extension of the room with island views. For each item in the frame, keep clutter to a minimum and let light define contrasts; if the west-facing wall glows at golden hour, adjust white balance to preserve warmth. Pass on distractions, and plan four focal points you want to show in every room.
Framing Techniques for Interiors
Lobby shots focus on entries, scale, and the flow from street to reception. Start at the main entrance, sweep toward seating clusters, and include a glimpse of the corridor toward the port beyond. Use a wide-angle but mind perspective lines to avoid distortion; capture a grand chandelier or above-eye-line architectural details while keeping people as supporting elements. If theres live events in the evenings, shoot a quick sequence that hints at what guests experience, and whats infocus for guests; reference what you saw on relevant sources and websites for consistency. Great light transitions here help the space read as welcoming to guests and press alike.
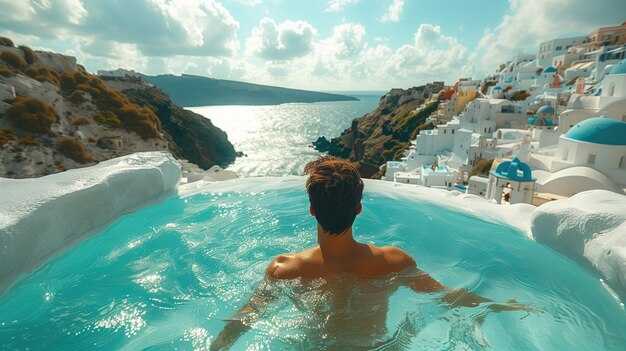
Amenity spaces spotlight the cocktail bar, pool deck, spa corridor, dining area, and private lounges. Show a bartender serving a cocktail, a guest gazing toward the island, and the balcony edges with the sea beyond. Frame above the bar to reveal textures above and below, then switch to a lower angle for table details or tile patterns. Use the same four angles in each space to maintain cohesion, and keep the tempo fast so you can deliver quick selections to the client. The overall mood should feel welcoming for happy guests and easy to share on social and on trade pages, whether you’re serving america audiences or international readers; theres a clear, true sense of place here, and soon you’ll see the gallery take shape. This approach is great for websites and trade publications alike, and it helps you meet client preferences with confident, consistent imagery.
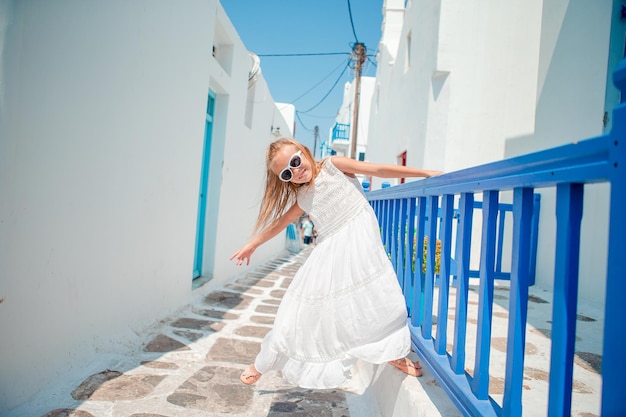
Showcasing Island Views: Best Angles for Aegean Seascapes, Windmills, and Whitewashed Streets
Start with a dawn shot from kalafatis Beach: set the camera low, 0.5 m, and frame the sea along the lower foreground while windmills rise on the horizon. This direct, targeted approach yields a memorable opener for island views. It also creates a beautiful, cinematic balance between sea and light.
Knowing the light path lets you plan each frame: golden hour on Mykonos typically starts about 60 minutes before sunset in summer, and a polarizer boosts blue skies without blowing out whitewashed walls. Maintain a right-side angle to reduce glare on sunlit walls and to emphasize texture. Build a shot list across seascapes, windmills, and street scenes for a cohesive story of the island. Collect отзывa from clients after shoots to refine your approach. When planning, keep away from clutter and avoid including heavy objects (объекта) in the foreground.
Angles and Compositions
- Seascapes at Kalafatis: horizon on the upper third, foreground texture like wet sand or a boat wake, and a line that leads toward the windmills.
- Windmills: shoot from a slightly lower angle with 28–70mm, capturing the blades against a warm sky or in silhouette at sunset.
- Whitewashed streets: shoot along narrow alleys from a corner angle, use doors and arches as frames, and seek repeating patterns of white with blue accents.
- Poolside scenes: frame reflections in glass or water, add a splash of color from towels or fruit, and a pinch of spice with a red napkin for warmth.
- Where people appear: feature a simple dinner setup or a street moment to show scale and life, avoiding crowding the frame.
- Detail shots: door handles, stone textures, and balcony railings enrich the gallery with close patternsbuttonspin details.
Practical Tips and Timing
- Arrive via the airport, scout the best angles within the first hour, then return at golden hour to refine lighting.
- Lens choices: 16–35mm for seascapes, 70–200mm for windmill clusters, 50mm for street textures.
- Use a plugin to batch-edit color and contrast; aim for natural saturation that preserves the white of walls and the blue of the Aegean.
- Keep a review workflow: tag shots by categories (seascape, windmills, street), then compile a report to share as a gallery.
- Social-ready: craft captions that mention kalafatis and the island's vibe, and publish to Facebook during summer peak engagement.
- Backup the best frames and consider a booksyearbookssewing project to turn a season’s highlights into a small yearbook with a cohesive look.
The Waving Windmill: Timing, Composition, and Shot Lists for Iconic Moments
Start with a concrete plan: shoot the waving windmill at golden hour using three core moments–head-on, blade in motion, and a silhouette over the sea. In september the window runs roughly 19:40–20:30, in июля it shifts later toward 21:00–22:00, and in october it settles around 18:50–19:45. Record the times on your page for quick reference the next month. Those notes keep your workflow focused, and they help you turn a few minutes of light into an unforgettable set. Nearby market sellers provide life on the frame, a small detail that makes the scene feel real and lived-in, and you can pass by a store to capture authentic energy away from crowds.
Timing and exposure matter, so choose three tempo settings: crisp blades at 1/250–1/500, subtle motion at 1/60–1/125 for a slight blur, and a long exposure around 1/8–1/20 if you want silky water and a soft sky. Use ISO 100–400, depending on the light in September or October, and stay ready to adjust in seconds. A fast sequence works for quick social edits, while a longer shutter can create a dreamlike feel. In fully overcast moments, meter for the windmill itself rather than the sky and push shadows up just enough to reveal texture in the stonework.
Composition guides keep the windmill above the center of the frame and the horizon level, with foreground decor like stone stairs, white walls, or a cafe balcony to frame the blades. Use leading lines from the terrace railing or a path toward the windmill, and place the sails along a diagonal to imply motion. If you want context, include tiny elements such as a breakfast table or a distant airport sign in the background to convey place without stealing focus. This approach helps you tell a complete story in a single frame and makes those very shots feel intentional rather than incidental.
Shot list you can rely on: 1) Wide panorama with sea, windmill, and sky; 2) Close-up on blade tip with texture detail; 3) Silhouette at sunset with a soft gradient; 4) Wind-swept flag or scarf to show wind direction; 5) Architectural detail of the decor around the windmill; 6) Breakfast table view with the windmill in the backdrop; 7) Market scene with nearby sellers for human scale; 8) Overhead or above-shot from a terrace; 9) Reflection in a window or doorframe; 10) Dusk lights with the windmill as a beacon; 11) Quick cut between two angles to create rhythm; 12) Page-length gallery version for your record, ready to publish.
After the shoot, analyze the outcomes by noting what worked best in different light conditions–these insights are the means to improve next time. If you enjoyed the process, save a copy of the sequence to your store of ideas for future trips, and share a concise caption that uses the words you used during planning to keep your voice consistent. In summer or autumn, those ready-made notes help you deliver unforgettable content even when setup changes quickly.
Lighting, Color, and Post-Processing: Techniques for Vibrant Postcard-Ready Mykonos Imagery
Start by shooting RAW in the morning light, bracket three exposures (−1, 0, +1 EV), and keep ISO at 100; whether you shoot from a rooftop or street café, set white balance near 5200K to keep Mykonos’ blue sky and white walls true to life.
For color, lean on natural contrast: let the sun do the heavy lifting and avoid heavy saturation in-camera; in post, push blues for the sea and soften skin tones with a touch of warmth; this approach supports those photos that look ready for a postcard.
Post-processing should stay non-destructive: correct perspective when needed from rooftop angles, recover texture in walls with local adjustments, and apply a gentle luminance lift to the sky to preserve cloud detail; avoid over-sharpening, and keep edges clean for a crisp finish.
Organize and collect photographs (фотографии) into a folder by time and location; store edits with a clear naming convention; analyze which shots from the airport area perform best when shared publicly; this quick routine helps you prepare a gallery to share with visitors.
Workflow for events and rooftop shoots: arrive early, collect context shots, then move to interiors; carry a small spray bottle to refresh textures on hot mornings; keep a bottle of water handy to stay comfortable while you frame long sessions.
Mondays can be quiet; use the time to test color tweaks and to store footage; whether you’re a visitor or local, plan quick edits for events and collaborations; sharing around the island becomes easy when files are stored and organized.
Rooftop-specific tip: align lines with horizon, use a polarizing filter to deepen blue skies, and combine a longer exposure with a shorter one to hold balance between sunlit facades and shadowed courtyards; a 2–5 stop ND filter helps when you want smooth water and dynamic skies.
Rooftop and Street Lighting Techniques
Prioritize the view from elevated spots at dawn or dusk, when the wind eases and textures on limestone walls pop; use reflectors or white surfaces to bounce light softly onto faces, especially when guests linger near a cocktail bar or café terrace, to keep skin tones natural.
Keep a careful eye on shadows: position subjects in open shade if possible to retain detail in bright facades; if you must shoot with sun low behind, expose for the highlights and recover midtones in post to maintain a balanced feel.
Processing Pipeline
Import, rate, and flag keepers; apply lens correction and perspective fix first, then adjust white balance globally; fine‑tune color using selective HSL or color grading to preserve the sea’s depth and the walls’ cream tones; export with sharpness set modestly to suit both web and print needs.
| Time of Day | Lighting Tip | Camera Settings | Post-Processing Focus |
|---|---|---|---|
| Morning | Soft shadows, warm glow | ISO 100, f/8, 1/125 | WB around 5200K, lift shadows gently |
| Blue Hour | Sky drama, reflective surfaces | ISO 200, f/4, 1/60 | Maximize cloud detail, desaturate glare |
| Sunset | Rich sky, balanced foreground | ISO 100–200, f/5.6–8, 1/80–1/125 | Selective sky warm-up, preserve texture |
| Midday | Even contrast, clean lines | ISO 100, f/11, 1/200 | Highlight recovery, shadow nuance |
Gear and Setup for On-Island Hospitality Photography: Cameras, Lenses, and Accessories
Start with a full-frame mirrorless body and a versatile 24-70mm f/2.8 lens. If you want tighter room shots, add a fast 35mm prime; for sweeping hotel exteriors and wide lobby frames, keep a 16-35mm. Carry a second body as backup to stay flexible through daily shoots and events around the property, including tight interior space.
Popular choices include Canon EOS R5, Sony A1, and Nikon Z9. Look for dual card slots, weather sealing, long battery life, and straightforward tethering. If located in resort towns, you may find good deals from used gear sellers; buying used can mean more kit options at the same budget. The light, the rooms, and the atmosphere create a wonderful canvas, and the grace of the space helps every shot feel alive on page and screen.
Recommended Gear List
Body: one prominent full-frame mirrorless with fast AF and reliable high-ISO performance; a second body for the suite, lobby, or events. Lenses: 16-35mm for interiors, 24-70mm for general, 70-200mm for distance at events; add a fast 35mm or 50mm prime for portraits in small spaces. Lighting: portable LED panels (compact 1x2 ft or similar) with diffusion; a small flash with bounce capability for privacy-friendly fill. Accessories: spare batteries, multiple memory cards, a wireless trigger, a compact tripod or monopod when space allows, cleaning kit, protective rain cover for sudden weather. Keep a lightweight bag that fits under a bed in a suite and an easy-to-access spare strap. Texture and spice in fabrics and architectural details bring life to those hotels’ spaces, making photos pop with grace.
On-Site Setup and Workflow
Plan your day to align with hotel routines and events; arrive early to scout light in actual spaces around the property. If a monday event appears, adjust the schedule to shoot around lighter crowds. Always ask permission for interior shoots, especially in private areas of hotels, suites, and spa spaces. Use natural light first, then add bounce or LED if needed, keeping distance to guests to respect privacy. For events, anticipate changing angles from around the room and the hallway, and shoot from a respectful distance to capture ambiance without intrusion. If a casino hosts a function, capture exterior reflections and the crowd in a way that highlights atmosphere but avoids intrusive close-ups. Label files by date (дата) and keep notes on the plan for June (июня) shoots, so the client page stays coherent and you can welcome revisions quickly. Dear hosts, welcome the team and keep the vibe very friendly with grace.


