Grand Teton Tours - Sunrise Safaris, Scenic Adventures, and Custom Journeys
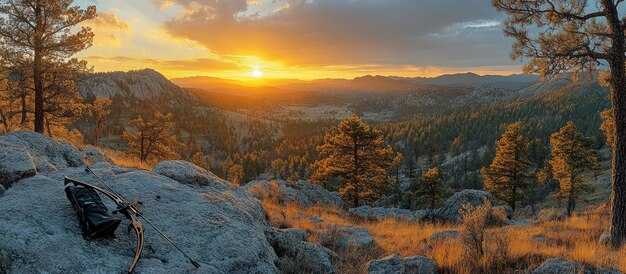
Reserve a sunrise safari for your first day to catch the teton peaks in gold light and see wildlife activity before crowds. You’ll spot grazing elk along sagebrush corridors, and the quiet that follows dawn makes the mountains glow. That moment becomes the welcome start to your journeys and sets a friendly, incredible frame for the days ahead in the parks that surround the west side of the teton range.
Scenic adventures unfold along corridors that connect valleys and lakes, and you can choose half-day routes based on your pace. A standard half-day loop from Jackson Hole to Oxbow Bend suits late-morning light, while full-day circuits linger at Jenny Lake and Signal Mountain for panoramic views. Transportation options range from private vehicles to small-group shuttles, and following park guidelines helps you stay within limits and minimize impact on wildlife.
Custom journeys allow you to tailor every day to wildlife, scenery, or history. A private guide curates the itinerary around your interests–wildlife concentrations, alpine lakes, and the stories locals tell about the range. Guides share a ranger report and safety tips, helping you maximize sunrise opportunities and minimize disruption to habitats. Expect midday breaks for coffee or a shaded lunch, and optional evening stargazing to finish the day.
When planning, consider late-spring and early-fall windows for quieter trails and clearer light. If you want a hassle-free visit, book private transportation or a guided shuttle to save time and ensure you don’t miss key overlooks. A welcome approach means checking current closures and weather reports, and packing layers for temperatures that vary with elevation. While you enjoy the incredible alpine scenery, respect the limits that protect habitats and keep your pace mindful.
Sunrise Safari Timing and Wildlife Highlights: When to Go and What to Expect
Plan to arrive 60 minutes before dawn and linger 60 minutes after sunrise to maximize sightings and photography opportunities. Pullouts outside the town centers give easy access and a wider view of the Tetons, increasing your chances for more wildlife sightings. The naturalists live here, and their insights help you read animal behavior as it unfolds on the roadside.
Seasonal Dawn Windows
- Spring (March–May): dawn typically 6:40–7:15; expect young calves and moose near wetlands; light is soft and favorable for close-up shots of behavior along roadside.
- Summer (June–August): dawn around 5:15–6:15; the morning air is clear and colors are vibrant along water edges; look for elk and bears near meadows and lakes.
- Autumn (September–November): dawn 6:15–6:45; elk bulls vocalize and gather near grassy patches; silhouettes against the Tetons create dramatic photography moments.
- Winter (December–February): dawn 7:20–7:50; snow-covered scenes offer quiet mood; if wildfire smoke drifts in, be prepared for hazy light and consider adjusting plans.
Wildlife Highlights and Photography Tips
- Expect roadside and wetland sightings: moose with moosenose, elk, mule deer, bison, and black bears; there are times when young animals join their mothers, adding hopefulness to each frame.
- The surreal early light makes tracks and grasses glow; there can be sudden moments when a family crosses the road or a coyote slips through tall brush–stay patient and ready with your camera.
- Photography settings: use a telephoto lens (300–600mm), a tripod if possible, and shoot RAW; for dawn light, start at ISO 400–800, aperture f/5.6–f/8, shutter 1/250–1/500; bracket exposure to handle backlit scenes.
- Practical notes: bring snacks and water; stop at roadside pullouts for breaks and to reassess light; late departures happen as the town quiets down; there’s always information at trailheads or visitor centers to guide you.
- Safety and guidance: keep distance, respect animal behavior, and listen to naturalists and guides; guide sarah often points to subtle signs like hoof prints or fresh scat that hint at where activity will shift next.
- Conditions to watch: wildfires can alter air quality and visibility; if you notice heavy smoke, reschedule or switch to a higher vantage point where the air may be clearer across roadside.
- Family-friendly angle: dawn safaris suit all ages; even younger travelers, with a little patience, find wonder in the first light and the soft movement of wildlife along the roadside.
Top Scenic Routes in Grand Teton: Key Vistas, Photo Spots, and Access Tips
Begin at Jenny Lake to maximize light and minimize crowds: park at Jenny Lake Visitor Center, ride the shuttle across the water to the West Shore, then walk the Jenny Lake Loop to Inspiration Point. This setup supports easy excursions for families and photo enthusiasts alike. Allow 2–3 hours for the loop plus time at Hidden Falls, and look for reflected peaks in calm water during the morning golden hour.
Route 1: Jenny Lake Scenic Loop and West Shore offers a compact, high-impact sequence. Start at the boat dock, follow the loop clockwise to Inspiration Point, then finish along the shore back to the shuttle dock. Photo spots include Hidden Falls, the Cathedral Group reflected in the lake, and the long, clear view toward Mount Teewinot. Bring a wide-angle lens for the canyon rim and a telephoto for wildlife silhouettes; there are those moments when a lone pronghorn crosses the meadow near the marshes. In summer, this area can be busy on weekends, so consider a weekday start to avoid crowds.
Route 2: Oxbow Bend and Snake River Overlook centers on a classic river-and-rim panorama. Park at the pullouts along the Oxbow Bend stretch, where the Snake River mirrors the Teton range at sunrise or sunset. Best photo opportunities occur when willows frame the river, and the Tetons rise behind the bend. Wildlife pockets appear in late afternoon; those who arrive early often grab the best shots without lingering crowds. For information on access, check the Grand Teton government site and the official map leaflets; истоочник notes from visitor centers frequently update parking and closure advisories.
Route 3: Signal Mountain Summit Road climbs a paved, moderate grade with a 360-degree vantage from the top. The drive is short, but the payoff is high: sweeping views across Jackson Hole toward the Teton Range, with the town and the lake below. Plan 25–45 minutes to reach the summit, plus time to breathe and compose shots. Expect cooler air at the summit, so bring a light layer. This route is especially appealing for night or twilight shots when the town lights begin to twinkle over the valley.
Route 4: Teton Park Road connections from Moran to Jackson Lake Junction create a sequence of pullouts that frame four major vistas: the dynamic Snake River Overlook, the Oxbow Bend bend, the Mount Moran mass, and Jackson Lake with the Cathedral Group as a distant backdrop. Start early to beat mid-day glare; late afternoon lighting enhances color and contrast on the granite walls. There, those who prioritize photography will appreciate the gentle light on the Tetons and the quiet water in the foreground. For a relaxed pace, drive slowly, stop at each overlook, and plan a short walk to the shore for different angles and textures.
Access tips to maximize your time and safety: arrive before 8:00 a.m. in high season and use designated parking; on busy summer weekends, some lots fill by 7:15 a.m. so have a backup plan for a second location. Bring layers for temperature shifts, especially at altitude; professional photographers often carry a tripod and a lightweight remote, plus a lens in the 24–70 mm range for versatility. Keep pets on leash where allowed and respect wildlife distances; pronghorn and other animals frequent meadows near the overlooks, and the government recommends keeping a safe distance. If you get stranded by sudden weather, seek shelter in an established overlook area or the visitor center. Always comply with posted signs and closures; look for official updates before setting out on a Tuesday or any busy day that could see abrupt changes in access or traffic flow.
Practical planning: check information boards at each Visitor Center for current conditions, especially in spring and fall when snow and late-season storms can alter routes. For those who want a themed plan, guided excursions can tailor a four-route circuit that concentrates on sunrise shots and twilight silhouettes; welcome to customize your day with a local guide who understands the patterns of light, wildlife movement, and safe access in summer heat. There are those who prefer the flexibility of self-led drives, and others who rely on a university-endorsed field guide for composition tips and location scouting. There, you can choose a pace that fits your style and keep the momentum steady.
Access notes and sources: for up-to-date road conditions, closures, and parking rules, consult the National Park Service information pages and local government travel updates. истоочник of practical route data is the park’s official map and ranger-guided summaries, which frequently highlight area-specific tips and seasonal changes. Inquiries about photography permissions or group access can be directed to the visitor center staff; they provide current information on permits, safety tips, and best practices for those who photograph at dawn or night for immersive images. There, the community of photographers and visitors often shares stories about four preferred overlooks, and each season brings new light that invites you to look closely at the mountains and water.
Designing a Custom Grand Teton Tour: Choosing Duration, Activities, and Pace
Choose a three-day core plan to create a grand, exciting experience, and add days for sunrise safaris and private naturalists-led walks to fit your pace and interests.
Duration flexibility helps you comply with park limits and avoid a busy pace. Even in shoulder seasons, you can still enjoy quieter trails. For those with a newborn or family, keep daily activity windows short and base near the park gate with restful evenings.
Design days around sunrise with one or two active options, such as private hikes through sagebrush corridors, wildlife viewing with professional naturalists, and short lake paddles. Nearby trails along the west shore let you stay close to civilization while staying immersed in vast scenery.
Set a steady pace by limiting daily driving to 2–3 hours and reserving time for last-light photography. A well-paced plan reduces fuel stops and debris hazards, and allows you to shift from active exploring to relaxed evenings at lodges or private camps.
Coordinate transportation with a private guide or professional outfitter who can comply with park rules and safety guidelines. Bring spare tires, extra fuel, water, and a basic safety kit–this reduces risk and potential deaths in remote areas.
For families with a newborn, choose shorter hikes and stroller-friendly segments with predictable rest periods, welcoming those who want a calmer daily rhythm while exploring the west and america’s great outdoors. Travelers from america often value clear, manageable days with time for sunrise views and quiet lakeside moments.
To tailor a plan that fits your interests, align with a private, professional guide who understands park access, sunrise timing, and corridor routes. Keep your focus on manageable days, a clear shift in pace when needed, and daily check-ins to stay on track with your goals.
Practical Gear and Packing Checklists for Grand Teton Tours in All Seasons
Pack a compact, weather-ready kit: a 3-layer system–breathable shell, insulated mid-layer, and fast-drying base layer–plus waterproof pants. This setup handles chilly starts, sudden gusts, and sun-drenched afternoons, keeping you comfortable across all seasons.
Carry a 2–3 liter hydration system per person, high-energy snacks, and a compact first-aid kit with blister care. Include a map or offline GPS, a whistle for emergencies, and a small repair kit. Instructors and guides offer assistance when adjustments are needed, usually during briefings or meetings with crews. Keep electronics in dry bags to protect them from river spray and debris on nearby crossings. Make a quick report if you notice wildlife behavior or weather changes so the team can adjust plans safely.
Seasonal Gear Lists
Summer gear includes 2–3 lightweight base layers, short-sleeve shirts, convertible or lightweight hiking pants, a 20–25L daypack, a wide-brim hat, sunglasses, SPF 30+ sunscreen, a light wind/rain shell, sturdy hiking boots, extra socks, insect repellent, hydration capacity of 2–3 liters, water purification options, a compact headlamp, and a small camera or smartphone for field notes. Expect sweeping vistas and frequent wildlife sightings as birds soar above the canyon. Keep a contingency plan for sudden showers and mud, and store electronics in a dry bag when near river crossings.
Spring gear centers on versatility: a waterproof shell, a warm mid-layer, and rugged footwear with good tread; add gaiters for muddy streams and splashes. Pack an extra pair of socks, a universal charging cable, and a compact emergency blanket. Trails may present debris and last-minute muddy spots, so watch your footing near rocks and stream rills. Spring often brings longer days with opportunities to discover active wildlife along the river, so pace yourself to stay fresh for late-afternoon explorations.
Winter gear requires heavy insulation and traction: a top-quality insulated parka, a thick mid-layer, waterproof gloves, a balaclava or knit hat, wool socks, and waterproof boots with traction devices. Include a high-visibility headlamp, extra batteries, and a compact avalanche beacon if you’ll be in backcountry-adjacent areas; carry a small emergency shelter or space blanket. Expect cold winds, potential snow, and snow-covered routes behind ridgelines. Abandoned tracks or blocked spots can appear after fresh snowfall, so keep to designated routes and check in with your guide before proceeding.
Packing Tips and On-Trail Scenarios

Organize your pack with dry bags for clothes, food, and safety gear, placing the most-used items at the top for quick access. A lightweight rain layer should stay in an outer pocket for fast response to weather shifts; keep your map, compass, and emergency contact card together in a Ziploc inside a larger pouch. On long or fast-paced days, maintain a steady pace to maximize opportunities for wildlife viewing without exhausting the group’s energy.
What to do if weather shifts or smoke from a wildfire appears: check in with the lead guide, adjust the route if needed, and file a report. If conditions worsen, be prepared to switch to a shorter, safer option and use private pickup arrangements if the outfitter offers them to reduce exposure. In any case, stay close to the crew and avoid wandering into unknown sections of the river or canyons behind you. Meetings ahead of trips help set expectations, spots to meet, and contingency plans; always know where to regroup and how to reach nearby help fast.
During trail crossings, step carefully on stable rocks and use trekking poles for balance. If you encounter debris or unstable banks, pause, re-evaluate, and move with careful sightlines. For family outings, designate a second adult to supervise children near water and keep a close eye on wildlife as you travel the river zones. By planning ahead and packing thoughtfully, you’ll turn every Grand Teton outing into a rewarding day of discovery and safe exploration.
Permits, Safety Protocols, and Visitor Guidelines for Grand Teton Tours
Obtain permits two weeks ahead for all planned excursions and confirm site access with the park's issuing officials. If traveling with crews, coordinate through your partnership that handles permits to reduce delays at the gate.
Permits are issued for specific areas and activities, and some require a second approval based on the season. The park offers a structured process that includes a report of participants and equipment, and the review is based on safety criteria that matter to protecting visitors and wildlife. Plans may include west areas and midland zones, roadside stops, and spots near willows; if changes arise, report them promptly and keep the process moving with officials. When plan changes arise, notify officials immediately to keep your reservations current.
Safety guidelines emphasize staying with your group, observing wildlife from a safe distance, and carrying the 10 essentials. In fall, fires are a key risk, so avoid open flames and follow posted restrictions. If someone is stranded or if a vehicle breaks down, stay with the group, use the emergency contact, and report the situation right away. Crews should remain active and prepared to adjust, like when weather shifts or trails close, to keep everyone safe.
Permit Details
| Type | Issuer | Required Documents | Processing Time | Fee | Notes |
|---|---|---|---|---|---|
| Standard day-use | Grand Teton NP | Photo ID, group roster, itinerary | 1–3 business days | Low | Valid for specific areas; may be issued year-round |
| Overnight permits | National Park Service | Emergency contact, vehicle details, fuel plan | 5–10 business days | Moderate | Includes backcountry zones; must follow fires restrictions |
| Special-use for guided excursions | Park Partnerships | Letter of partnership, safety plan | 7–14 business days | Varies | Coordinate with licensed guides; may include second approval |
On-site Protocols and Guidelines
Arrive early and check in at the gate; log your crew and participants with staff. Before departures, review route notes and weather updates with the guide crews, and ensure all gear is in good condition. If you encounter any drama or closures at roadside spots or near willows, move to a safe, clearly marked area and inform officials. Maintain a welcome attitude toward other visitors and report hazards immediately.
During excursions, stay on marked paths and respect areas closed for nesting or sensitive vegetation. Do not venture outside the established routes, and avoid blocking roadways or parking spaces at roadside gates. Keep noise to a minimum near wildlife and be ready to adapt plans if conditions change quickly. Each vehicle should carry a fuel plan and a spare map; do not rely on data signals alone in backcountry segments. They will appreciate your careful planning and very calm handling in tense moments, being prepared to adjust as needed.
Post-activity, submit a quick report to your guide base detailing any incidents, near misses, or changes in plans. This helps crews improve safety for future trips and supports officials in maintaining stable operations year after year.
Weekend Controlled Burn: Firefighters’ Fuel Break Plan, Safety Measures, and Nearby Impact
Recommendation: Start Saturday at first light and run a four-hour burn window. The plan will allow a 3 kilometres buffer along the ridge and around willows, with strict limits to prevent flare-ups and wildfire risk. The county assigns a dedicated incident commander, and theyre teams will provide a concise report on progress and any new risks, as asked by residents. Notify the town through local channels and share maps showing the burn line and escape routes. If weather shifts, switch to the tuesday window while keeping the same safety standards.
Fuel-break design: keeps a 5-10 metres wide cleared strip, offering a reliable line that reduces ember crossing. The corridor is kept open during the burn, with all fine fuels cleared within the zone. Use planned, controlled ignition patches to keep heat inside the line; this best practice increases safety while reducing risk. Overhead monitoring comes from ground workers and support aircraft; workers stay in assigned posts, and pickup trucks move gear to where it is needed. Assistance from neighbouring agencies offers extra resources. There are strict limits on wind and humidity; during windy periods, the operation pauses. This approach delivers much safer outcomes and demonstrates incredible discipline; there is room to adjust there if conditions change.
Nearby impact: smoke can drift kilometres, affecting air quality in the town. Migrations of wildlife move near the willows and open meadows, especially at night. When conditions shift, information flows to residents, and the county posts updates on air quality. There is continuous monitoring of hotspots that may form there, with crews ready to intervene and shorten exposure times.
Safety and site management: protect lives and workers: crews wear reflective PPE and maintain overhead radios. Abandoned gear and structures within the burn zone are identified and secured before ignition. Open access points remain staffed and clearly posted; pickup trucks carry water, tools, and personnel along the corridor. If a hotspot appears, responders act quickly and report to the incident commander. The county offers assistance during and after the event, and there is a transparent information flow to keep the town informed.
Information and follow-up: a post-burn report captures fire behavior, line integrity, and lessons learned. The report offers guidance for future weekends and helps there stay prepared. For residents needing support, the county provides a dedicated contact line and an online form. The effort fuels hopefulness in the community and demonstrates what can be achieved when workers, volunteers, and neighbours pull together.


