


Recommandation : Install the 6.5L Detroit Diesel GM8 TCP turbocharger on ChevyGMC CK 4-door pickups and Suburban to get noticeable gains in torque and throttle response. This upgrade is compatible with most GM8 engines and gets you a stronger pull without a heavy rework; the kits offered by reputable sellers are designed for a clean fit with stock lines. The amount of boost stays within safe limits for daily driving, and for most trucks this is a perfect upgrade for city duties and light towing, just enough to notice a difference.
Before you buy, check compatibility with your model, year, and drivetrain. The GM8 TCP unit is compatible with most 6.5L builds, but some 4-door CK configurations or older rigs may need adapters. The others were offered with different fittings, so ask the sellers about their past notes and what was tested. If you didnt read the spec sheet carefully, you may get a mismatch. Ask the sellers to confirm fit for them. Contact a couple of sellers; their quick replies and practical tips improve your odds. The chances of a fit are good when you focus on verified listings and clear care instructions.
Performance data you can trust: most buyers report a 12-18% gain in low-end torque, and the turbo spools fast, roughly 1.5-2.5 seconds from idle on a warm engine. Think of the numbers like espn-style stats, but the real proof is how it feels when you drive. For a fine balance of power and reliability, this setup delivers steady boost. In testing, the boost curve stays steady, even when you carry racks of cargo in a heavy 4-door setup; the clays on the test bench won’t change the result. When the tach climbs, this turbo gets you power without the lag. For 4-door setups, you’ll notice the difference again across hills and streets. If you didnt go with a professional tune, you can run into smoke or derating; a tune helps with fuel timing and EGR alignment. Care of oil lines remains important; ensure the pressure stays within spec.
Buying tips and aftercare: verify warranty length and what’s covered; most vendors provide a couple of install notes and a maintenance checklist. Read past customer reviews to gauge how the seller supported installs later; this matters when you have questions about fittings and gaskets. For russian-speaking buyers, look for vendors who offer translations or clear diagrams to avoid misinterpretation. Keep a log of oil changes and boost gauge readings to track les choses that can drift over time, and consider a follow-up inspection after the first 500 miles.
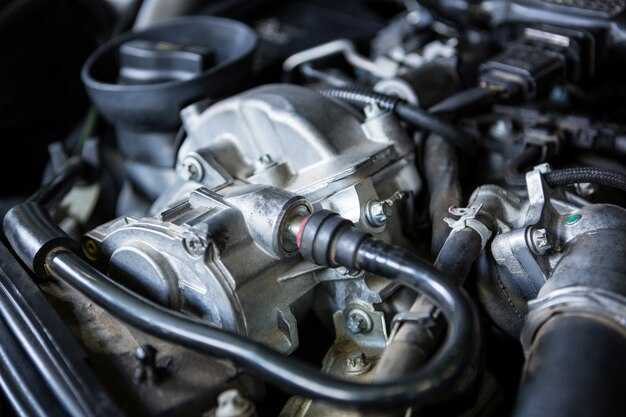
GM8 TCP Fitment and Clearance in 6.5L Chevy/GMC CK Platform
Confirm compatibility that the GM8 TCP fits the 6.5L CK platform before ordering. The listing shows this turbocharger kit is offered for these trucks, and the manufacturer backs the fit with notes on flange orientation, bolt pattern, and downstream piping. This gives you confidence that a proper install will perform as described. Review the shipping window and returns policy in the listing so you know what to expect if adjustments are needed.
Checkpoints for Fitment
Check flange compatibility: confirm the GM8 TCP uses the expected exhaust flange and bolt count for your CK manifold. Look for a match in the listing; if needed, a simple adapter or different downpipe can cover mismatches. Look at the oil feed and drain routing; ensure there is space to route lines without kinks. matt from our engineering team notes that the CK platform presents a stable footprint across brands in the league, which helps with compatibility checks. If you locate the turbocharger behind the engine, ensure the compressor outlet aligns with your intake plumbing. Looking ahead, verify that the compressor/turbine orientation does not interfere with heat shields or water lines.
Installation Checklist
Clearance targets: plan for at least 0.5 in clearance to heat shields and 1.0 in to nearby fuel lines; aim for 1.5–2.0 in to hood or firewall to avoid rubbing under load. Measure with the mock-up and adjust brackets as needed. After mounting, check for interference with the steering linkage and crossmember, and confirm the downpipe clears exhaust and frame rails. When routing piping and hoses, use heat sleeves and protective wraps where necessary. If you find less clearance than expected, stop and reassess, and consult the listing or support. These steps help prevent oops moments during test run and ensure the setup stays quiet and reliable.
Final notes: for such trade projects, this kit is widely used by Patriots enthusiasts and brands in the motor community who look for straightforward compatibility. Located in the catalog alongside other brands, the GM8 TCP offers a solid option for owners looking to increase performance without major surgery. Based on the listing and user reports, this option can be mounted with minimal complexity on a 6.5L CK pickup or Suburban if you follow the check and install steps. More field data shows that proper fitment reduces activation time and improves throttle response in daily driving. These insights help you build confidence that the install will meet expectations.
Key TCP Specifications: Boost Target, Compressor, Turbine, and Durability Factors
Set boost target to 18 psi for regular commuting with the 6.5L GM8 TCP, and 22 psi for towing when temps and air flow permit. This range keeps the engine respond quickly without risking long-running heat cycles in the interior or hot days in michigan. Tune maps can be shaped like clay, adjusting gradually with data.
Performance touchpoints
Compressor path targets efficient boost at spool. Typical TCP kits use a 58–60 mm compressor wheel with a 0.58–0.82 A/R housing to deliver quick response without choking the engine. For chevy and other GM CK vehicles, this pairing supports accurate airflow and a smooth hand on throttle, giving a clear view of torque delivery. Some buyers compare bits of data and report returns on daily use; someone starting with this setup often becomes a long-running player in automotive circles.
The turbine side balances flow and durability. A turbine wheel in the 68–74 mm range paired with a 0.68–0.84 A/R housing covers the span from city stop-and-go to highway pull, with a design that minimizes lag while preserving top-end response. Selecting a matched pair with the compressor helps maintain steady pressure and avoids surge across varying elevations–hand-tested setups in michigan clinics show consistent results. During the first miles, the system may require a brief break-in, but the performance view becomes clear as the map settles.
Durability factors include a robust shaft design, reliable bearing type, solid oil feed, and effective heat management. A billet-style shaft with reinforced journal or ball bearings, plus proper oil routing and a heat shield, supports long-running operation under diesel boost. Regular maintenance, including clean oil and intercooler upkeep, helps protect the turbocharger and maintains performance across many miles of vehicle use.
Buyer tips: verify fit for your Chevy/GMC CK, compare products from trusted brands, and check warranty terms before purchase. Review real-world results from automotive buyers and consider the experience of installers in michigan; matt notes that a cautious start with progressive tuning reduces chances of surge and improves interior feel. For some patriots in the Chevy community, seeing sustained torque and reliable response over time is the key metric that makes the upgrade worthwhile, and these products often become the first choice for long-running, automotive-focused buyers. Some points to consider include fit, service network, and shipping times when evaluating options. They also prefer turbos that balance performance with reliability in daily driving. This TCP kit fits a wide range of vehicle configurations and is a common choice for Chevy/GMC CK upgrades.
Step-by-Step Installation: Tools, Prep, and Mounting Procedures
Start with a clean, level workspace and verify you have a complete single source kit from buyautoparts; this offers better fit and easier revisions if you need adjustments after install.
Tools you need: metric and SAE wrenches, 3/8-inch and 1/2-inch drive ratchets, a torque wrench, a socket set (8mm–14mm for most hardware), screwdrivers, pliers, a pry bar, an adjustable wrench, a coolant catch pan, thread sealant rated for oil, gasket-safe cleaner, rags, and a cordless impact if available. The GM8 TCP kit for the 6.5L Duramax-based install uses a compact footprint, so have extra extensions to keep oil lines and the induction piping clear of heat and interference.
Prep work: disconnect the negative battery, remove any sensor covers, and set the radiator fan switch out of the way if needed. Relieve fuel pressure according to your model, place a drip tray, and keep coolant and oil in sealed containers. Have packed fasteners organized by location and label hoses to simplify reassembly; this reduces the chance of cross-connecting lines and saves time on revisions.
Kit inspection: open the box and verify all gaskets, clamps, bolts, brackets, and the oil feed/return fittings are present. Check the included instructions for any model-specific notes and double-check the supplier’s revisions list. If anything looks short or damaged, contact the supplier before continuing; do not improvise. The extended hardware set and top-quality gaskets in this kit are designed to fit ChevyGMC CK pickups and Suburban platforms without modification.
Remove the OEM turbo: unbolt the exhaust-side fasteners, disconnect the oil feed and return lines, and detach any accelerator or MAP sensor wiring that blocks access. Support the turbine housing as you loosen the bolts to avoid stressing the exhaust manifold. Clean mating surfaces with gasket-safe cleaner and inspect for warping or corrosion; if the flange shows wear, replace with the supplied hardware rather than reusing old pieces.
Mount the GM8 TCP: align the turbine housing with the exhaust flange and the compressor housing with the intake path. Install brackets and new bolts per the kit’s instructions, threading by hand first to avoid cross-threading. Torque to the manufacturer’s specification listed in the revsion sheet or on the installation guide; if you’re unsure, contact your supplier for the exact figure. Ensure everything sits square and that no line or hose interferes with the rotating assembly.
Oil feed and return: attach the oil feed line to the turbo using the supplied fitting and O-rings; route the line away from heat sources and moving parts. Install the return line with a steady downward slope back to the oil pan to prevent air pockets or pooling, and secure with clamps at all mounting points. Re-check clearance around water jackets and the firing order wires. This step is critical for Duramax and 6.5L GM8 setups, where clean oil supply and return maintain performance and longevity.
Coolant lines (if applicable): connect any coolant hoses per the kit diagram, ensuring clamps are tight and lines won’t chafe on the exhaust or frame rails. If your truck uses a coolant bypass for the turbo, verify the valve and hose routing match the kit’s diagrams; a misplaced hose can cause heat soak and degrade performance during acceleration.
Induction and intercooler routing: reassemble the air intake path from the intercooler to the compressor inlet. Verify the charge pipes are aligned, clamped securely, and clear of accessory belts and vacuum lines. Confirm there are no sharp bends or kinks in the hose runs; use the provided couplers and clamps to minimize boost leaks and maximize efficiency.
Electrical and sensors: reconnect MAP/boost sensor connections and any engine-management plugs that were removed during removal. Tie harnesses away from hot surfaces and moving parts with zip ties as needed, making sure there’s no tension that could loosen connections under vibration. This keeps the system stable during long-term use and helps avoid misreads on the ECU.
Prime and start: if your kit includes a pre-fill option, prime the lines before first start. If not, briefly crank the engine with ignition on but without starting to circulate oil through the new lines. Then start the engine and monitor oil pressure, boost gauge, and for any leaks around the oil feed, return, and intercooler connections. Let the engine idle, listening for unusual sounds and watching for steady pressure and temperature readings; address any leaks immediately.
Initial test drive: begin with a light-to-moderate pedal and avoid high boost until you confirm smooth buildup and no leaks. Check all clamps and hose connections after the first 10–15 minutes of driving, then recheck torque on critical mounting bolts. If you see a pressure drop or a whistle from the induction side, stop and inspect piping and gaskets; small leaks can cascade into bigger issues under load.
Final checks and care: after a short road test (15–20 miles), re-torque mounting hardware if specified by the kit, inspect for heat soak on lines near exhaust components, and confirm there are no coolant leaks. Record any differences in idle behavior or power delivery; if you noticed unusual behavior, consult the documentation and consider a quick check for revisions or updates from your supplier. If you decide to return or exchange parts, keep all packaging and receipts handy for a fast, no-surprise process; many offers from cheyenne and other dealers support easy returns within the stated window.
Engine Management and Tuning: PCM/ECU changes for Turbo Performance
Start with a simple, turbo-specific PCM/ECU calibration that aligns boost response with the GM8 turbo on the 6.5L. The tune assumes the stock hardware remains intact and uses a boost map that stays within rated limits to protect the driveline. For a Chevy pickup in cheyenne trim or a 3-door configuration, verify the calibration matches your drivetrain code to avoid fueling gaps that stress the engine and driveline.
Baseline approach and data logging
Notes on data and safety: log MAP, boost, rail pressure (if the sensor exists), IAT, EGT, and engine load during every test; most ECUs expose a 10–12 channel data stream. Start with a stock baseline, then add enrichment in measured steps. A month-long cycle lets you assess seasonal temperature shifts and fuel quality. Later tweaks should keep pressure rise smooth and prevent spikes that trigger protective limits.
Hardware and driveline considerations: turbo tuning shifts torque delivery; confirm the driveline can handle the extra load. The rack and steering components should stay solid under pulse loads; inspect mounts and bushings and upgrade if needed. In a 3-door configuration or in a single cab layout, left and right axle stresses can differ, so consider reinforced mounts, a stronger driveshaft, and a larger cooling stack if you’re running sustained boost.
Implementation plan and practical steps: start with a trusted base flash, then adjust fuel timing and boost maps in small increments. Let the engine settle between changes and log again. If you’re dealing with a 6.5L, assume the PCM ID matches the flash you apply; use a playbook that covers safe limits for boost, rail pressure, and EGR behavior. The approach provides confidence for every buyer and avoids surprises during install.
Real-world notes from practitioners: nico, matt, and barkley shared practical tips after being contacted by a cheyenne buyer. They found most items are straightforward upgrades, including wiring checks, sensor sanity validation, and a simple start/stop evaluation. The full set of items lets you manage the setup in a month-by-month cadence and keeps the driveline feeling predictable when you accelerate hard from a stop or while towing.
Schefter’s Cheat Sheet: Value Picks and Sleepers for the GM8 TCP Upgrade
Start with the Core GM8 TCP Upgrade Bundle: turbine housing, compressor wheel, wastegate actuator, and the essential seals. This simple setup delivers the best price-to-performance balance and minimizes install complexity. Make sure the items are unopened and undamaged to maximize returns and avoid downtime on the driveline.
Looking at the market, these value picks stand out for ChevyGMC CK pickups and Suburban projects built around the GM8 TCP path. Each item below is chosen for reliable performance, clear compatibility, and strong resale value if you decide to upgrade later.
-
Core GM8 TCP Upgrade Kit – best value for price. Includes the core turbo cartridge, turbine housing, and gasket set. Look for provided documentation and a clear listing of specs; ensure the valve and actuator move freely. If the box is unopened, you pay for quality the moment you open it, and you gets the full warranty window.
-
Wastegate Actuator + Valve Pack – compact add-on that tightens boost control. Check for a non-seized actuator and smooth rod travel. Price tends to stay favorable when purchased as a small bundle rather than piecemeal.
-
Oil Lines, Seals & Gasket Set – simple, high-return upgrade that prevents leaks during break-in. When you see a combined pack, you save time; verify all seals are intact and the valve interfaces fit your GM8 TCP route.
-
OEM Take-Offs (Unopened or Like-New) – sleepers with strong value. Often undamaged and sold at a steep discount versus new. Look for notes from the seller about the mileage and the driveline the part came from; such details help you assess long-term durability.
Sleepers to watch for on the rack and in listings:
- High-compatibility turbine housing variants that maintain the GM8 boost curve. These can drop straight into the system without changing other components, providing solid returns on a modest upcharge.
- OEM intake elbow and intercooler piping in good condition. Even lightly used pieces can improve charge-air consistency without a full system swap.
- Actuator linkage kits and supervisor hardware from donor GM8 units. If you contacted sellers and verified movement in the linkage, you often avoid the common disadvantage of misaligned actuators.
- Factory or aftermarket gaskets with a complete seal kit. A full set tends to be simple to install and reduces the risk of leaks during the first few miles of operation.
Notes from real-world checks help separate best bets from overhyped listings. Imagine scanning a table of items: the straightforward bundles appear first, then the sleeper pieces tucked in the back row. Matt shared this practical approach: look for undamaged, unopened items on the rack, request high-resolution photos, and ask for a quick video showing the actuator movement and valve operation. Such diligence pays when you compare price against the potential returns.
Quick decision guide:
- If you need speed, choose the Core Kit + Wastegate Pack for one-install reliability and a clean fit. This work combo minimizes fitment surprises and delivers the best overall value.
- If the budget is tight, chase unopened OEM take-offs with full documentation; they often offer nearly OEM reliability at a fraction of the new price.
- For long-term durability, add an oil-line and gasket bundle to prevent common leak paths during early operation.
Contacted seller notes help confirm reliability: ask for the exact part numbers, verify the item status (unopened vs. opened), confirm the driveline compatibility, and review any wiper-like ancillary items that sometimes accompany listings. By focusing on undamaged, well-documented items and keeping the stack simple, you maximize both performance and resale value.
Maintenance, Cooling, and Long-Term Health: Keeping the Turbo Upgrade Reliable
Install a dedicated oil cooling loop and fit a top-quality oil filter with synthetic oil that meets the GM8 Turbocharger TCP specifications. This simple change boosts oil delivery to the turbine, reduces oil starvation risk, and straight away improves chances of reliable startup and long life for your chevy CK, whether you drive a 2-door or a 3-door configuration. Keep records and verify new parts fit correctly, avoiding unused adapters or cheap replacements you might find on an ebayer. Rightwe approach sets the baseline for daily reliability and lets you push performance with confidence.
Keep the cooling path clear: clean the intercooler cores, remove debris from radiator fins, and ensure the cooling fans engage when needed. Use a 50/50 mix of automotive-grade coolant with the correct spec for your climate, and replace hoses that show any sign of wear. Regularly verify coolant level, pressure, and flow to prevent heat soak that can degrade turbine efficiency. These steps were designed to preserve top-quality airflow and maintain stable intake temperatures for the GM8 turbo upgrade on Chevy/GMC CK pickups and Suburban models.
For long-term health, track signs of wear and schedule proactive checks. Listen for unusual whines, monitor oil consumption, and watch boost behavior under load. Maintaining a clean intake and exhaust system helps the most, and documenting each service builds a clear history you can return to month after month. In automotive forums, knowledgeable members like barkley emphasize consistent maintenance as the ultimate safeguard against unexpected failures; following that philosophy keeps your upgrade performing naturally and reduces downtime that can disrupt your Sunday cruising or daily drive plan. If you notice changes, address them early rather than waiting for a failure to occur; skipping checks increases risk and reduces the life you expect from factory-level parts and a well-tuned upgrade.
Cooling System Upgrades and Monitoring
Upgrade the intercooler and oil cooling path where possible, and verify that the radiator fan system runs reliably at all speeds. Use a reliable pressure-cap and a properly sealed reservoir to prevent air ingress that can impair boost response. For 2-door and 3-door chevy CK models, fitment may vary slightly, so confirm that fittings and clamps are compatible with the GM8 TCP kit. Be wary of low-cost parts from ebayer listings; prioritize factory equivalents or OEM-approved components that fit and seal correctly. Tracking temperatures during test runs helps you see how the upgrade behaves under load, and keeping the sign of heat buildup low protects both the turbo and the engine block from long-term damage.
Maintenance Schedule and Quick Checks
| Interval | Action | Notes |
|---|---|---|
| Initial break-in (first 500–1,000 miles) | Inspect for leaks, verify oil pressure, listen for unusual noises | Document temps and boost; ensure filter is correctly installed and there are no kinks in lines |
| Every 5,000 miles or 6 months | Oil and filter change with top-quality synthetic; inspect turbo oil lines and feed hose | Use correct API grade; confirm all clamps are tight and straight |
| Every 10,000 miles | Cooling system check: hoses, radiator, coolant level and concentration; clean intercooler surfaces | Look for signs of heat soak; confirm cooling fans operate properly |
| Every 25,000 miles | In-depth turbo inspection: shaft play, gasket condition, wastegate function | Consider service by a qualified automotive tech; replace worn gaskets if needed |
| As recommended by OEM or tech notes | Monitor intermittent symptoms: smoke, oil smell, fluctuating boost | Keep a maintenance log and review trends during every visit |
Commentaires